The Front of the Body I taught the supine points that fill most of an ordinary morning, ending with the first head-end treatment, W D. This article finishes the front of the body.
It is a longer list and a more varied one, and the variety is the lesson. From here the hand comes back into the work; the foot begins to slide instead of press; several counts stop meaning how many presses and start meaning how many strokes make one; and in two treatments the instrument is the patient's own legs and the patient's own fists.
Everything from The Front of the Body I still stands. The eight standing rules of every supine treatment are set out in full in The Front of the Body I, "The Front of the Body — I", and an entry silent about them is not excusing you from them. See also → Placing the Patient, "Placing the Patient"; The Shorthand, "The Shorthand"; and Six Seconds, "Six Seconds".
Watch


The rule that governs the head end
Beside the neck, carrying nothing — and never any pressure on it
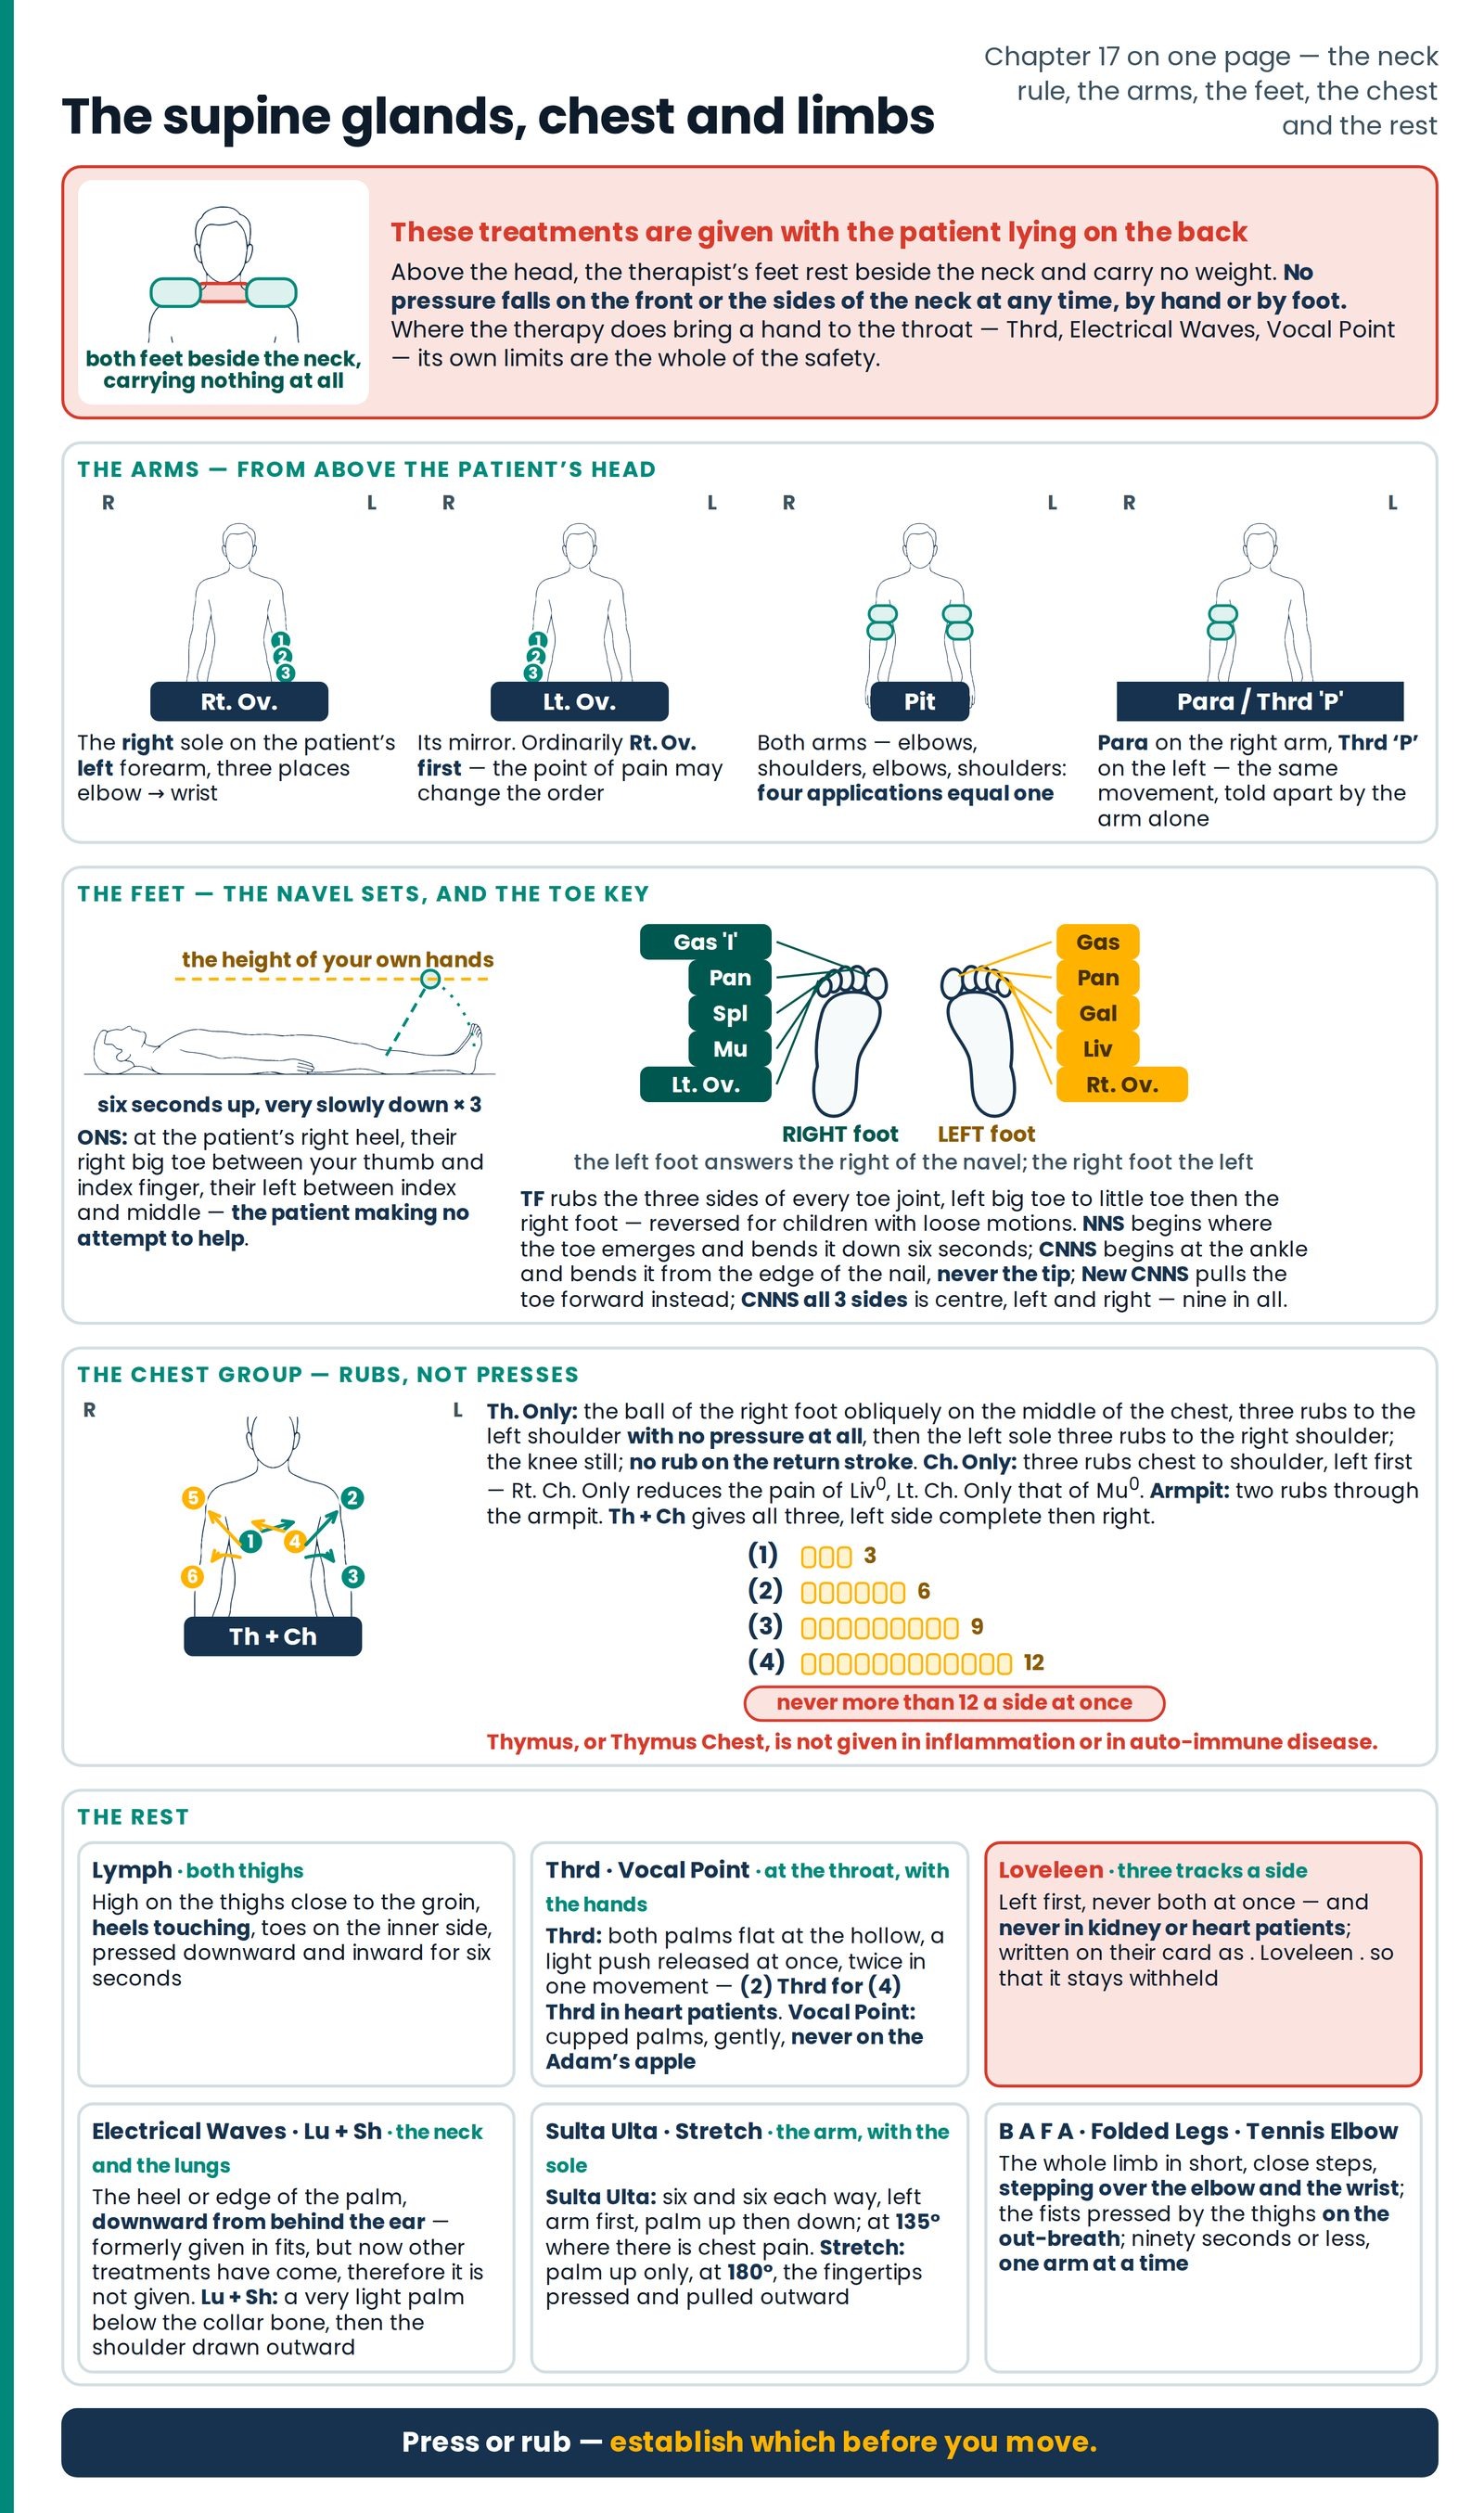
Five treatments begin with the therapist above the patient's head, putting both feet down at the sides of the neck: WD from The Front of the Body I, and Rt. Ov., Lt. Ov., Pit and Para here. Three more bring the hands to the throat or the side of the neck: Thrd, Electrical Waves and Vocal Point.
The Front of the Body I said only that the feet go beside the neck and sent you here for the rest. Here it is — the most important safety instruction in the atlas, and a short one.
The forearm points for the lower abdomen
Rt. Ov. on the left forearm, Lt. Ov. on the right — three places each
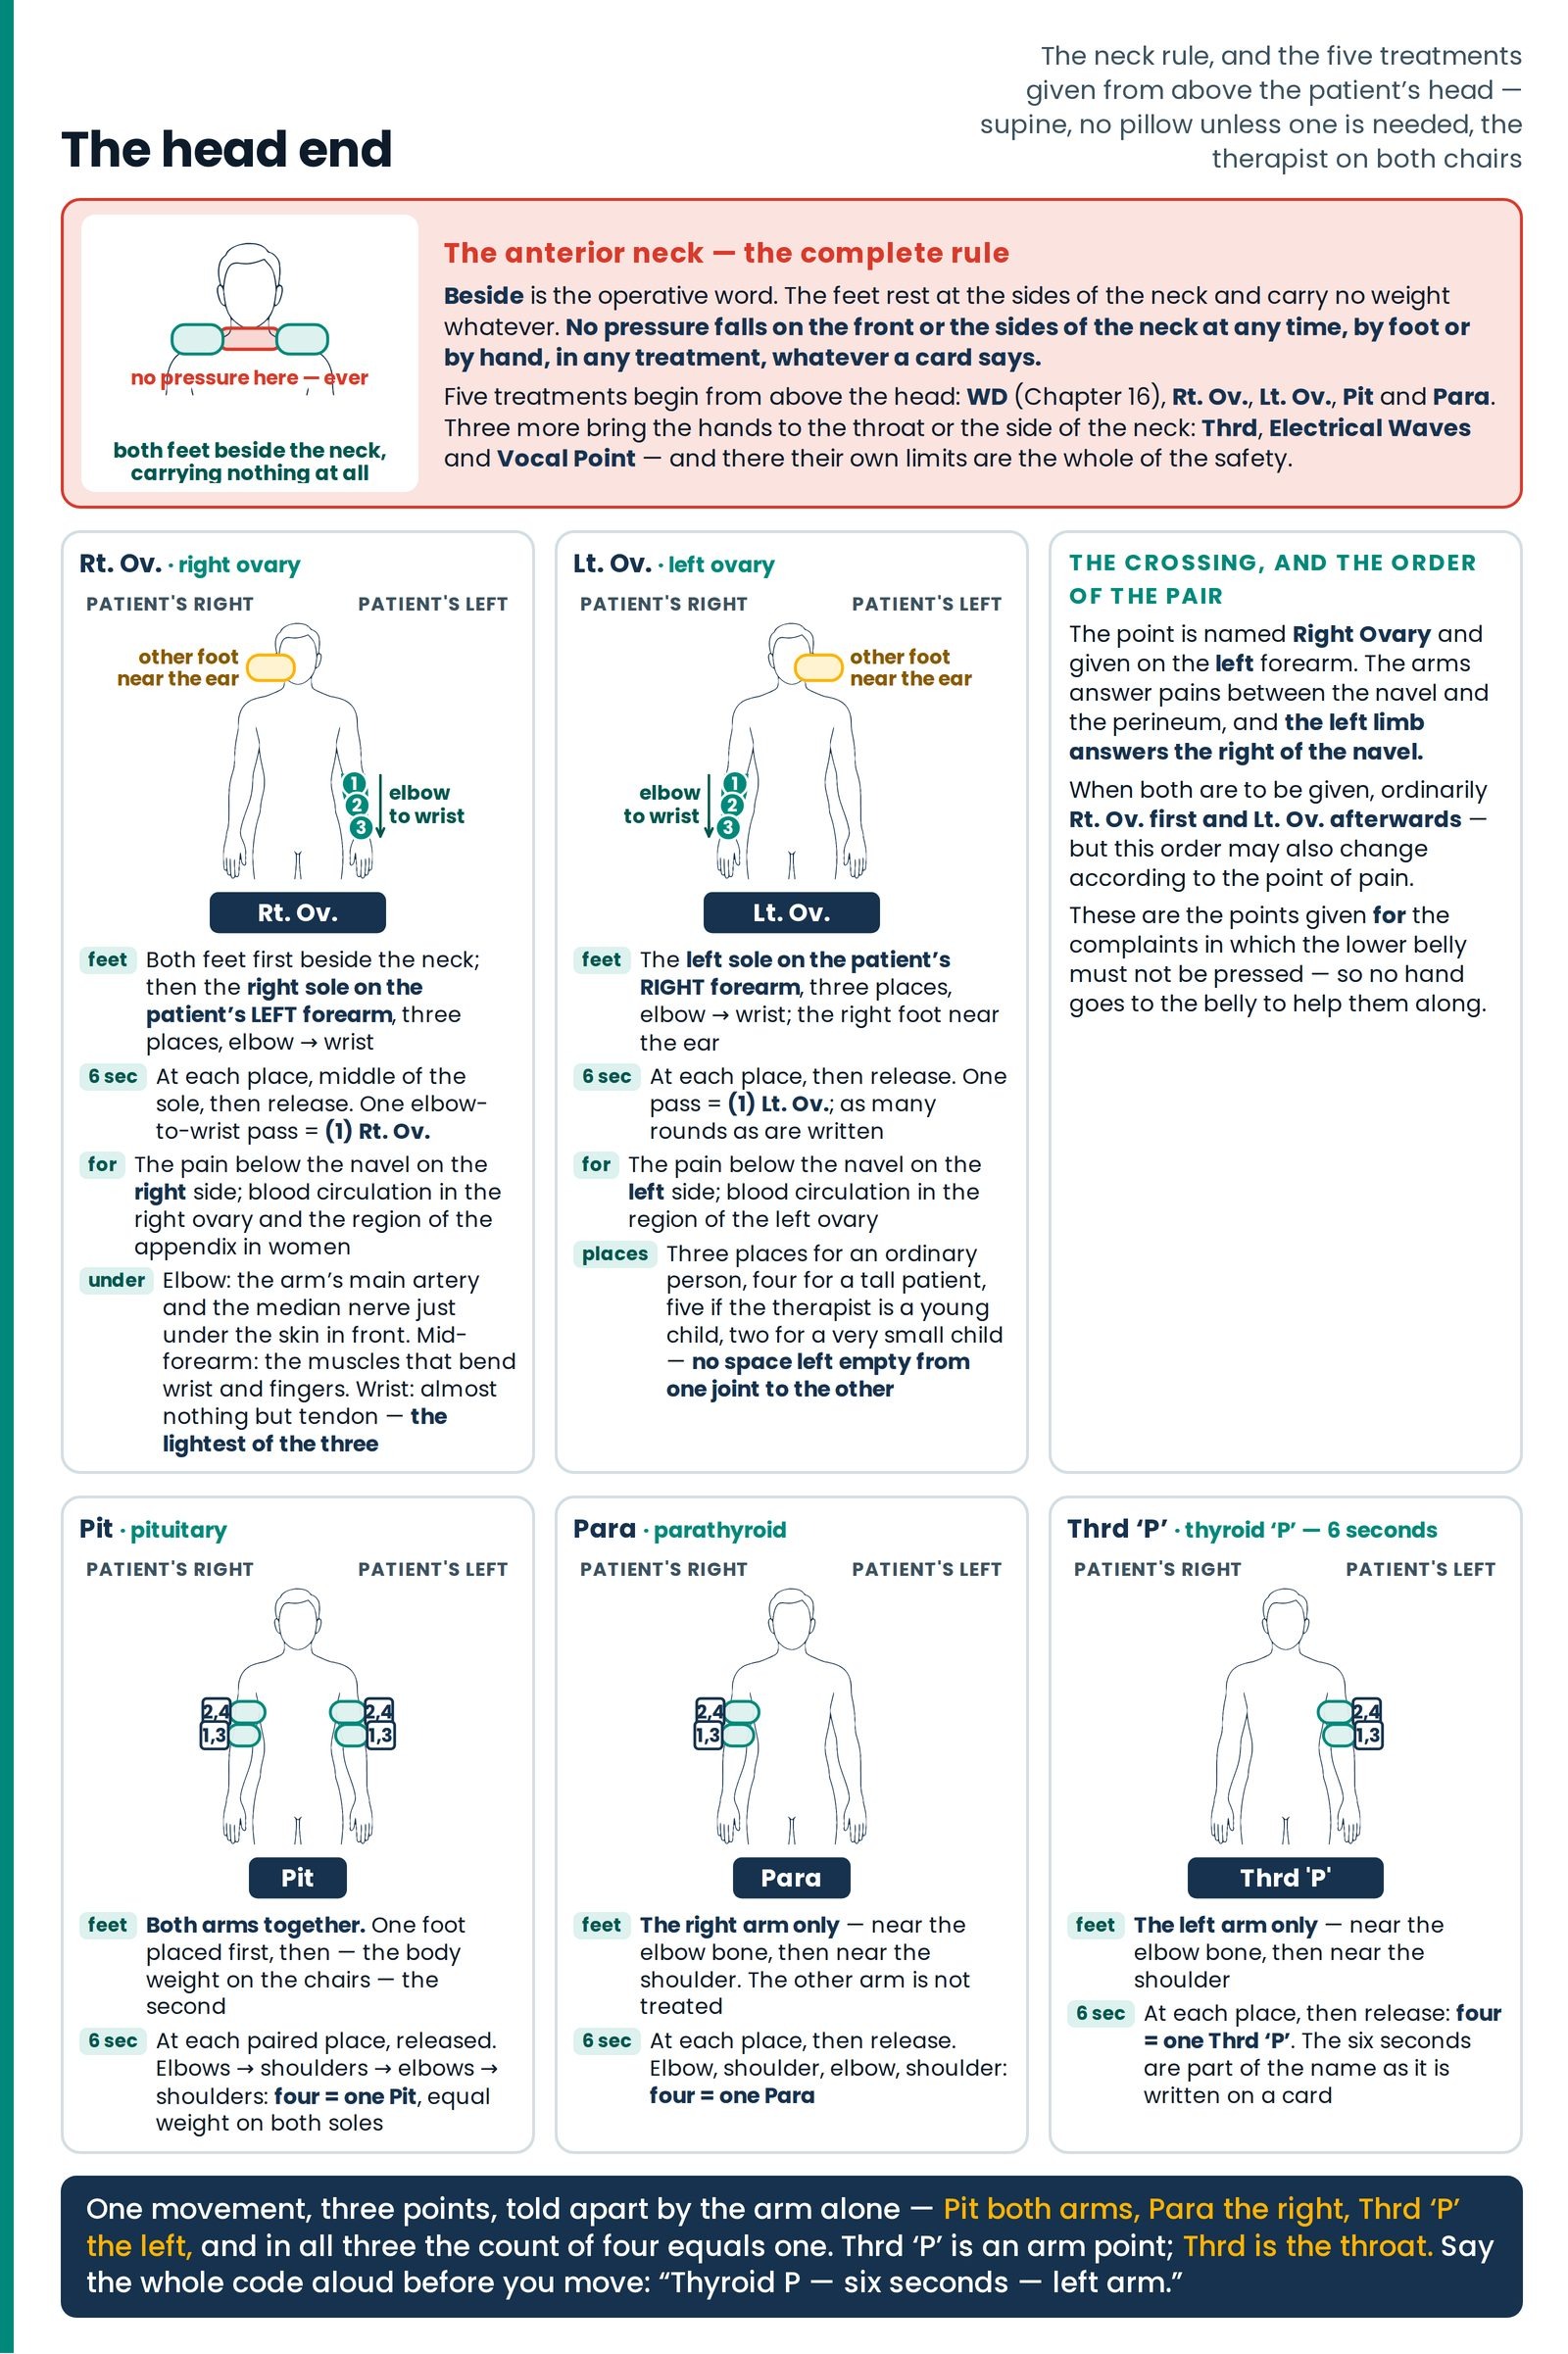
Rt. Ov. — Right Ovary (राईट ओवरी)
First place both feet on both sides of their neck. Then, with your right sole, give pressure on their left hand at three places from elbow to wrist. The other foot stays near the ear. At each place press with the middle part of the sole for six seconds and release. Done once from elbow to wrist, this is called (1) Rt. Ov. Do as many rounds as are written. (Figure 17.1)
| Patient's position | Supine, no pillow under the head unless there is need of one; the therapist at the head end, supported on both chairs Supine |
|---|---|
| Where the feet are placed | Both feet first beside the neck; then the right sole on the patient's left forearm at three places, elbow → wrist; the left foot stays near the ear, carrying nothing Left |
| Duration and repetitions | 6 seconds at each place, middle of the sole; one elbow-to-wrist pass = (1) Rt. Ov.; as many rounds as are written 6 sec |
| What it is for | Reduces the pain below the navel on the right side, and especially increases blood circulation in the right ovary and in the region of the appendix in women |
Read the crossing first. The point is named Right Ovary and given on the left forearm — the atlas rule again: the arms answer pains between the navel and the perineum, and the left limb answers the right of the navel.
Lt. Ov. — Left Ovary (लेफ्ट ओवरी)
First place both feet on both sides of their neck. Then, with the middle part of your left sole, give pressure on their right hand at three places from elbow to wrist. The other foot stays near the ear. At each place press for six seconds and release. Done once from elbow to wrist, this is (1) Lt. Ov.
| Patient's position | As for Rt. Ov. Supine |
|---|---|
| Where the feet are placed | Left sole on the patient's right forearm, three places elbow → wrist; the right foot near the ear Right |
| Duration and repetitions | 6 seconds at each place; one pass = (1) Lt. Ov. 6 sec |
| What it is for | Reduces the pain below the navel on the left side, and especially increases blood circulation in the region of the left ovary |
The order of the pair, and the one thing that changes it
When both are to be given, ordinarily Rt. Ov. is given first and Lt. Ov. afterwards — but this order may also change according to the point of pain.
How many places on the forearm. The station rule governing Rt. Ov. and Lt. Ov. — three for an ordinary person, four for a tall patient, five if the therapist is a young child, two for a very small child, the principle being that no space is left empty from one joint to the other joint — is taught in full in The Front of the Body I. The half of it that names these points bears saying again: while giving WD and Pit, keep equal weight on both soles. Both sides
What lies beneath. At the elbow, the arm's main artery and the median nerve close under the skin in front, the "funny bone" nerve in its groove behind; at the middle of the forearm, the muscles that bend the wrist and fingers; at the wrist, almost nothing but tendon — the lightest of the three. The ovaries lie deep on the side walls of the pelvis, out of reach of any hand from outside; what the point is named for is the ache low in the belly on that side.
The three gland points on the arms
One movement, three points, told apart by the arm alone
Three treatments follow, named for three glands, and not one touches the gland it is named for. All three are given on the arms, all three use the same movement, and they are told apart by which arm.
Pit — Pituitary
Pit indicates the pituitary gland.
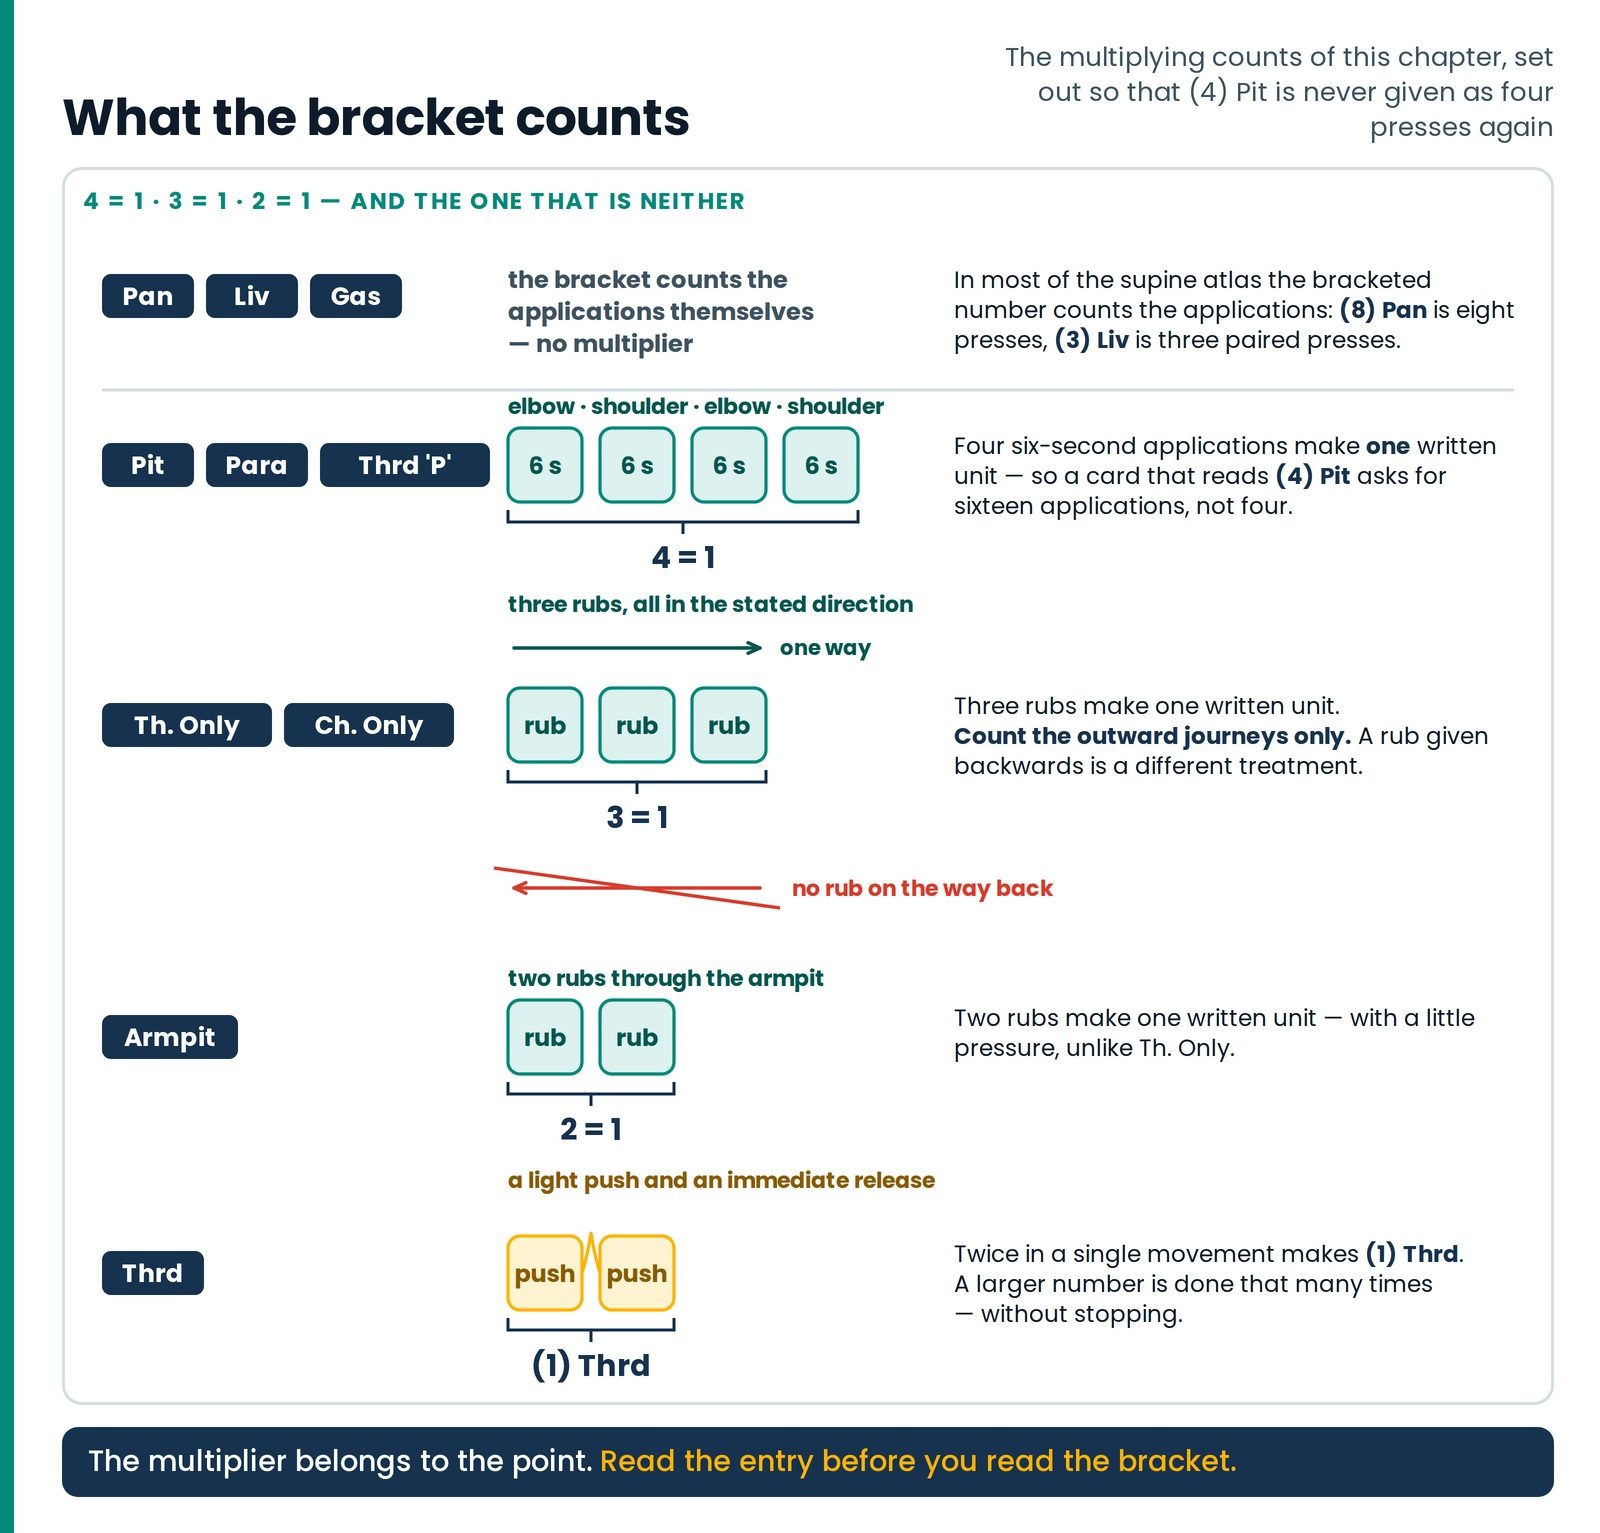
First place one foot — and then, supporting your body weight on the chairs, place the second foot at the proper place — and press on both arms together for six seconds and release. First near both elbows, then near both shoulders; do two such rounds. That is, the count of four equals one.
| Patient's position | Supine, no pillow under the head unless there is need of one; the therapist at the head end, on both chairs Supine |
|---|---|
| Where the feet are placed | Both feet at once, one on each arm: stations 1 and 3 near the elbows, stations 2 and 4 near the shoulders. One foot placed first, then, with the body weight on the chairs, the second Both sides |
| Duration and repetitions | 6 seconds at each paired place, released. Elbows → shoulders → elbows → shoulders: four applications = one Pit. Keep equal weight on both soles 6 sec × 3 |
| What it is for | Named for the pituitary gland |
Para — Parathyroid
Para indicates the parathyroid gland.
On the right arm: first near the elbow bone, and then near the shoulder — at each place press for six seconds and release. Then do the same again at the same places. That is, the count of four equals one.
| Patient's position | Supine, no pillow under the head unless needed; therapist at the head end Supine |
|---|---|
| Where the feet are placed | The right arm only — near the elbow bone, then near the shoulder; the other arm is not treated Right |
| Duration and repetitions | 6 seconds at each place; elbow, shoulder, elbow, shoulder — four applications = one Para 6 sec × 3 |
| What it is for | Named for the parathyroid gland |
Thrd 'P' — Thyroid 'P', six seconds
That is, थाइरोइड पी – 6 सेकंड — Thyroid 'P' – 6 seconds, and it is read aloud that way, the six seconds included, because the six seconds are part of the name as it is written on a card.
On the left arm, pressure is to be given first near the elbow bone and then near the shoulder. At each place press for six seconds and release. Then do the same again at the same places. That is, the count of four equals one.
| Patient's position | Supine, no pillow under the head unless needed; therapist at the head end Supine |
|---|---|
| Where the feet are placed | The left arm only — near the elbow bone, then near the shoulder Left |
| Duration and repetitions | 6 seconds at each place; elbow, shoulder, elbow, shoulder — four applications = one Thrd 'P' 6 sec × 3 |
| What it is for | Named for the thyroid |
The family, laid side by side. One movement, three points, told apart by the arm alone.
| Point | Arm or arms | Places, in order | Applications per written unit | Named for |
|---|---|---|---|---|
| Pit | Both, together | elbows → shoulders → elbows → shoulders | 4 = 1 | Pituitary gland |
| Para | Right only | elbow → shoulder → elbow → shoulder | 4 = 1 | Parathyroid gland |
| Thrd 'P' | Left only | elbow → shoulder → elbow → shoulder | 4 = 1 | Thyroid |
What lies beneath, and what is not. The thyroid is wrapped round the front of the windpipe low in the neck, the four parathyroids stuck to the back of it; both are governed by chemical messages, not mechanical ones, and neither is under the therapist's foot — which, as the anterior-neck rule makes plain, is an extremely good thing.
Setting the navel — and the toes that lead to it
The chairs put away: the hands at the foot end, the patient passive
Here the therapist puts the chairs away, comes down off the patient's body, and works with the hands at the foot end. It is also where the whole therapy began — a boy of eleven, and the folk work of setting the navel.
Ask the patient to lie down on their side and then to lie straight. The therapist stands near the patient's right foot, so placed that your right heel is beside their right heel. (Figure 17.2)
Now, bending down, grasp with the thumb, first (index) and middle fingers of your right hand between the big toes of both the patient's feet, in such a way that the big toe of their right foot lies between your thumb and index finger, and the big toe of their left foot lies between your index and middle fingers.
Holding them thus, slowly raise both the patient's feet to the height of your own hands, hold for six seconds, and then bring them down very slowly — do this three times. On the card this is written (3) ONS.
| Patient's position | Supine, having lain down by rolling onto the side; legs together and straight; the patient making no effort whatever of their own Supine |
|---|---|
| Where the hands are placed | Therapist beside the patient's right heel, his own right heel beside it; thumb, index and middle fingers of the right hand between the big toes — right big toe between thumb and index, left big toe between index and middle Both sides |
| Duration and repetitions | Slowly raise both feet to the height of the therapist's own standing hands; hold 6 seconds; bring down very slowly. Three times = (3) ONS 6 sec × 3 |
| What it is for | All the organs around the navel return to their appointed places, so that the whole abdomen becomes set |
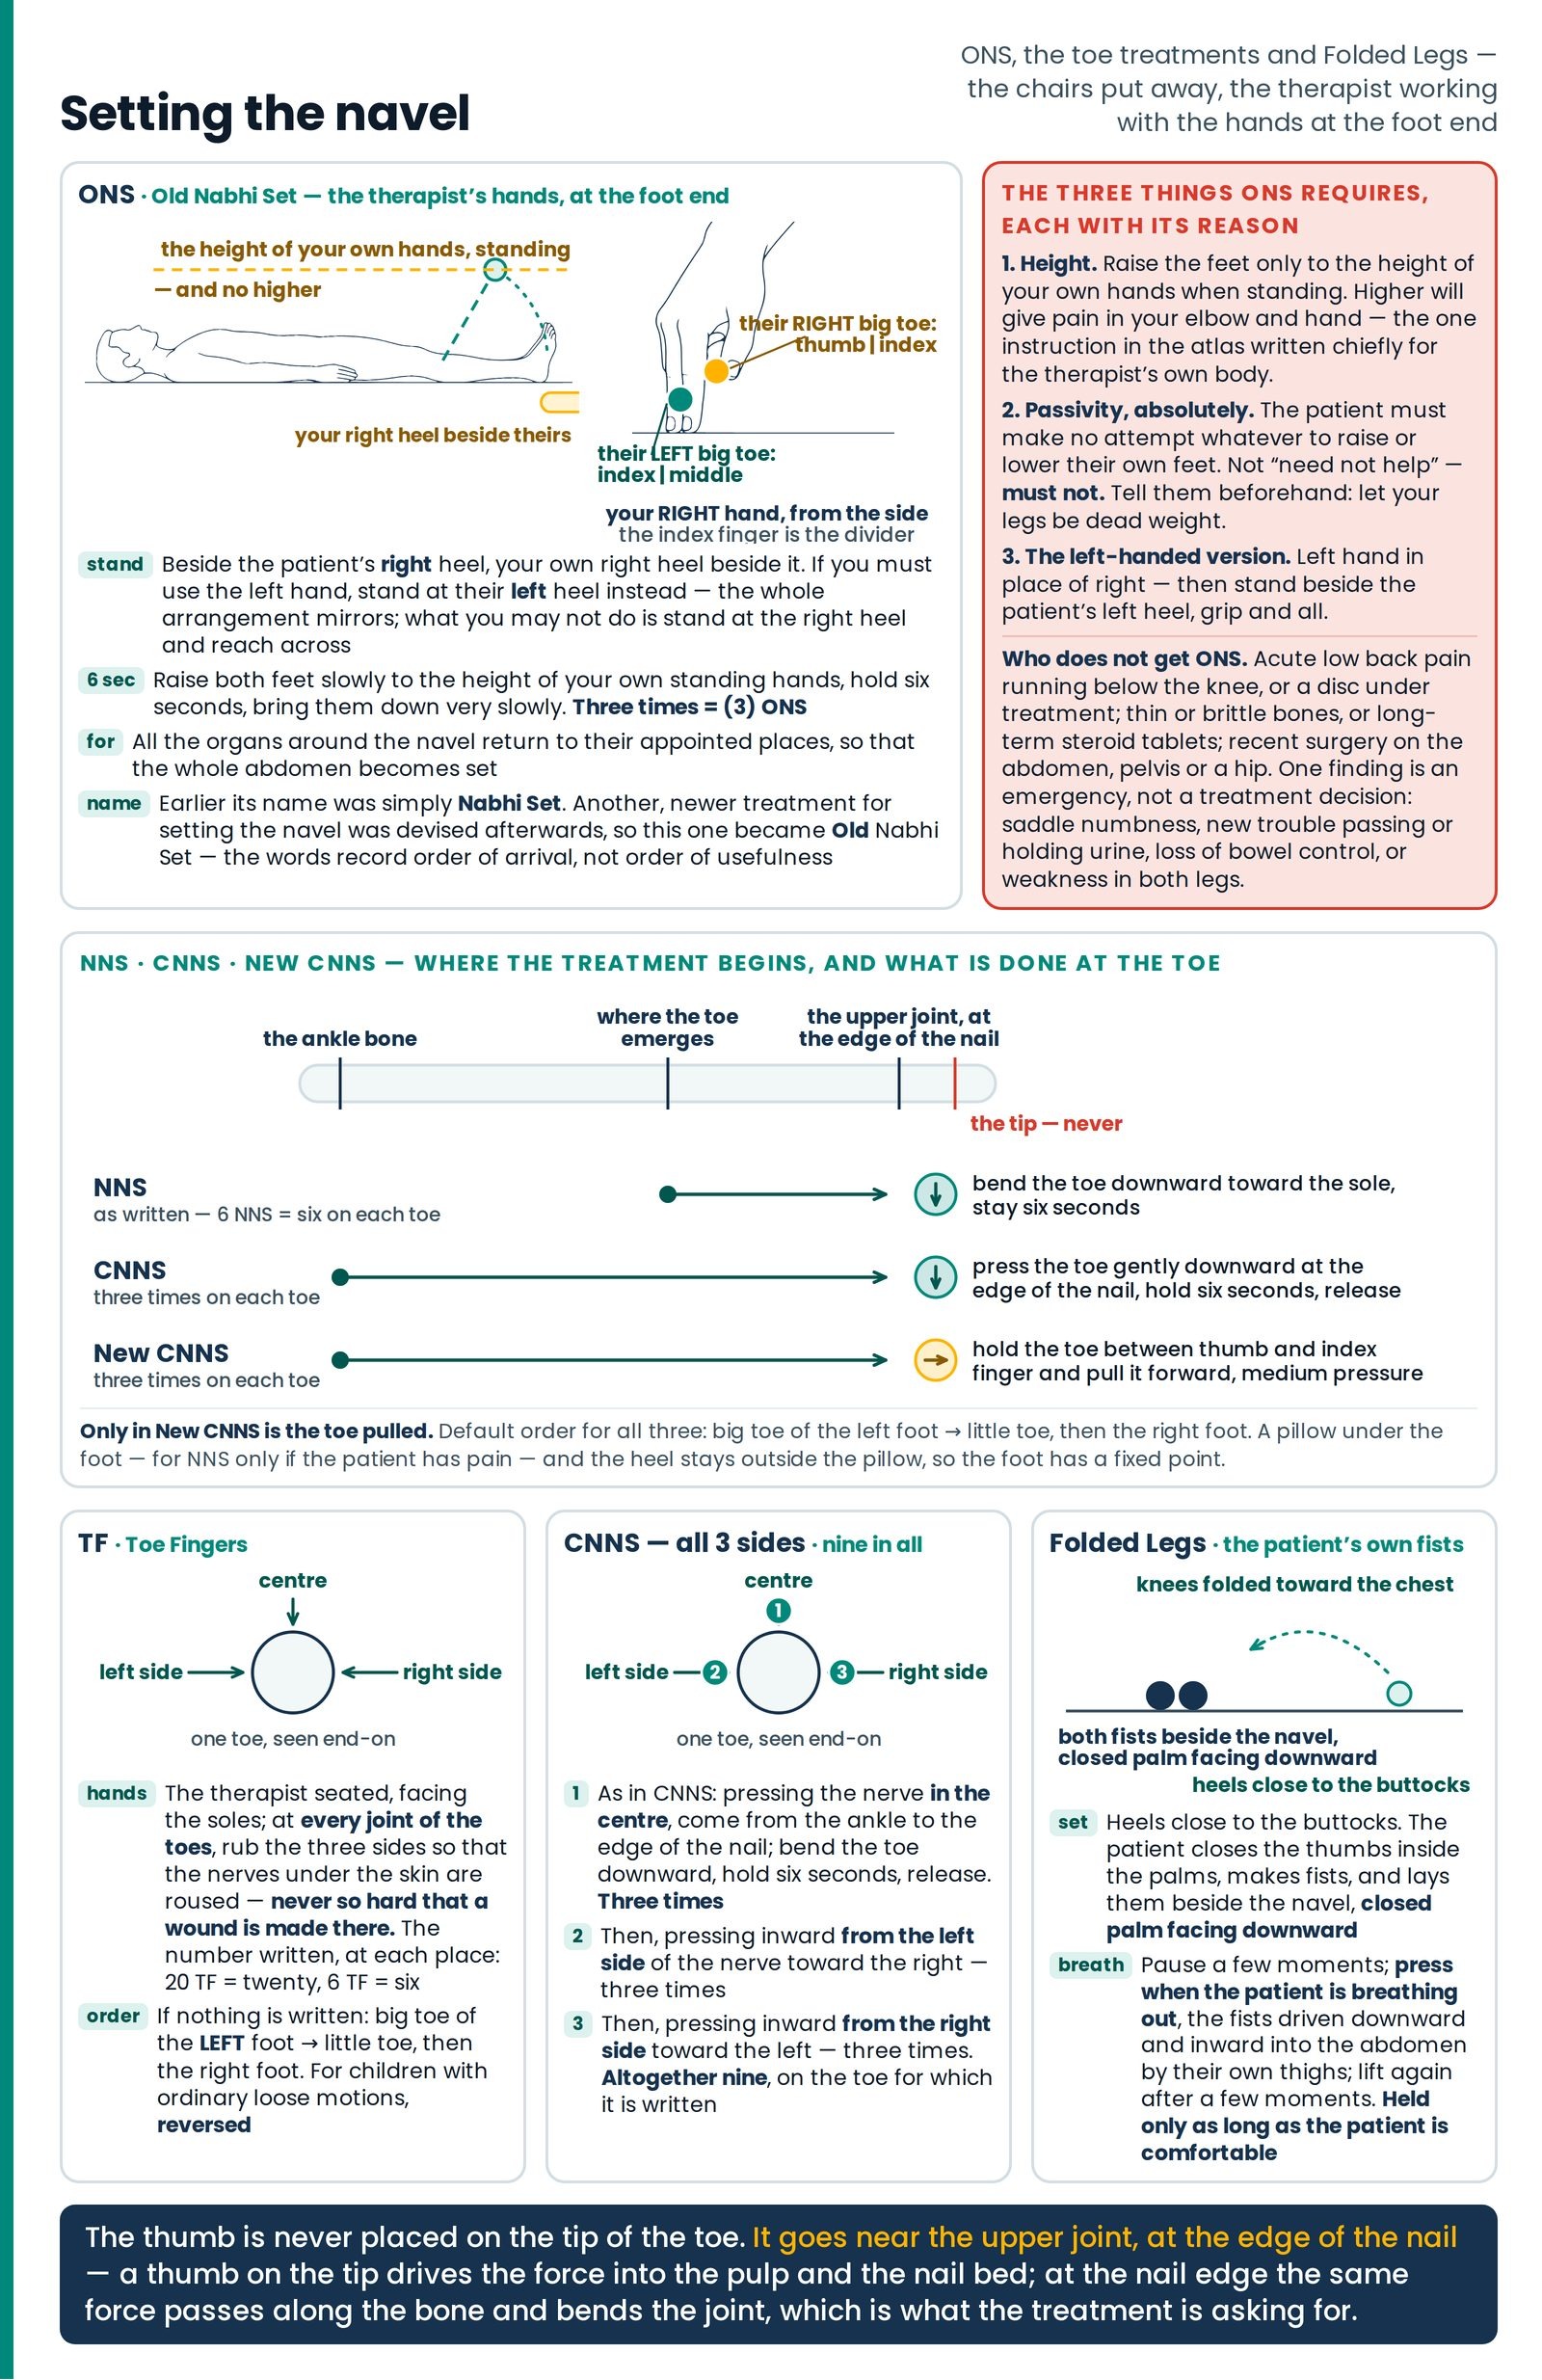
ONS — Old Nabhi Set
Read the finger grip again, because it is impossible to guess. The two big toes are held in two different gaps of one hand: thumb and index finger hold the right, index and middle fingers the left, so the index finger lies between the two and is the divider.
Why it is called Old. Earlier its name was simply Nabhi Set — navel set. Afterwards another, newer treatment for setting the navel was devised, and so this one was called Old Nabhi Set: Old meaning purānā, New meaning nayā. They are separate treatments with separate cards; the words record order of arrival, not order of usefulness.
TF — Toe Fingers (टो फिंगर)
The patient should be lying straight, with both hands relaxed beside both thighs. The therapist sits comfortably facing the soles of the patient's feet and gives the treatment on the toes.
At every joint of the toes, as many times as the number written — counting as you go — rub the three sides, so that the nerves under the skin are roused, but not so hard that a wound is made there. At each place knead as many times as is written. For example, if 20 TF is written, do twenty times at each place; if 6 TF is written, do six times at each place.
If it is to be done on some particular toe, that will be written. If nothing is written, start from the big toe of the left foot and go to the little toe, then do the right side.
| Patient's position | Supine, both hands relaxed beside both thighs; the therapist seated, facing the soles of the patient's feet Supine |
|---|---|
| Where the hands are placed | Every joint of the toes, rubbing the three sides of each Both sides |
| Duration and repetitions | The number written, at each place, counted aloud or under the breath — 20 TF = twenty at each place, 6 TF = six. Default order: big toe of the LEFT foot → little toe, then the right foot Left Right |
| What it is for | Rousing the nerves under the skin — but never so hard that a wound is made there |
The reversed order for children with loose motions
If children have ordinary loose motions, give the order reversed — that is, start from the little toe of the right foot and work to the big toe, then do the left side in the same way, and it will give immediate benefit.
The condition under which the reversal applies is stated and is narrow: children, and ordinary loose motions. It is not a general rule for diarrhoea in adults, and not for a child who is ill with more than ordinary looseness — a child who is drowsy, passing blood, feverish, or not drinking and not passing urine is a child for a doctor and for fluids, today.
NNS — New Nabhi Set (न्यू नाभी सेट)
Pressing with your thumb at each joint of the toes in order, bend the toe downward toward the sole and stay six seconds. Start from the big toe of the left foot and go to the little toe, then do the same on the right side.
If 6 NNS is written, give six times on each toe.
If the patient has pain, a pillow may be given under the foot — but place the pillow so that the heel stays outside the pillow.
| Patient's position | Supine; if the patient has pain, a pillow under the foot with the heel outside the pillow; the therapist seated at the foot end Supine |
|---|---|
| Where the hands are placed | Thumb, at each joint of the toes in order, beginning at the place where the toe emerges Both sides |
| Duration and repetitions | Bend the toe downward toward the sole and stay 6 seconds. The number written = the number of times on each toe — 6 NNS = six on each. Left big toe → little toe, then the right foot 6 sec Left Right |
| What it is for | The new navel set — setting the abdomen from the toes |
The pillow detail is mechanics, not comfort. It lifts the forefoot so your thumb can work; leaving the heel outside keeps the heel on the floor, so the foot has a fixed point and the bend happens at the toe.
CNNS — Complete New Nabhi Set
Place a pillow under the patient's foot. With your thumb, pressing the skin inward, go on drawing the nerves from the ankle up to the place where the toes emerge. Then, placing your thumb near their upper joint at the edge of the nail, press their toe gently downward, hold for six seconds and release.
Do this three times each.
If it is written for one toe only, do it on that one. If nothing is written, start from the big toe and finish at the little toe. Do three times on each toe. Remember that your thumb is not to be placed on the tip of their toe.
| Patient's position | Supine, a pillow under the foot; therapist seated at the foot end Supine |
|---|---|
| Where the hands are placed | Thumb, pressing the skin inward, drawing from the ankle forward to where the toes emerge; then at the toe, near the upper joint, at the edge of the nail — never on the tip Both sides |
| Duration and repetitions | Press the toe gently downward, hold 6 seconds, release. Three times on each toe. Big toe → little toe unless one toe is named 6 sec × 3 |
| What it is for | The complete new navel set |
New CNNS
Do it with your thumb just as in CNNS above. From the patient's ankle up to the place where the toes emerge, press the skin and draw the nerves. But in this treatment do not press downward; instead, holding their toe between your thumb and index finger, pull it forward with medium pressure.
| Patient's position | Supine, a pillow under the foot Supine |
|---|---|
| Where the hands are placed | Thumb from the ankle forward to where the toes emerge, exactly as CNNS; then the toe held between thumb and index finger Both sides |
| Duration and repetitions | Pull the toe forward with medium pressure — the toe is not pressed downward at all. Three times on each toe; big toe → little toe × 3 |
| What it is for | The same territory as CNNS, with the toe pulled instead of bent |
TF and CNNS — the principle that connects the toes to the navel
By all these treatments the organs of the digestive system can be set one by one. The toe in which there is pain is joined to a particular place of the navel. If, after a treatment or two, the patient says the pain in the toe has gone, then the related navel pain will also have gone.
CNNS — all 3 sides
Do it on the toe for which it is written.
First, as in CNNS above, pressing the nerve in the centre, come from the ankle to the edge of the nail of the toe; bend the toe downward, hold six seconds and then release. Do this three times.
Then, pressing inward from the left side of the nerve toward the right, do it three times.
Then, pressing inward from the right side of the nerve toward the left, do it three times. That is, altogether nine times.
| Patient's position | Supine, pillow under the foot with the heel outside the pillow; therapist at the foot end Supine |
|---|---|
| Where the hands are placed | Ankle → edge of the nail, along the named toe's line: the centre first; then from the left side pressing inward toward the right; then from the right side pressing inward toward the left Both sides |
| Duration and repetitions | 3 + 3 + 3 = nine in all. The six-second toe-bend belongs to the first set — the centre one 6 sec × 3 |
| What it is for | The full three-sided CNNS, on the toe for which it is written |
The toe key
Ten codes in two columns — the same crossing as thighs and forearms
Every toe on both feet carries a code, and the same key serves TF, NNS and all the forms of CNNS. Learn it as a pair of columns, not as ten separate facts. (Figure 17.3)
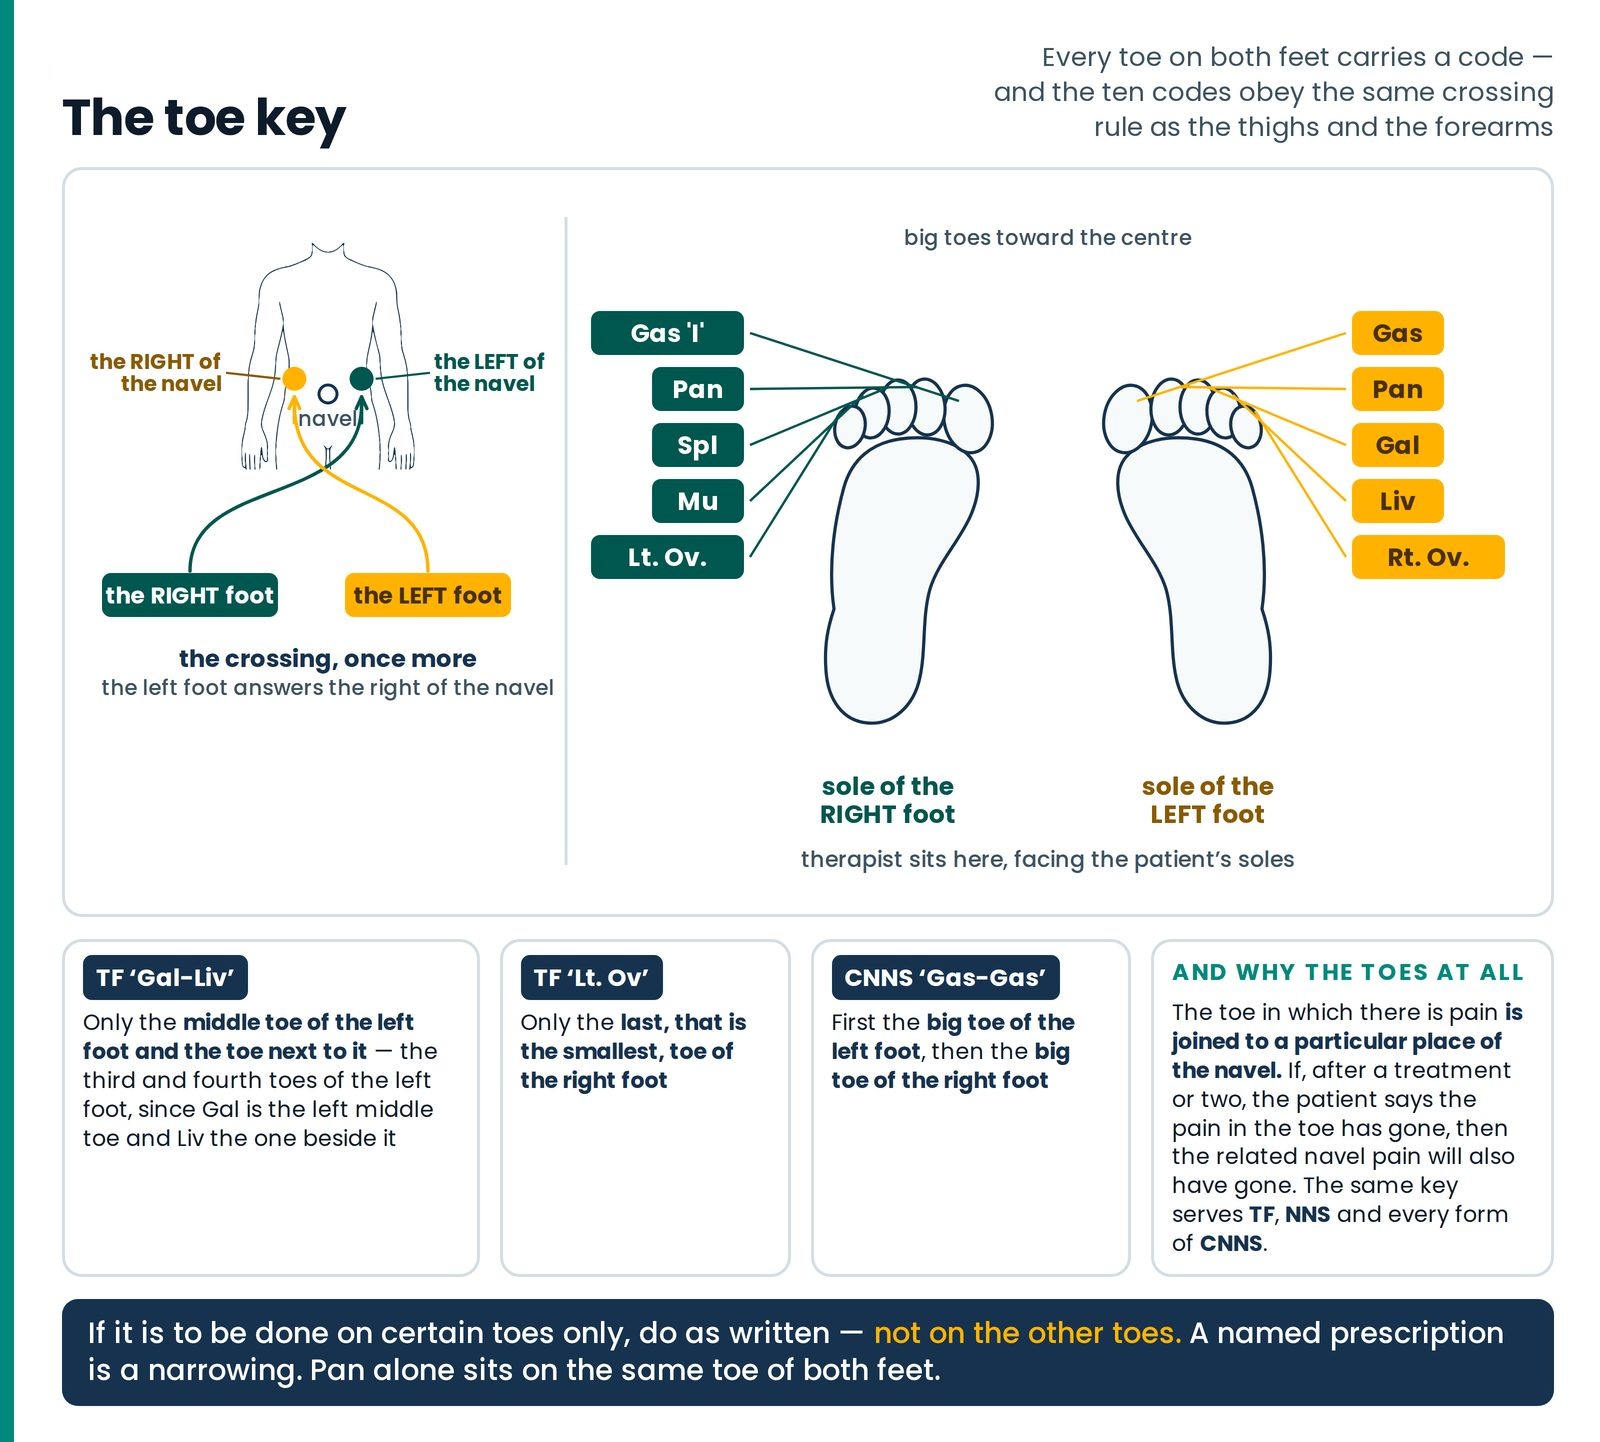
| Toe | Right foot | Left foot |
|---|---|---|
| Big toe (first) | Gas 'I' | Gas |
| Second toe | Pan | |
| Third toe (middle) | Spl | Gal |
| Fourth toe | Mu | Liv |
| Little toe (fifth) | Lt. Ov. | Rt. Ov. |
Reading a prescription written for named toes
If it is to be done on certain toes only, then do as written — not on the other toes.
Three worked examples, each of which you should be able to point to on a foot before you turn the page:
TF 'Gal-Liv' means do it only on the middle toe of the left foot and the toe next to it — that is, the third and fourth toes of the left foot, since Gal is the left middle toe and Liv the one beside it.
TF 'Lt. Ov' means do it only on the last, that is the smallest, toe of the right foot.
CNNS 'Gas-Gas' — first do it on the big toe of the left foot, then on the big toe of the right foot.
"Not on the other toes" is the operative half of the rule. A named prescription is a narrowing.
The difference between NNS, CNNS and New CNNS
Where the treatment begins, and what is done at the toe
In NNS it is enough to begin the treatment from where the toe emerges, whereas in the other two treatments the treatment is to be begun from above, near the ankle bone. Only in New CNNS is the toe to be pulled.
Two sentences, and between them they separate three treatments that a tired student will otherwise merge. Set out whole:
| NNS | CNNS | New CNNS | |
|---|---|---|---|
| Full name | New Nabhi Set | Complete New Nabhi Set | — |
| Where the treatment begins | At the place where the toe emerges | Above, near the ankle bone | |
| The stroke | Thumb pressure at each joint of the toes, in order | Thumb presses the skin inward, drawing the nerves forward to where the toes emerge | The same as CNNS |
| What is done at the toe | Bend the toe downward toward the sole and stay 6 seconds | Thumb near the upper joint at the edge of the nail; press the toe gently downward, hold 6 seconds and release | Pull the toe forward between thumb and index finger with medium pressure — do not press downward |
| Repetitions | As written — 6 NNS = six times on each toe | Three times on each toe | |
| Default order | Big toe of the left foot → little toe, then the right foot | Big toe → little toe | |
| Pillow | Under the foot if the patient has pain, the heel outside the pillow | Under the foot |
Lymph — the point that looks like Pan and is not
Heels touching, high on the thighs: three differences you can see
Lymph — the lymph point (लिम्फ)
In appearance this seems like the Pan treatment, and yet it is different from it. It rouses the lymph nodes of the thighs — that is, the ducts that carry the lymph.
Stand on both thighs very close to the groin, so placed that both your heels are very close to one another. Then press both heels downward and inward, hold for six seconds and release. Do it as many times as the number written.
| Patient's position | Supine, one pillow under both thighs Supine |
|---|---|
| Where the feet are placed | Both feet on the thighs, very close to the groin, with both heels touching one another; the toes on the inner side of the patient's thigh Both sides |
| Duration and repetitions | Press both heels downward and inward, hold 6 seconds, release; as many times as the number written 6 sec |
| What it is for | Rousing the lymph nodes of the thighs — the ducts that carry the lymph |
The three differences between Pan and Lymph
They are given a hand's breadth apart on the same thighs and they are not the same treatment. The differences are stated as three, and all three are checkable by eye before any weight goes down.
1. Which part of the foot carries the weight. In Lymph the therapist's weight is on the heels; in Pan the weight is on the middle part of the sole.
2. Whether the heels touch. During the treatment, in Lymph it is compulsory that both heels touch each other; whereas in Pan, if the width of the patient's thigh is greater, there may be some distance between the two heels.
3. Where the toes lie. In Lymph the therapist's toes will be on the inner side of the patient's thigh; whereas in Pan the toes may also be outside the thigh — and that depends on the width of the thigh and the length of the therapist's foot.
The finding that proves the point. If someone has a boil or a pimple on any toe of the foot, or has been injured anywhere on the foot, there will be a great deal of pain in the lymph node of that thigh; and as soon as we rouse that node by our treatment, the pain will reduce immediately. That is a prediction — it says in advance what you will find and on which side.
What lies beneath. Just below the crease of the groin sit the drainage glands of the whole lower limb — including the whole surface of the leg and foot, toes included, which is why the observation above is anatomically exact. A finger's breadth to the inside run the leg's main artery, vein and nerve under little more than skin: which is why the heel is a more demanding tool here than the mid-sole, and why the toes go on the inner side.
The chest group — Thymus, Chest, Armpit, and their combination
The foot stops pressing and begins to slide — ghisāī, the rub
The line printed over this whole group
For the following treatments a pillow is not needed. Supine
Not no pillow under the head — no pillow at all. The patient lies flat on the mat, and the therapist's foot needs the chest and the shoulder to be level with one another.
Four treatments built out of one another: Th. Only works the breastbone, Ch. Only the chest, Armpit the armpit, Th + Ch all three. They differ from everything before them in one respect. (Figure 17.4)
Th. Only — Thymus Only (थैमस ओनली)
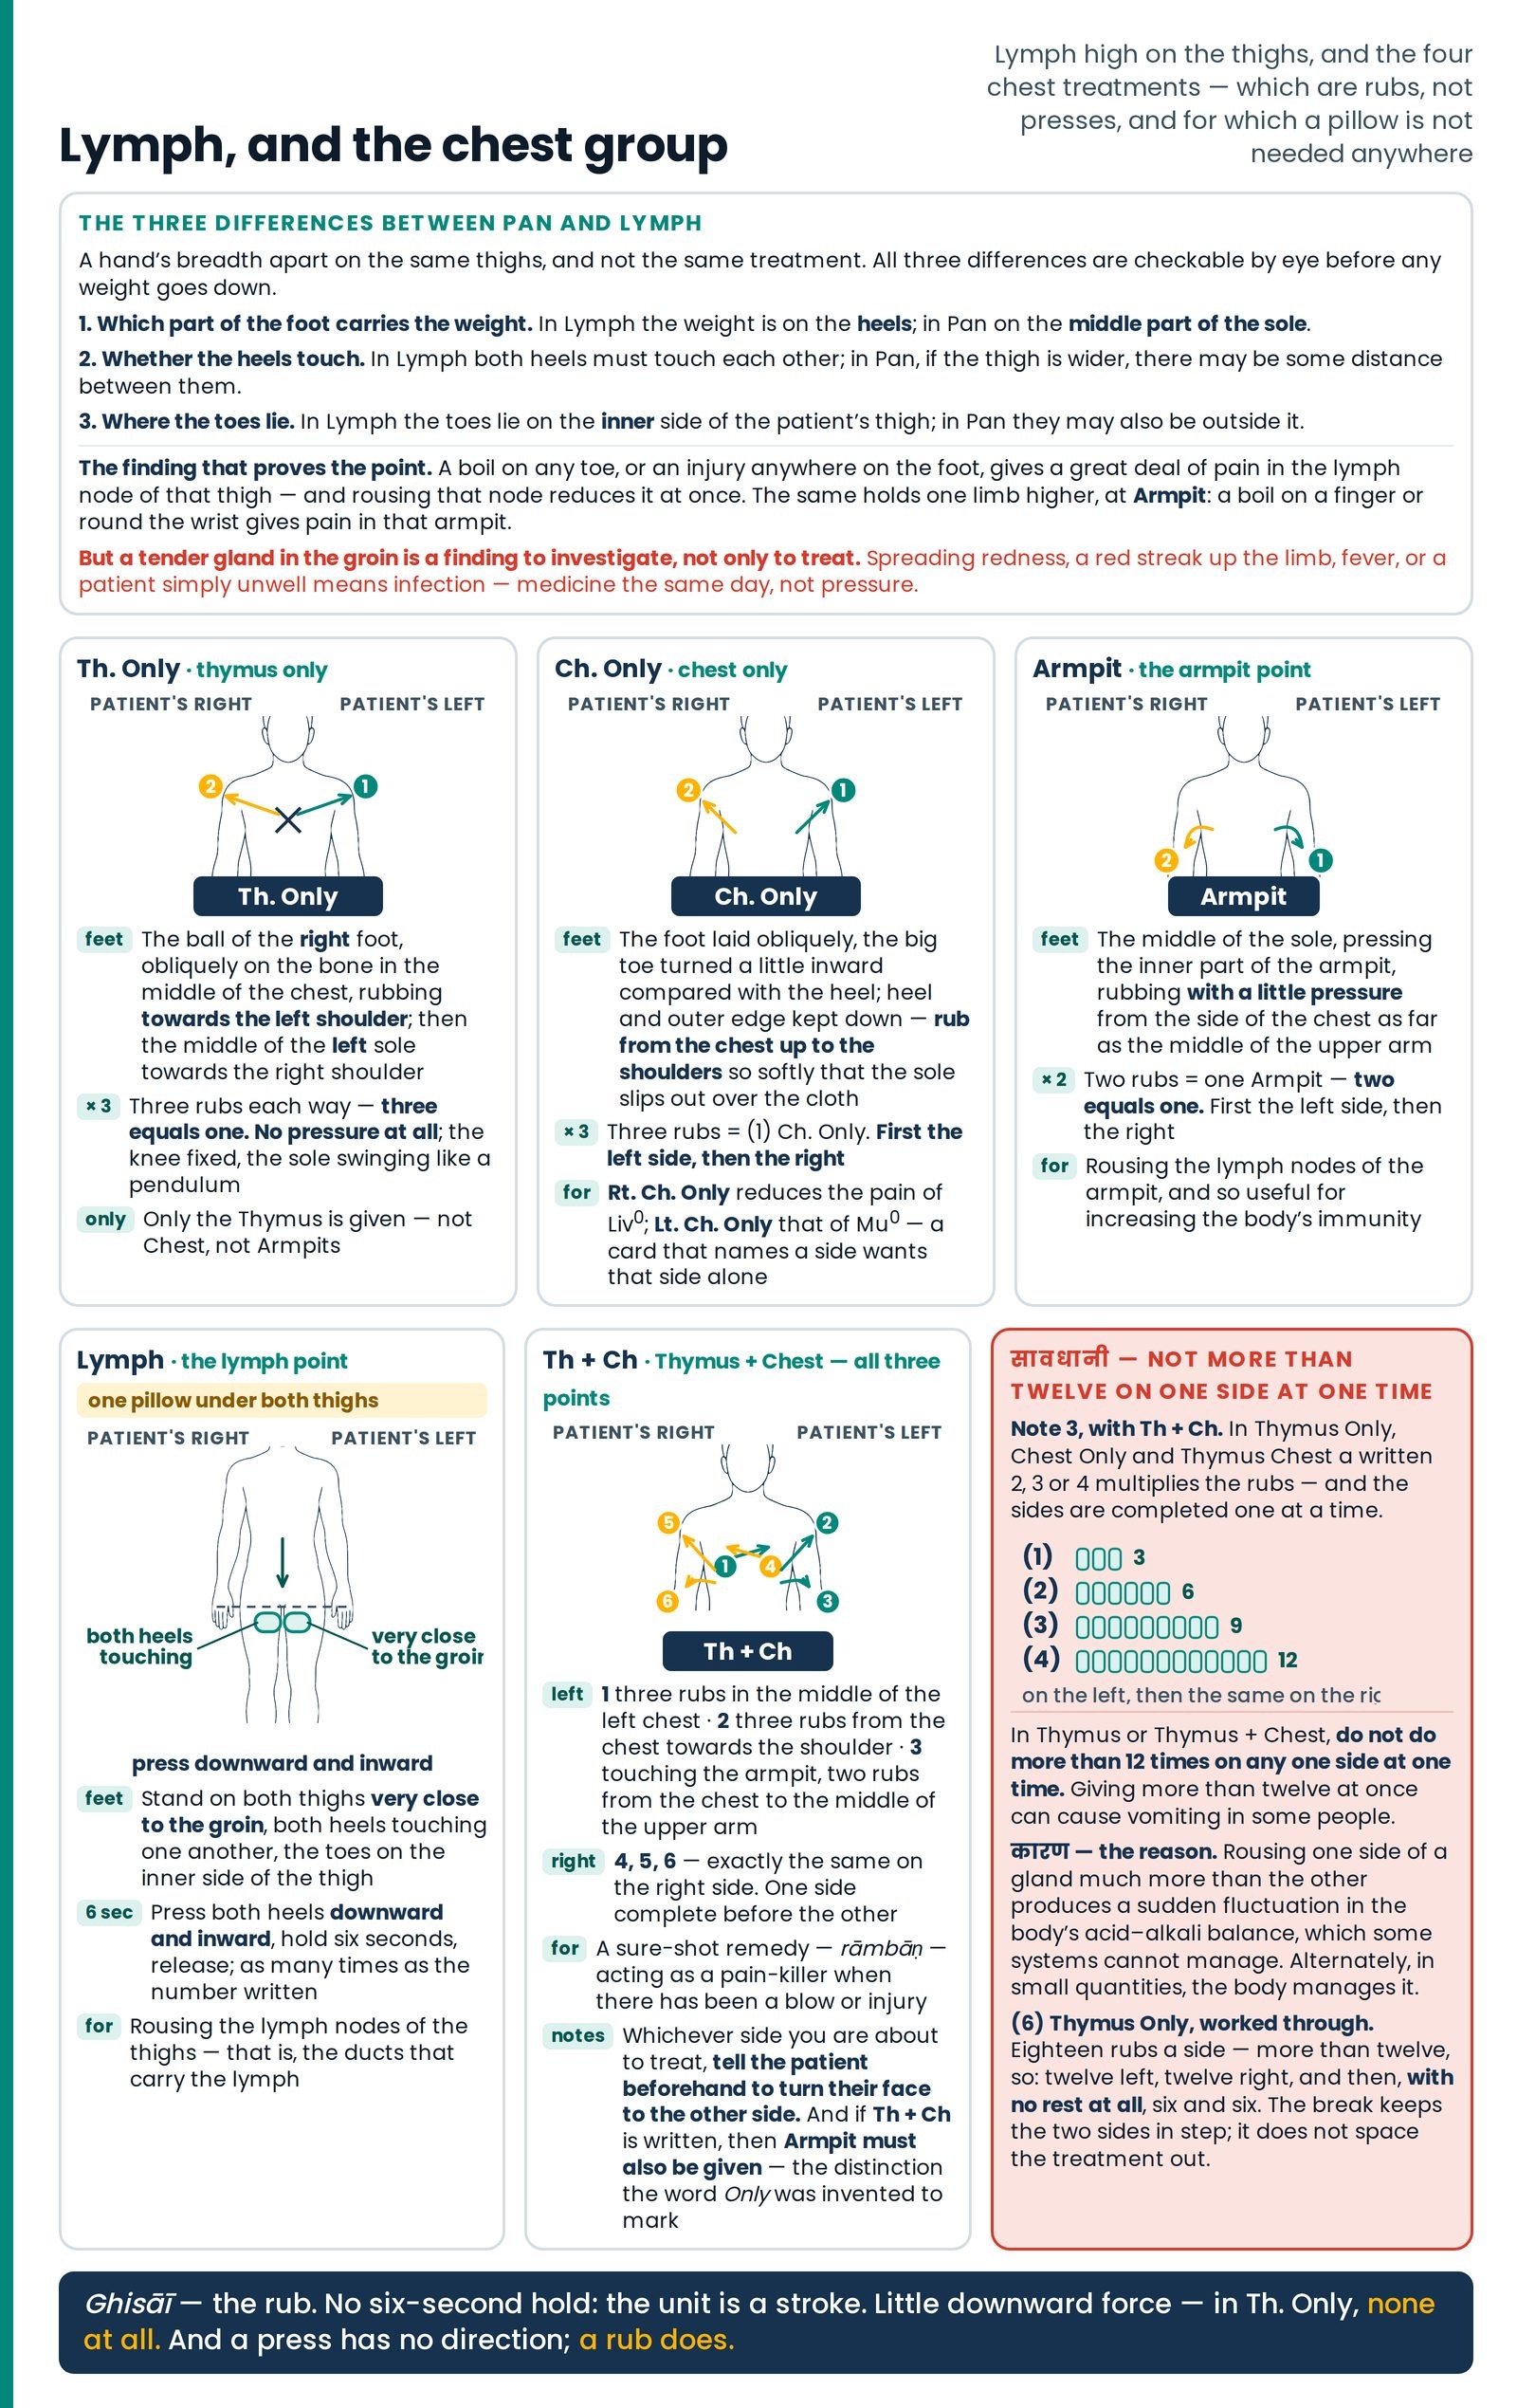
Taking the support of the chairs, place your feet on both sides of the patient's waist. First lay the right sole obliquely and, with the soft part of the ball of the foot, on the bone in the middle of the chest, without giving pressure, rub three times towards the left shoulder; then with the middle part of the left sole rub three times towards the right shoulder. The count is three equals one.
The word Only has been added here to show that only the Thymus is to be given — not Chest and not Armpits.
| Patient's position | Supine, no pillow; the therapist on the chairs, feet on both sides of the patient's waist Supine |
|---|---|
| Where the feet are placed | The soft part of the ball of the right foot, laid obliquely on the bone in the middle of the chest, rubbing towards the left shoulder; then the middle of the left sole, rubbing towards the right shoulder Both sides |
| Duration and repetitions | Three rubs each way; the count is three equals one. No pressure at all. One-directional strokes only × 3 |
| What it is for | Named for the thymus; given alone — not Chest, not Armpits |
Ch. Only — Chest Only (चेस्ट ओनली)
Place your foot obliquely, so that compared with the heel the big toe is turned a little inward. Keep the sole and the heel resting lightly on the patient's chest below. Take care not to lift your heel or the outer edge of your sole.
(1) Ch. Only — rub so softly from the chest up to the shoulders that the sole slips out over the cloth; then the patient will feel very comfortable.
In this, the count is three equals one. That is, for (1) Ch. Only one has to rub three times. First the left side, then the right side.
| Patient's position | Supine, no pillow Supine |
|---|---|
| Where the feet are placed | The foot laid obliquely, the big toe turned a little inward relative to the heel, heel and outer edge of the sole kept down; rubbing from the chest up to the shoulders Both sides |
| Duration and repetitions | Three rubs = (1) Ch. Only; first the left side, then the right × 3 Left Right |
| What it is for | Rt. Ch. Only reduces the pain of Liv°; Lt. Ch. Only reduces the pain of Mu° |
The two side-variants, each with its own purpose, each taught whole:
If Rt. Ch. Only is written, do it only on the patient's right chest; this will reduce the pain of Liv°.
If Lt. Ch. Only is written, do it only on the patient's left chest; this will reduce the pain of Mu°.
Those are two different prescriptions answering two different findings, located by palpation before the session. A card that says Ch. Only without a side wants both, left first; a card that names a side wants that side alone.
Armpit (आर्म पिट)
With the middle part of the sole, pressing the inner part of the armpit, rub with a little pressure from the side of the chest as far as the middle part of the upper arm. The count is two equals one. First the left side, then the right side.
This rouses the lymph nodes situated in the armpit, and so is useful for increasing the body's immunity.
| Patient's position | Supine, no pillow, the arm held a little away from the side Supine |
|---|---|
| Where the feet are placed | Middle part of the sole, pressing the inner part of the armpit, rubbing from the side of the chest as far as the middle part of the upper arm Both sides |
| Duration and repetitions | Two rubs = one Armpit; with a little pressure, unlike Th. Only; first the left side, then the right × 3 Left Right |
| What it is for | Rousing the lymph nodes of the armpit; increasing the body's immunity |
And the same predictive observation as at Lymph, one limb higher. If there is a boil or a pimple on any finger of the hand, or around the wrist, there will be pain in the armpit of that hand. With the Armpit treatment we can give immediate relief in that.
Th + Ch — Thymus + Chest (Thymus Chest)
The next treatment is Th + Ch, or Thymus Chest, in which all three of the above points are to be given.
This treatment is a sure-shot remedy — rāmbāṇ — which acts as a pain-killer when there has been a blow or injury.
The sequence, in its six numbered steps.
First rub three times in the middle of the left chest,
then rub three times from the chest towards the shoulder,
then, touching the armpit, rub two times from the chest to the middle part of the upper arm.
4, 5, 6 — Do exactly the same on the right side.
| Patient's position | Supine, no pillow; the face turned away from the side being treated Supine |
|---|---|
| Where the feet are placed | All three contacts of the group, one side complete before the other: breastbone, then chest-to-shoulder, then through the armpit to the middle of the upper arm Both sides |
| Duration and repetitions | 3 + 3 + 2 on the left (steps 1, 2, 3), then 3 + 3 + 2 on the right (steps 4, 5, 6) × 3 Left Right |
| What it is for | A sure-shot remedy acting as a pain-killer when there has been a blow or injury |
ध्यान दें — the three notes printed with Th + Ch
1. Whichever side you are about to treat, tell the patient beforehand to turn their face to the other side.
2. Remember that if Th + Ch is written, then Armpit must also be given. A therapist who gives the breastbone and the chest and stops there has not given Th + Ch — which is exactly the distinction the word Only was invented to mark.
3. Thymus Only, Chest Only or Thymus Chest — in these three, if the number 2, 3 or 4 is to be given, then first rub on the left side 6, 9 or 12 times according to the count, and then do the same on the right side. The written number multiplies the rubs, and the sides are completed one at a time: all of the left, then all of the right.
The arithmetic, set out so it cannot be got wrong:
| Written as | Rubs on the left side, then the same on the right |
|---|---|
| (1) | 3 |
| (2) | 6 |
| (3) | 9 |
| (4) | 12 |
The twelve-rub limit
Twelve on one side at a time; the same total, divided, is safe
Work the example through. (6) Thymus Only converts, by the table above, to eighteen rubs a side — more than twelve, so it cannot be one run. It is broken: twelve on the left, twelve on the right, and then, with no rest at all, six on the left and six on the right. Four runs, none over twelve, the two sides kept level. (Figure 17.5)
"Without giving any rest" is not a throwaway. The break keeps the two sides in step; it does not space the treatment out.
The throat, and the treatments given with the hands
Thrd, Loveleen and Sulta Ulta — and a point written to be withheld
Thrd — Thyroid (थाइरॉइड)
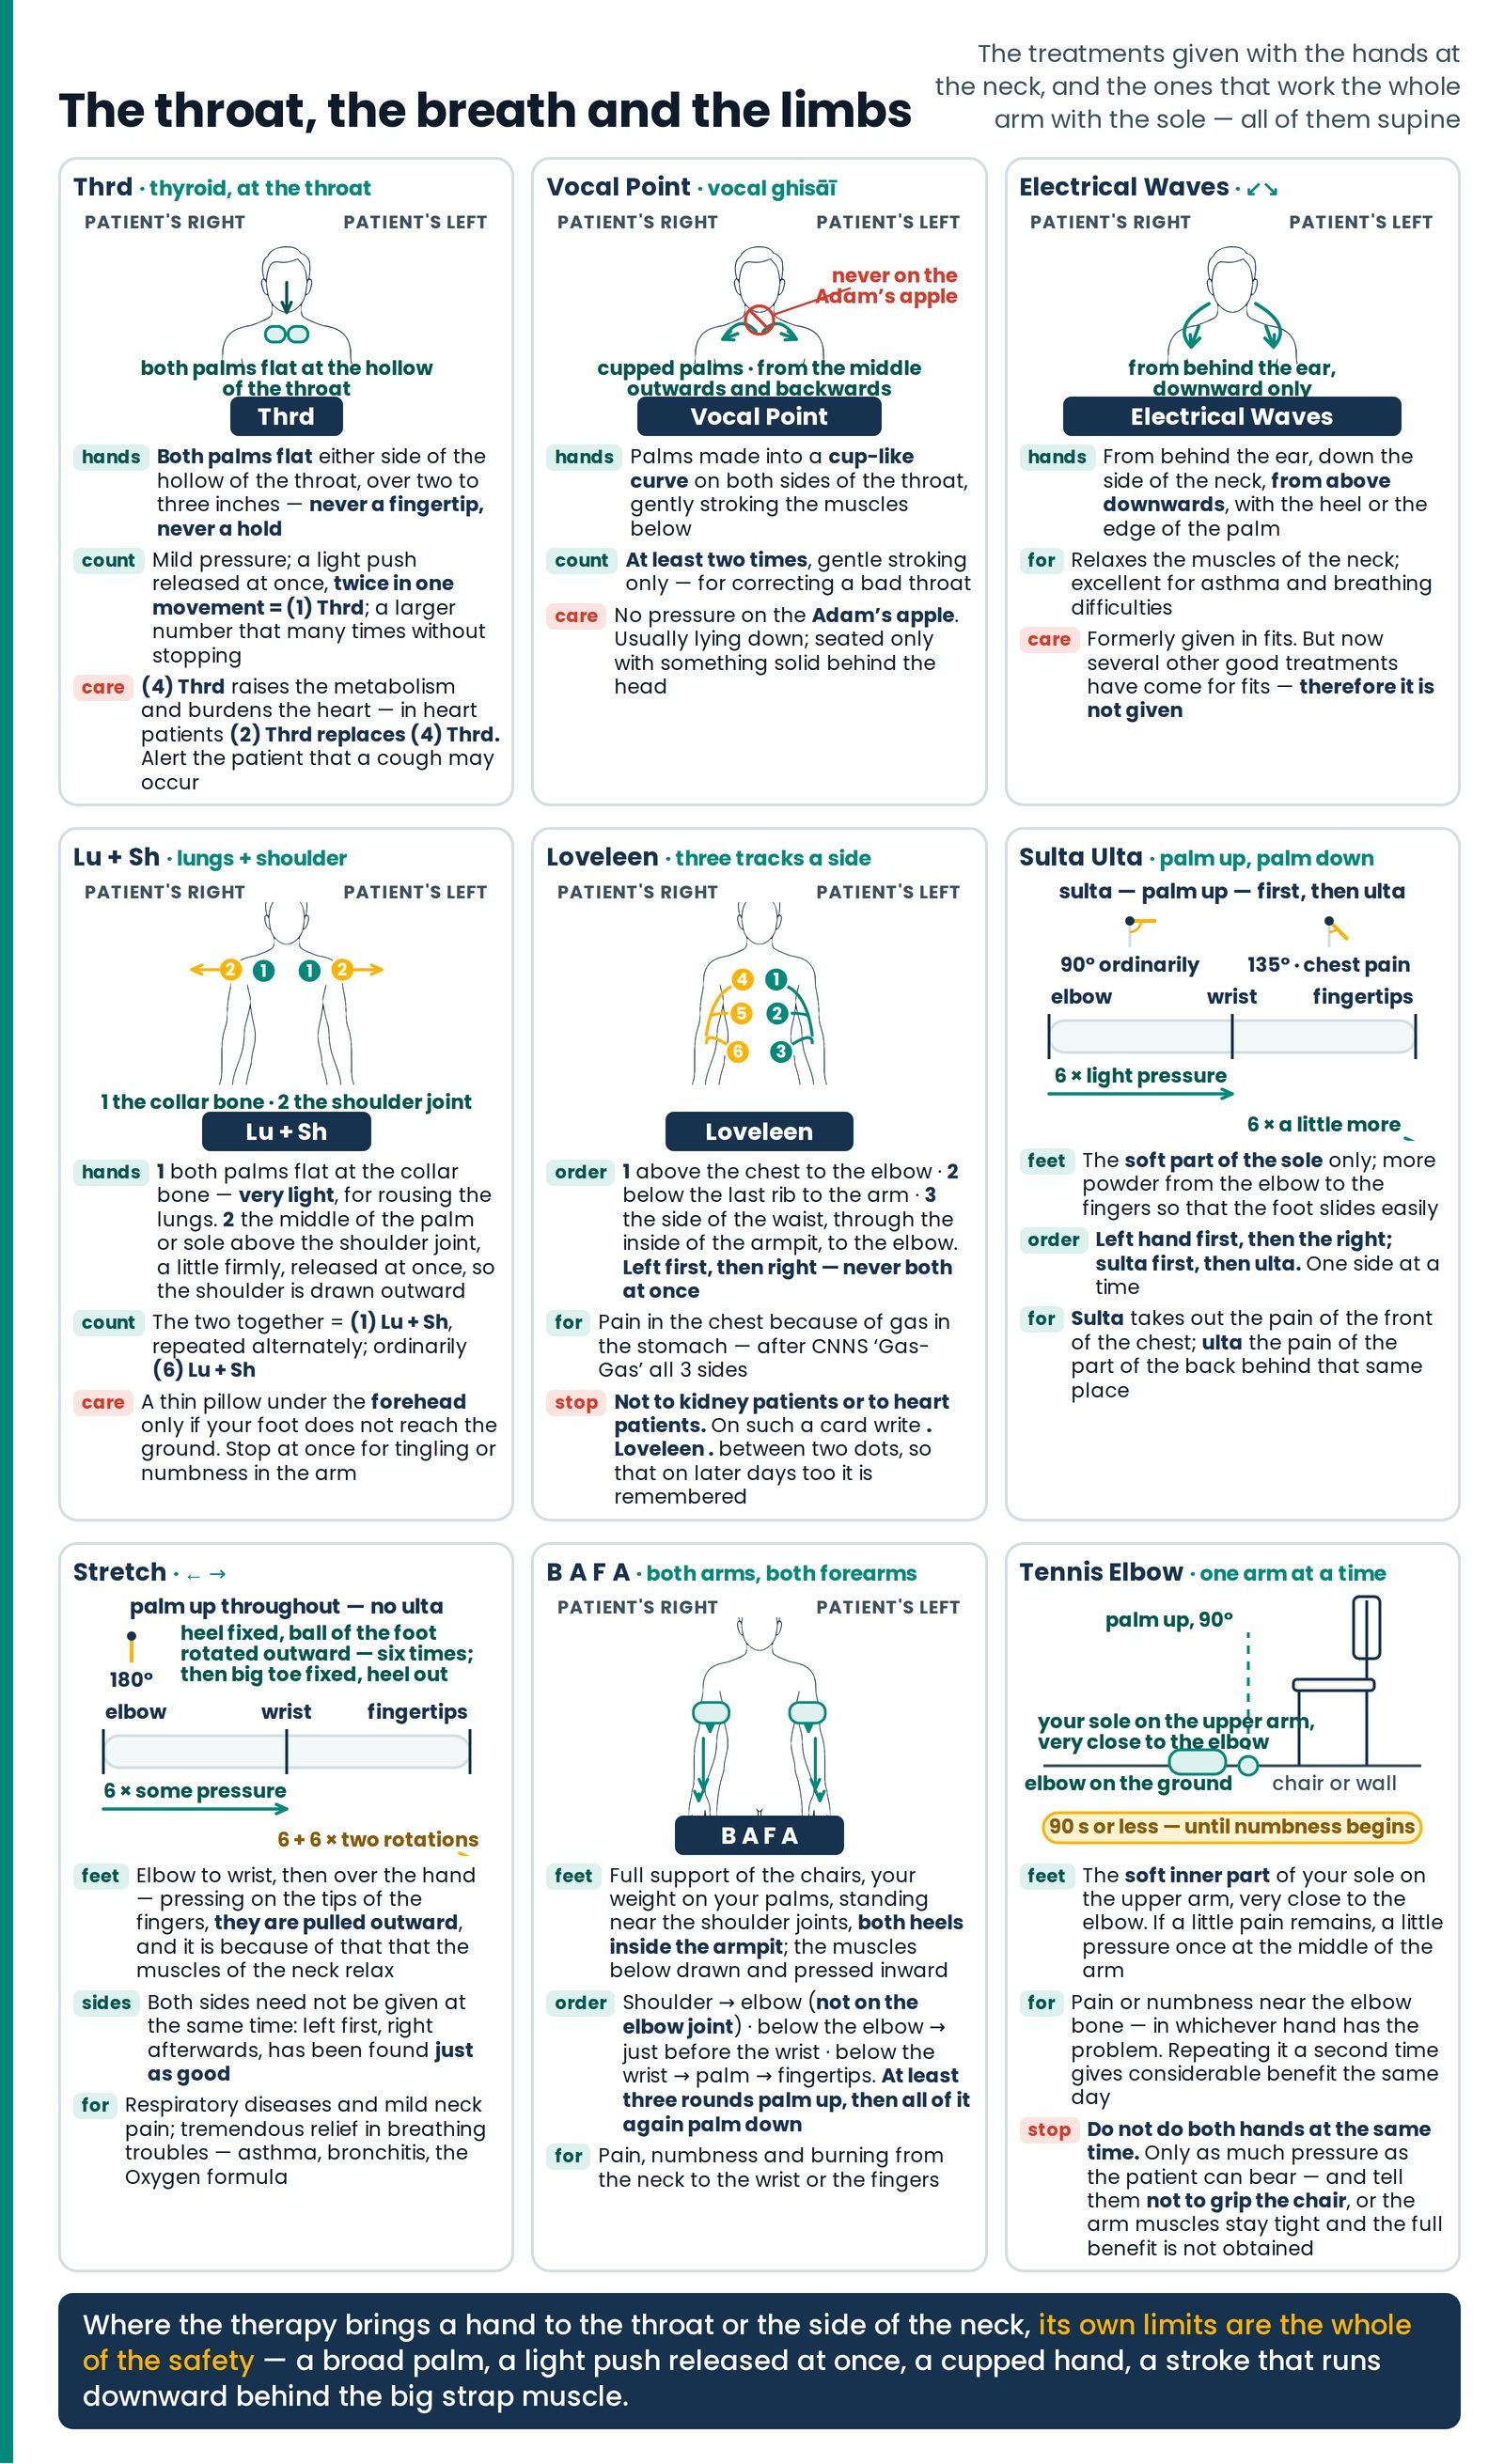
Tell the patient to keep their neck loose and relaxed; then more benefit will be obtained. If it is not needed, it is better that no pillow lie under the head while this treatment is given. First of all, alert them that some people may occasionally get a cough during the treatment, so that they are not alarmed. (Figure 17.6)
Place the flats of your palms on both sides of the hollow of the patient's throat, touching the skin. Then, with mild pressure, give a light push on the hollow and release at once; do this twice in a single movement. That makes (1) Thrd. If a larger number is written, do the same that many times — without stopping.
Note that instead of giving pressure at a single point, treating with a broader surface of two to three inches of the palm will give them more comfort.
| Patient's position | Supine, no pillow under the head if it is not needed; the neck loose and relaxed; the patient alerted beforehand that a cough may occur Supine |
|---|---|
| Where the hands are placed | Flats of both palms on both sides of the hollow of the throat, touching the skin, over a broad surface of 2–3 inches of the palm — never a fingertip Both sides |
| Duration and repetitions | Mild pressure; a light push and an immediate release, twice in a single movement = (1) Thrd; larger numbers done that many times without stopping |
| What it is for | Named for the thyroid |
The variant, and the substitution, taught whole. (4) Thrd raises the metabolism — the body's rate of building up and breaking down. In a heart patient that increase throws a burden onto the heart and the trouble can increase. So in angina — that is, in heart patients — (2) Thrd is given in place of (4) Thrd, to reduce cholesterol. Both halves of a substitution travel together: which count is withheld, which replaces it, in whom, and why. What every count of Thrd is used for belongs to Each Point in Use, "Each Point in Use".
Loveleen (लवलीन)
This is given in three stages. First do the left side, then the right side.
From above the chest to the elbow
From below the last rib of the chest to the arm
From the side of the waist, passing through the inside of the armpit, to the elbow
Those who feel pain in the chest because of gas in the stomach — for them, giving the Loveleen treatment after giving CNNS 'Gas-Gas' all 3 sides is of great benefit. But both sides are not to be done at the same time.
| Patient's position | Supine, the arm out; both sides are not to be done at the same time Supine |
|---|---|
| Where the feet are placed | Three stages on each side: (1) from above the chest to the elbow; (2) from below the last rib of the chest to the arm; (3) from the side of the waist, passing through the inside of the armpit, to the elbow Left Right |
| Duration and repetitions | The three stages, the left side complete first, then the right |
| What it is for | Pain in the chest because of gas in the stomach — given after CNNS 'Gas-Gas' all 3 sides |
What lies beneath. The third track is the longest sweep in the supine atlas — flank, lower ribs, the armpit, then the inner upper arm where the arm's main artery and two great nerves lie close to the surface. Behind that same lower-rib region lie the kidneys — presumably why the point is withheld where the kidneys are diseased.
Sulta Ulta — palm up, palm down (सुलटा उल्टा)
This is given in several stages. The treatment is to be given only with the soft part of the sole. Put more powder from the elbow to the fingers, so that the foot slides easily.
First sulta — that is, treatment with the palm placed facing the sky:
Keeping the hand at 90 degrees, that is, straight out from the shoulder, stretch the muscles six times with light pressure from the elbow to the wrist.
Then, giving a little more pressure and drawing the tissue, rub six times from the wrist to the tips of the fingers.
After this, ulta — that is, turning the hand so that the palm looks at the ground — repeat all of the above in the same way.
First do the left hand and afterwards the right hand. First do sulta and afterwards ulta.
| Patient's position | Supine; the hand at 90 degrees, straight out from the shoulder — or up at 135°, or as far up as it will go, if there is pain in the chest. Powder from the elbow to the fingers Supine |
|---|---|
| Where the feet are placed | The soft part of the sole only: elbow → wrist, then wrist → tips of the fingers |
| Duration and repetitions | 6 times elbow to wrist with light pressure, then 6 times wrist to fingertips with a little more pressure — palm up (sulta); then all of it again palm down (ulta). Left hand first, then the right; sulta first, then *ulta* Left Right |
| What it is for | Sulta takes out the pain of the front of the chest; ulta takes out the pain of the part of the back behind that same place |
ध्यान दें — the 135° variant, and why the angle and the order are the instruction
If there is pain in the chest, then keep the arms up at an angle of 135°, or as far up as they will go, and give it that way. With sulta the pain of the front of the chest will go out; with ulta the pain of the part of the back behind that same place will go out.
The angle. 135° — the arms extended a little upward, not parallel to the shoulders. The ordinary position is 90°, straight out from the shoulder; the chest-pain position lifts them above that line. Or as far up as they will go is the second half of the same instruction: the angle is a target, never forced; a stiff or previously dislocated shoulder goes as far as it goes.
The order. Left side first, right afterwards, one side at a time.
The sequence on each arm. Sulta before ulta — palm up first, palm down second, before you move to the other arm.
Which answers what. Palm up takes the pain out of the front of the chest; palm down out of the back behind that same place.
The limb and breathing treatments
The breath reached from the neck and the arm, not from the chest
Electrical Waves (इलेक्ट्रिकल वेव्स)
From the side behind the ear, on the side of the neck, rub from above downwards with the heel or the edge of the palm. This relaxes the muscles of the neck, and it has been found excellent for asthma or breathing difficulties — for asthma and other respiratory diseases. Its symbol is ↙↘.
| Patient's position | Supine Supine |
|---|---|
| Where the hands are placed | Heel or edge of the palm, from the side behind the ear, down the side of the neck Both sides |
| Duration and repetitions | Rubbing from above downwards only |
| What it is for | It relaxes the muscles of the neck. It has been found excellent for asthma or breathing difficulties — asthma and other respiratory diseases |
| What it is no longer given for | Formerly it was given in fits. But now several other good treatments have come for fits. Therefore it is not given |
Read the last row as it is written. It is not a prohibition and it is not a failure: the treatment was withdrawn from one of its uses because better ones arrived, and the therapy keeps that in its ledger rather than quietly dropping it. A card written years ago may still carry Electrical Waves against fits; what you give for fits comes from elsewhere.
And note where it belongs among the breathing treatments. The two points on this page and the one on the next all reach the breath from the neck and the arm rather than the chest: Electrical Waves relaxes the muscles of the neck, Lu + Sh rouses the lungs and opens the muscles of the chest, and Stretch relaxes the muscles of the neck from the fingertips. In an asthma or bronchitis patient they are given as a group, and Stretch — written (6) ←→ — is also a named part of the Oxygen formula.
The stated direction is the safety. The stroke runs down behind the big strap muscle of the neck; a stroke that drifts forward onto the front edge of that muscle is over the great artery to the brain.
Lu + Sh — Lungs + Shoulder
Read this as "Lungs plus Shoulder". This is for rousing the lungs, and is useful for breathing-related problems.
First, with the flats of your palms, give very light pressure on both sides at the collar bone — that is, the place below the shoulder bone. This is for rousing the lungs.
Ordinarily no pillow is needed in this treatment; but if the therapist's foot does not reach the ground, a thin pillow may be placed under the patient's forehead, so that pressure does not fall on the shoulder bone.
Then, with the middle part of the palm or the sole, press a little firmly above the shoulder joint and release at once — so that the shoulder is pulled outward. This is for opening the muscles of the chest.
These two points together make (1) Lu + Sh. Ordinarily (6) Lu + Sh is given. So repeat these two alternately, as many times as the number written.
| Patient's position | Supine; ordinarily no pillow, but a thin pillow under the forehead if the therapist's foot does not reach the ground Supine |
|---|---|
| Where the hands are placed | 1: flats of both palms at the collar bone, below the shoulder bone — very light pressure. 2: middle part of the palm or the sole above the shoulder joint, pressed a little firmly and released at once, so that the shoulder is pulled outward Both sides |
| Duration and repetitions | The two together = (1) Lu + Sh; repeated alternately, as many times as written. Ordinarily (6) Lu + Sh × 3 |
| What it is for | Rousing the lungs; breathing-related problems; opening the muscles of the chest |
Why station one is very light. In the narrow gap between the collar bone and the first rib run the great vessels and nerve trunks on their way to the arm, and the top of the lung rises above the inner third of the collar bone. Flat palm only — and stop instantly for tingling or numbness in the arm.
Stretch (स्ट्रेच)
Its symbol is ← →.
This looks somewhat like the Sulta Ulta treatment; but in this only sulta is done, ulta is not to be done — that is, treatment is given only with the palm facing the sky.
Keeping the hand at 180 degrees, that is, straight out from the shoulder, and giving some pressure, draw the tissue over the forearm from the elbow towards the wrist. Repeat six times.
Then with your sole, giving a little more pressure, drawing the tissue from the wrist to the tips of the fingers, rub six plus six times in the following manner:
First, keeping the heel fixed, give pressure with the ball of the foot and rotate it outward. Do this six times.
Then six times, keeping the big toe fixed, rotate the heel outward.
Those two rotations over the hand are what the point is named for. Pressing on the tips of the fingers, they are pulled outward — and it is because of that that the muscles of the neck relax. An arm's length away from the neck, and the neck is the target.
| Patient's position | Supine; the hand at 180 degrees, straight out from the shoulder; palm facing the sky throughout — no *ulta* Supine |
|---|---|
| Where the feet are placed | Over the forearm, elbow → wrist; then over the hand, wrist → tips of the fingers, with two rotations — pressing on the tips of the fingers, they are pulled outward |
| Duration and repetitions | 6 times elbow to wrist; then 6 + 6 times — six with the heel fixed, rotating the ball of the foot outward, then six with the big toe fixed, rotating the heel outward. Written on a card as (6) ← → × 3 |
| The two sides | It is not necessary to give both sides at the same time. If the left side is given first and the right side afterwards, the result has been found just as good Left Right |
| What it is for | Relaxes the muscles of the neck. Excellent for respiratory diseases and for mild neck pain. It gives tremendous relief in breathing troubles — therefore it is used in asthma, in bronchitis, and in the Oxygen formula |
The row about the two sides is written for the therapist working alone. Somebody tested it and wrote down the result, and the sentence has the shape of a tested thing rather than a rule: the result has been found just as good. Give the left arm, then the right, and nothing has been lost.
Stretch and Sulta Ulta are told apart by two things only: Stretch is palm-up throughout, and it is given at 180°. A therapist who turns the hand over at the end of Stretch has given Sulta Ulta under the wrong name and at the wrong angle. Neither rotation over the hand should be heavy.
B A F A — Both Arms, Both Forearms
Taking full support of the chairs and carrying your body weight on your palms, stand near their shoulder joints, so placed that both your heels are inside the armpit and the weight is directed downward.
On both sides, with the middle part of your soles, the treatment is given by drawing and pressing the muscles below inward. Its stages are as follows.
First, with the palm straight — that is, facing the sky:
From the shoulder joint, walking with short, close steps down to the elbow — but do not place the foot on the elbow joint.
In the same way descend from below the elbow joint to just before the wrist joint, giving pressure.
Below the wrist joint, passing over the palm to the tips of the fingers.
Do at least three such rounds.
After this, with the palm turned over — that is, facing the ground — repeat all of the above in the same way.
| Patient's position | Supine; the therapist taking full support of the chairs, weight on the palms, standing near the shoulder joints with both heels inside the armpit and the weight directed downward Supine |
|---|---|
| Where the feet are placed | Middle part of the soles, in short, close steps: shoulder joint → elbow (not on the elbow joint); below the elbow joint → just before the wrist joint; below the wrist joint → over the palm → tips of the fingers. The muscles below drawn and pressed inward throughout Both sides |
| Duration and repetitions | At least three such rounds with the palm facing the sky, then all of it again with the palm facing the ground × 3 |
| What it is for | Pain, numbness, burning and so on, from the neck to the wrist or the fingers |
The four arm techniques, side by side.
| Point | Arm position | Palm up | Palm down | Territory | Repetitions |
|---|---|---|---|---|---|
| Sulta Ulta | 90° — or 135° if there is chest pain | first | second | Elbow → wrist → fingertips | 6 + 6 each way |
| Stretch | 180° | only | not done | Elbow → wrist, then the hand | 6, then 6 + 6 |
| B A F A | At the side | first | second | The whole limb, the joints stepped over | ≥ 3 rounds each way |
| Pit / Para / Thrd 'P' | At the side | — | Elbow and shoulder places | 4 = 1 |
Folded Legs (फोल्डेड लेग्स)
Both the patient's heels should be close to their buttocks. Tell them to close their thumbs inside their palms, make fists, and place the fists beside the navel in such a way that the closed palm faces downward.
With your palms, holding their legs in the middle and lifting, fold the legs from the knees towards the chest; and after pausing for a few moments, when the patient is breathing out, press the fists downward and inward into the abdomen with their thighs, and lift again after a few moments.
| Patient's position | Supine, heels close to the buttocks; the patient's own fists — thumbs closed inside the palms, the closed palm facing downward — placed beside the navel Supine |
|---|---|
| Where the hands are placed | The therapist's palms holding the legs in the middle, lifting and folding them from the knees towards the chest Both sides |
| Duration and repetitions | Pause a few moments; press when the patient is breathing out; lift again after a few moments |
| What it is for | The fists are pressed downward and inward into the abdomen by the patient's own thighs |
Why the breathing-out matters. A held-in breath makes the belly a braced drum; letting the breath out makes it soft, the muscles quiet and the contents drawn up under the ribs. Pressing at the end of the out-breath is how you get depth without force.
Tennis Elbow (टेनिस एल्बो)
Keep the patient's hand standing with the support of a chair or a wall, so that the elbow is on the ground and the palm is straight upward at 90°. But tell the patient not to grip the chair, because if they do, the arm muscles will stay tight and the full benefit of the treatment will not be obtained.
With the soft inner part of your sole, standing very close to the elbow on the upper arm, give pressure for 90 seconds, or less — until numbness begins to be felt. If a little pain still remains, then give a little pressure once in the middle part of the upper arm. If needed, repeating the above treatment a second time will give considerable benefit the same day.
For those who have pain or numbness near the elbow bone, this is a sure remedy. Give it in whichever hand has the problem.
| Patient's position | Supine; the hand standing with the support of a chair or a wall, elbow on the ground, palm straight upward at 90°, and the patient not gripping the chair Supine |
|---|---|
| Where the feet are placed | The soft inner part of the sole on the upper arm, standing very close to the elbow; if a little pain still remains, once at the middle part of the upper arm |
| Duration and repetitions | 90 seconds, or less — until numbness begins to be felt. May be repeated a second time the same day |
| What it is for | Pain or numbness near the elbow bone; given in whichever hand has the problem |
Why the hand must not grip. A hand gripping a chair rail is contracting the very muscles the treatment is trying to lengthen, all the way up to their anchor at the elbow. The hand stands supported, not held — and check it again before your foot goes down.
Vocal Point (वोकल पॉइंट / वोकल घिसाई)
This is also called Vocal Point or Vocal Ghisāī — vocal rubbing. This treatment is for correcting a bad throat.
Tell the patient to keep the muscles of their throat relaxed; then the treatment will give more benefit.
Make your palms into a cup-like curve and place them on both sides of their throat. Now, gently stroking the muscles below, rub from the middle outwards and backwards, so that the muscles relax. Do this at least two times.
This treatment is usually given with the patient lying down. It can also be given seated. If so, it is necessary that there be the support of a wall, or of some solid surface, behind their head.
| Patient's position | Usually lying down, the muscles of the throat relaxed; may also be given seated, with the support of a wall or some solid surface behind the head Supine Seated |
|---|---|
| Where the hands are placed | Both palms made into a cup-like curve on both sides of the throat, gently stroking the muscles below, from the middle outwards and backwards Both sides |
| Duration and repetitions | At least two times; gentle stroking only |
| What it is for | Correcting a bad throat |
And the seated version's one condition. A patient sitting upright while receiving an unfamiliar sensation at the throat may feel faint; a head with something solid behind it cannot go anywhere. Supine, the same person cannot fall at all — which is why lying down is the usual way.
Questions students ask
- 1. I am nineteen and have just finished The Front of the Body I. What in this article will I actually use in my first year? Lymph, the chest group, Thrd, Lu + Sh and the toe work. Learn the chest group first, because it is the family in which the technique itself is new — a rub is not a press, and the hand that has spent a month pressing will want to press. (Figure 17.7)
- 2. The card says (4) Pit. Is that four presses or sixteen? Sixteen. Pit is counted four equals one, so one written unit is elbow, shoulder, elbow, shoulder — four six-second applications — and four units is four times that. The same arithmetic governs Para and Thrd 'P'.
- 3. How can I tell Thrd from Thrd 'P' on a card written in a hurry? By saying it aloud in full before you move. Thrd 'P' is written with the 'P' and with its six seconds and is given on the left arm with the foot. Thrd is given at the throat with both palms.
4. I am a physician. What is actually being claimed when the entry says Armpit increases the body's immunity? Two things that belong in separate pockets. The observation — that a boil on a finger produces tender glands in that armpit, relieved by working it — is straightforward regional anatomy. The claim about immunity is a proposal about what rousing lymph drainage does more broadly, and should be stated as one.
5. (6) Thymus Only — why can I not simply give eighteen and eighteen and save time? Because more than twelve on one side at one time can cause vomiting in some people, and the reason given is that one side of a gland has been roused much more than the other before the other was touched. Twelve, twelve, six, six — and no rest between the runs, because the break is there to keep the two sides level, not to space the treatment out.
- 6. Why is Dys printed in The Front of the Body I as "used next to never" while Loveleen is printed with a rule forbidding it in two whole classes of patient? Should I just avoid both? No — and the difference is worth understanding. Dys is recorded as rarely indicated; Loveleen is positively withheld in kidney and heart patients and freely given otherwise.
- 7. I am a village therapist and work alone. Which of these can I give with the hand instead of the foot? Any of them, where the patient is a child, frail, thin-boned or elderly — and Lymph and the shoulder contacts in particular. The hand is the correct tool there, not a second-best one. See also → The Child, the Elder and the Frail, "The Child, the Elder and the Frail".
- 8. My senior gave Ch. Only on the right side alone and I was taught left side first. Which of us is wrong? Neither, if his card said Rt. Ch. Only. A card that names a side wants that side alone — Rt. Ch. Only for the pain of Liv°, Lt. Ch. Only for the pain of Mu°. A card that says Ch.
Questions patients ask
- 1. "Why are you standing over my head with your feet by my neck? It frightens me." It is a fair thing to say and I am glad you said it. My feet rest beside your neck and put no weight on it at all — they are simply on their way to your arms, which is where the treatment is given. My whole weight is on my hands, on these two chairs.
- 2. "My problem is in my stomach. Why are you rubbing my toes?" Because in this therapy each toe is joined to a particular place at the navel, and the toe will tell us both whether we are getting anywhere. You will feel one of them as tender today.
- 3. "Last time I was sick after the chest treatment. Have you made me worse?" No — and I am sorry it happened. There is a limit on how many strokes may be given on one side at a time, and it exists because going past it makes some people feel sick. It passes in a few minutes and leaves nothing behind.
- 4. "My chest hurts. My brother-in-law says it is only gas." It may well be. But chest pain is the one thing I will not take a guess at, and neither should your brother-in-law. If it comes with breathlessness, sweating, sickness, or pain running into your jaw or arm, that is today's business and not mine.
- 5. "You have written my point with two dots round it. Is something wrong with me?" Nothing is wrong; something is being remembered. One treatment in the wiki is not given to people with your kidney condition, and I have written it that way so that anyone who takes this card after me can see at a glance that it was considered and refused.
Words used here
| Hindi | English | Neurotherapy code / usage |
|---|---|---|
| नाभि (nābhi) | Navel | The centre of the diagnostic map; nābhi set = setting the navel — ONS, NNS, CNNS |
| पुराना · नया (purānā · nayā) | Old · new | ONS = Old Nabhi Set; NNS = New Nabhi Set; the words record which arrived first |
| घिसाई (ghisāī) | Rubbing | The second family of technique: a stroke with a direction, not a press with a count of seconds |
| छाती (chhātī) | Chest | The chest group — Th. Only, Ch. Only, Armpit, Th + Ch; no pillow for any of them |
| थैमस | Thymus | Th. Only — no pressure at all; withheld in inflammation and auto-immune disease |
| थाइरॉइड | Thyroid | Thrd — at the throat, with the palms. Not Thrd 'P', which is the left arm |
| गले की घंटी | Adam's apple — the prominence of the throat | The forbidden landmark of Vocal Point, and of the neck on either side of it |
| सुलटा · उल्टा | Palm up · palm down | Sulta Ulta — sulta first, ulta after; 90°, or 135° where there is chest pain |
| — | 4 = 1 · 3 = 1 · 2 = 1 | The multiplying counts: Pit/Para/Thrd 'P'; Th. Only/Ch. Only; Armpit |
| — | . Loveleen . | A point written between two dots — recorded as withheld, so that it stays withheld |