Knee, Leg, Foot finished the body. Head, neck, chest, belly, spine, low back, hip, knee, calf, foot, big toe — the atlas walked all the way down a human being and came out at the toes. This article is what would not go into that order.
These are the treatments found one at a time, for one trouble each, and then kept because they worked: a point for an arm that will not lift after a blow, a point for a scrotal swelling that is felt in the calf, a point for a womb that has descended, a rule for treating the limb you cannot touch by treating the one diagonally across from it. They were never arranged by region because they were never discovered by region. They are arranged by problem, and the only way to learn them is one by one.
Three of them carry more force than anything else in this wiki and are hedged about with the sternest cautions the therapy writes. One of them — the last — uses no force at all, and is the only treatment in the atlas that can be given to a patient who cannot be given any of the others.
Watch


How this article is arranged, and how to stand
No region to carry the position — every entry names its own
There is no regional order here, so the two things that were carried by the region in earlier articles — the patient's position and where the therapist stands — are carried by each entry instead. Read them off the entry, every time. Nothing in this article may be given in the position you used for the last thing you gave.
| Where the therapist is | Named in |
|---|---|
| Sitting at the patient's head | Down arrow Supine Seated |
| Sitting at the patient's waist | Up arrow Supine |
| Beside the patient, hands only, no chairs | Lower shoulder blade pain Prone · Paralysis clockwise · Shukla · Feather touch · Ton 'P' and Ton 'T' · Ankle point · Abdomen setting Supine |
| Beside the patient, weight on the palms through the chairs | Upper shoulder blade pain Prone · Hydrocele point · Prolapse point · Superfast · Katka Prone · Motor neuron point Prone |
| Standing over the waist, a chair on each side | Gal–Spl ghisai Supine |
| Standing between the patient's legs | Vasanti Supine |
| Seated or lying, either allowed | Rocket point Seated Supine |
The chairs are the load control, not the furniture. Wherever a foot is used, the therapist's weight hangs from his arms and only as much of it comes down as he lets down. In two of the treatments in this article that is not a convenience but the entire safety of the technique.
And everything given face down is given under the arrangement taught at the head of Face Down — 1½ pillows under the chest, compulsory, half the lower pillow projecting, chest on the upper, chin on the lower, head straight. Two treatments in this article replace that arrangement with one of their own, and they say so in their own entries; nothing else here does.
The two shoulder-blade pains
Palms up with the palms; palms down, arms raised, with the feet
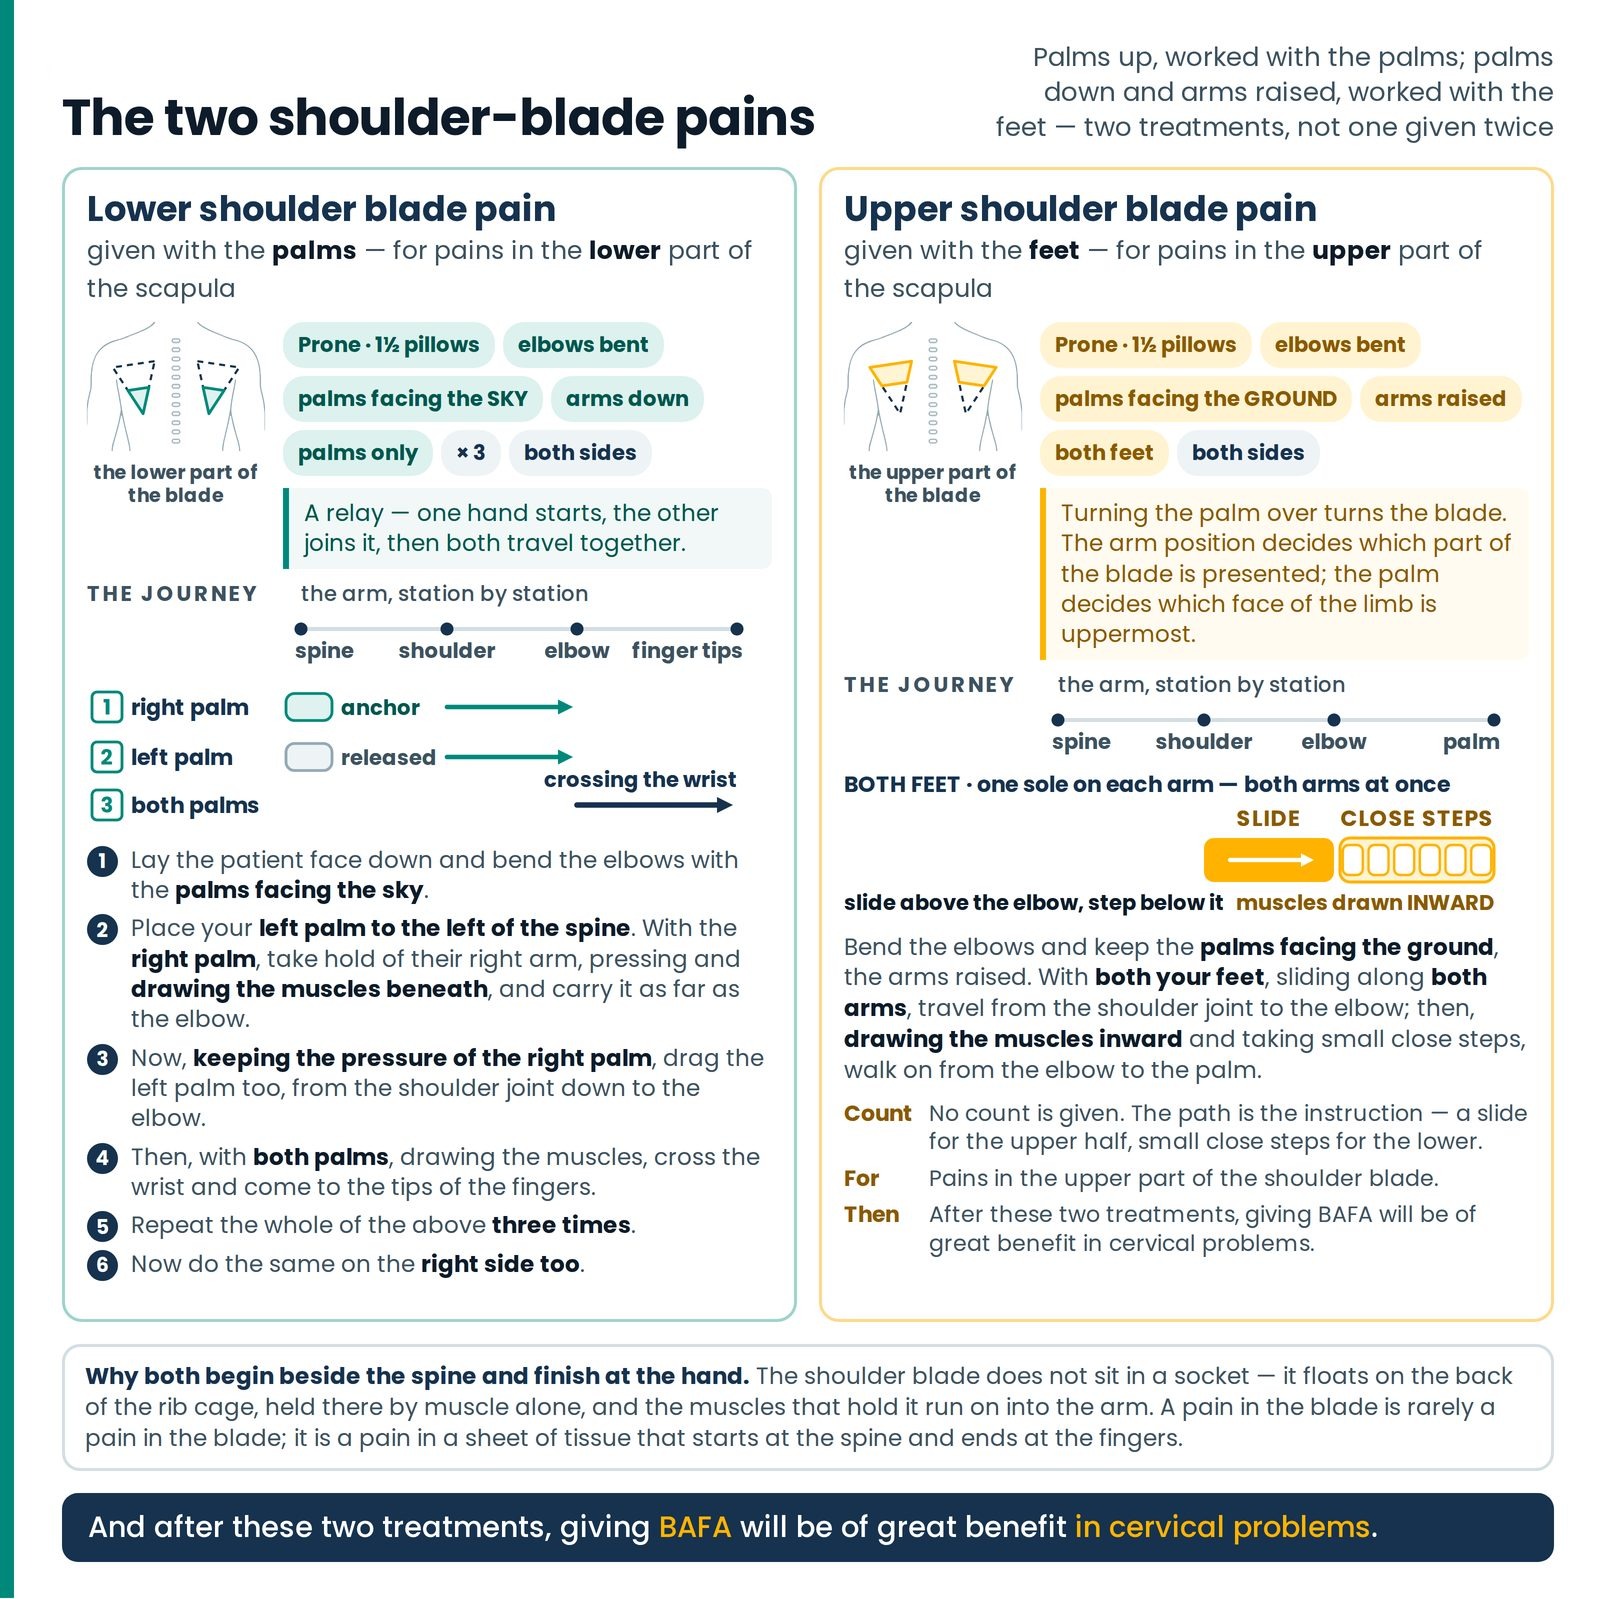
The shoulder blade is a flat triangle of bone that does not sit in a socket. It floats on the back of the rib cage, held there by muscle alone, and the muscles that hold it run on into the arm. So a pain in the blade is rarely a pain in the blade; it is a pain in a sheet of tissue that starts at the spine and ends at the fingers.
That is why both of these treatments begin beside the spine and finish at the hand — and why they are told apart by which part of the blade hurts, and by what the arm is doing while you work. (Figure 24.1)
The two entries, and what separates them
Lower shoulder blade pain is given, as the arrows show, to put right pains in the lower part of the scapula, that is, the shoulder blade — and that is exactly why it has been named lower shoulder blade.
Upper shoulder blade pain is given to put right pains in the upper part of the scapula — and that is exactly why it has been named upper shoulder blade.
Lower is given with the palms, the elbows bent and the palms facing the sky, the arms down. Upper is given with the feet, the elbows bent and the palms facing the ground, the arms raised.
And after these two treatments, giving BAFA will be of great benefit in cervical problems.
LOWER SHOULDER BLADE PAIN — given with the palms
The six steps are a relay: one hand starts, the other joins it, then both travel together. A table cannot show a relay, so this one is set out in order.
| Summary card | Prone, 1½ pillows under the chest, elbows bent, palms facing the sky. Palms only. The whole sequence three times, then the same on the right side too. For pains in the lower part of the shoulder blade Prone × 3 Both sides |
|---|
Read step 2 slowly, because the two hands are doing two different jobs. The left palm is an anchor, set down flat beside the spine and not yet moving. The right palm is the traveller, taking hold of the arm, pressing, and — the phrase that matters — drawing the muscles beneath as it goes, not sliding over the skin. It travels as far as the elbow and stops there.
Step 3 releases the anchor without releasing the pressure. Keeping the pressure of the right palm — the travelling hand stays loaded where it is — the left palm is now dragged from the shoulder joint down to the elbow, so that both hands finish at the same place. Only then, in step 4, do both palms move off together, crossing the wrist and running out to the tips of the fingers.
Step 5 is the count and there is only one. Repeat the whole of the above three times. Not three strokes of each stage — three complete runs, spine to fingertips, before you change anything. And step 6 is written as a separate numbered instruction, exactly as Back of knees closes in Knee, Leg, Foot: now do the same on the right side too. The entry is written out on one side and then sends you across.
UPPER SHOULDER BLADE PAIN — given with the feet
As in the figure, bend the elbows and keep the palms facing the ground. With both your feet, sliding along both arms, travel from the shoulder joint to the elbow; then, drawing the muscles inward and taking small close steps, walk on from the elbow to the palm.
After these two treatments, giving BAFA will be of great benefit in cervical problems.
| Patient's position | Laid face down, 1½ pillows under the chest, the arms raised as in the figure, the elbows bent and the palms facing the ground Prone Both sides |
|---|---|
| Where the feet are placed | Both feet, sliding along both arms — both arms worked at once — from the shoulder joint to the elbow; then, drawing the muscles inward and taking small close steps, from the elbow to the palm |
| Duration and repetitions | No count is given. The path is the instruction: a slide for the upper half, small close steps for the lower |
| What it is for | Pains in the upper part of the shoulder blade |
| What follows it | After these two treatments, giving BAFA will be of great benefit in cervical problems |
Two different actions in one journey, and students run them together. From shoulder joint to elbow the feet slide — one continuous travelling contact. From elbow to palm they step, closely, and the pressure changes direction: the muscles are drawn inward at each step. Slide above the elbow, step below it.
"With both your feet, sliding along both arms" means both arms at once — one of your soles on each of the patient's arms, the pair of you working as a bridge. That is what the raised, elbow-bent, palms-down position is for: it puts both arms up where two soles can reach them together.
And the closing sentence belongs to both treatments, not only this one. After these two treatments, giving BAFA will be of great benefit in cervical problems. It is a sequencing instruction: lower blade, upper blade, then BAFA — and the condition under which it is written is cervical problems, not shoulder-blade pain in general.
DOWN ARROW and UP ARROW — one stroke, run two ways
Opposite ends, opposite directions, and two opposite ears
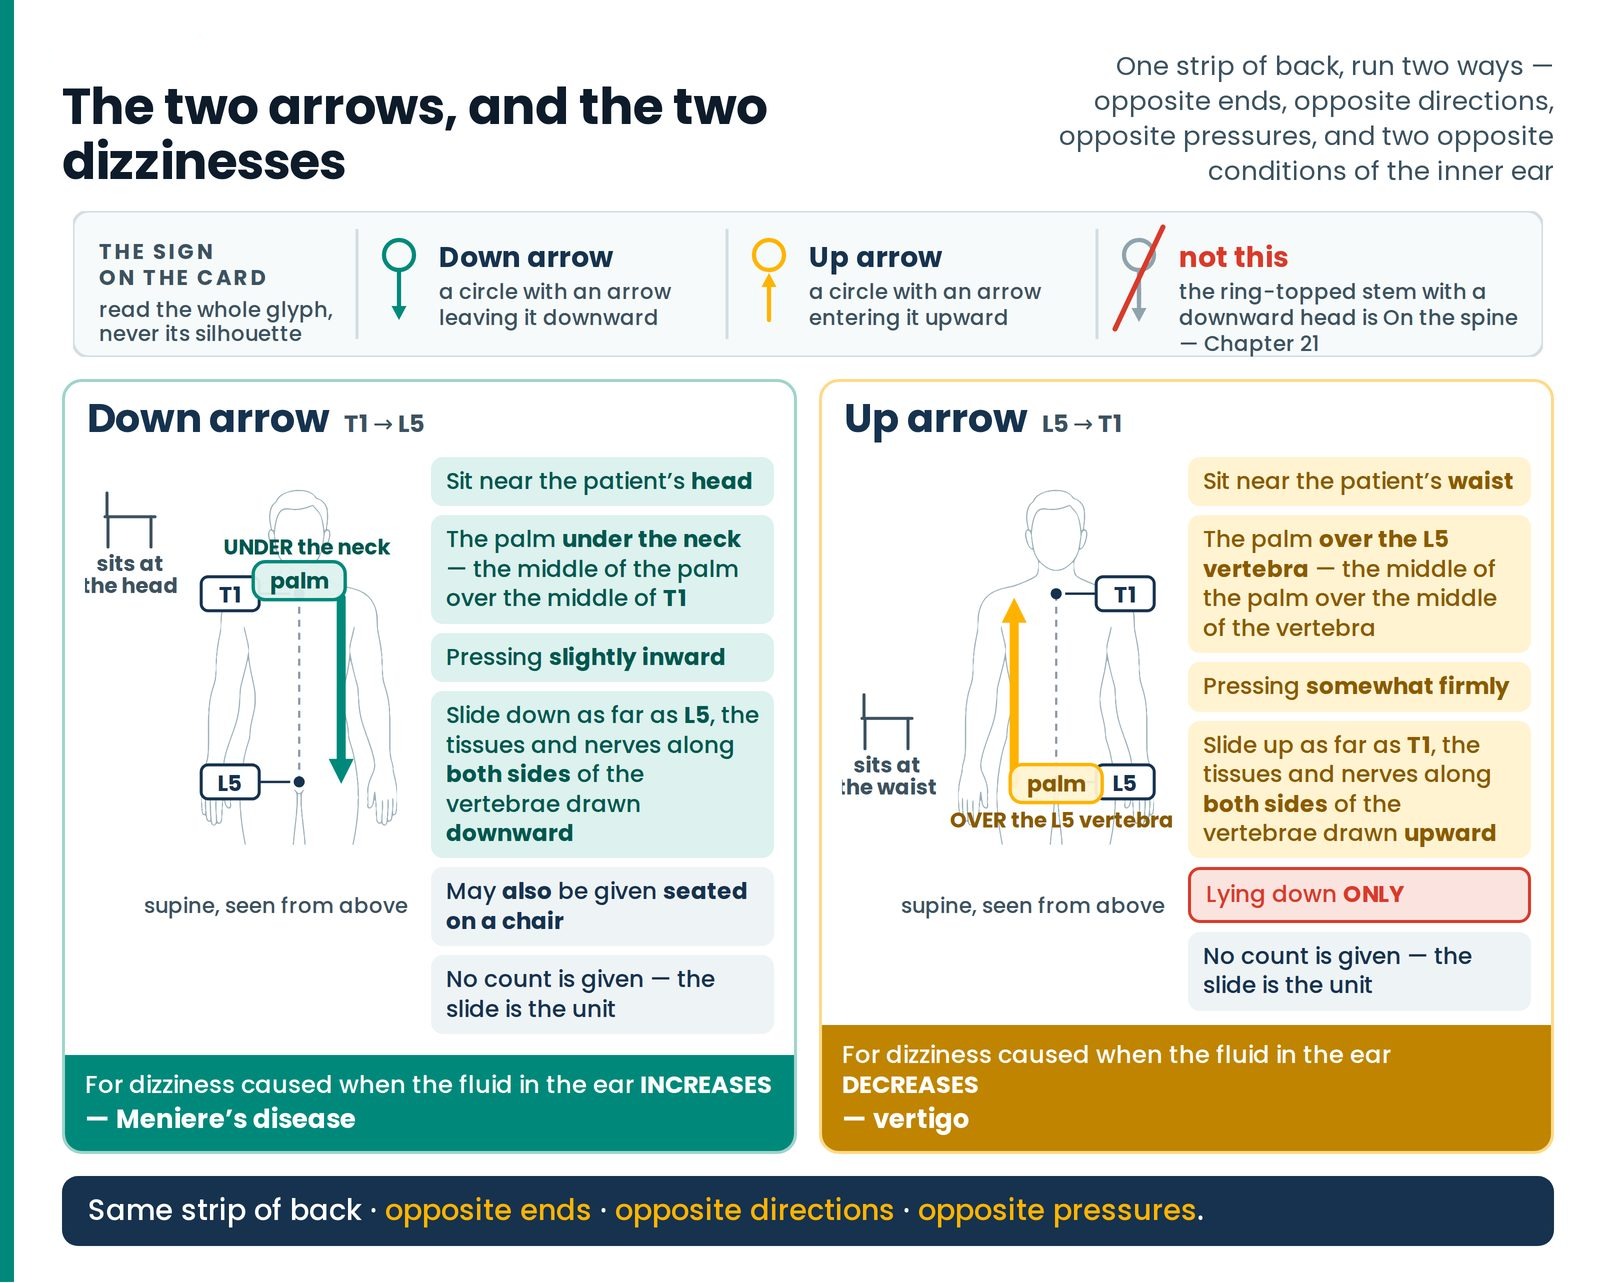
Here is a pair that looks like one treatment written twice and is nothing of the sort. Everything about them differs except the strip of tissue they travel over — where the therapist sits, which end the palm starts at, which way it runs, how hard it presses, which positions are allowed, and which of two quite different dizzinesses it is for. (Figure 24.2)
Face Down taught the arrow family of the prone back — Back arrow, H arrow, On the spine, Beside the spine, Round arrow, 3 arrows — and when it came to the bare ring-and-stem glyph it stopped and said: a different point, and not in this article. This is that point, and its partner.
Down arrow
Sit near the patient's head.
As in the figure, place your palm under their neck so that the middle of the palm lies over the middle of their T1 vertebra. Then, pressing slightly inward, slide down as far as the L5 vertebra, in such a way that the tissues, nerves and so on along both sides of the vertebrae are drawn downward.
This treatment may also be given with the patient seated on a chair.
Its sign is a small circle with an arrow leaving it downward.
If the fluid in the ear increases, that too causes dizziness, which is called Meniere's disease; this is useful for putting that right.
Up arrow
This treatment must be given with the patient lying down. Sit near the patient's waist.
As in the figure, place your palm over their L5 vertebra so that the middle of the palm lies over the middle of the vertebra. Then, pressing somewhat firmly, slide up along the spine from L5 as far as T1, in such a way that the tissues, nerves and so on along both sides of the vertebrae are drawn upward.
Its sign is a small circle with an arrow entering it upward.
If the fluid in the ear decreases, that causes dizziness, which is called vertigo; this treatment is useful for putting that right.
| Down arrow | Up arrow | |
|---|---|---|
| The therapist sits | Near the patient's head | Near the patient's waist |
| Where the palm is placed | Under the neck, the middle of the palm over the middle of T1 | Over the L5 vertebra, the middle of the palm over the middle of the vertebra |
| Direction of the slide | T1 → L5 | L5 → T1 |
| Pressure | Slightly inward | Somewhat firmly |
| What is carried, and where | The tissues, nerves and so on along both sides of the vertebrae, downward | The tissues, nerves and so on along both sides of the vertebrae, upward |
| Patient's position | Lying — and it may also be given with the patient seated on a chair Supine Seated | Lying down only Supine |
| Duration and repetitions | No count is given; the slide is the unit | |
| What it is for | Dizziness caused when the fluid in the ear increases — Meniere's disease | Dizziness caused when the fluid in the ear decreases — vertigo |
| Sign | ○ with an arrow leaving it downward | ○ with an arrow entering it upward |
Four of those rows are the treatment, and three of them are easy to lose. The therapist moves between the two — head for one, waist for the other — because a palm cannot deliver a long even stroke running away from a body it is sitting behind. The pressure differs: slightly inward going down, somewhat firmly going up. And Down arrow alone may be given on a chair; Up arrow carries the word must — this treatment must be given with the patient lying down — which is not a preference and not a note about comfort.
HYDROCELE POINT — a scrotal complaint found in the calf
The heel from the side, four to five inches above the ankle
This treatment is for those who have swelling or itching in the scrotum.
In such persons there will be a great deal of pain in the calf muscle, four to five inches above the ankle joint. Press and release at that point with your heel, from the side. Do this two to four times, and they will get much relief from the pain.
According to the pain, it may be done on one leg or on both, together or separately.
| Patient's position | Lying, the leg reachable from the side Supine |
|---|---|
| Where the foot is placed | The therapist's heel, applied from the side, on the painful point in the calf muscle, four to five inches above the ankle joint |
| Duration and repetitions | Press and release, two to four times. According to the pain — on one leg or on both, together or separately Left Right Both sides |
| What it is for | Those who have swelling or itching in the scrotum; and the patient gets much relief from the pain in the calf |
| Sign | A small figure with a mark on each calf |
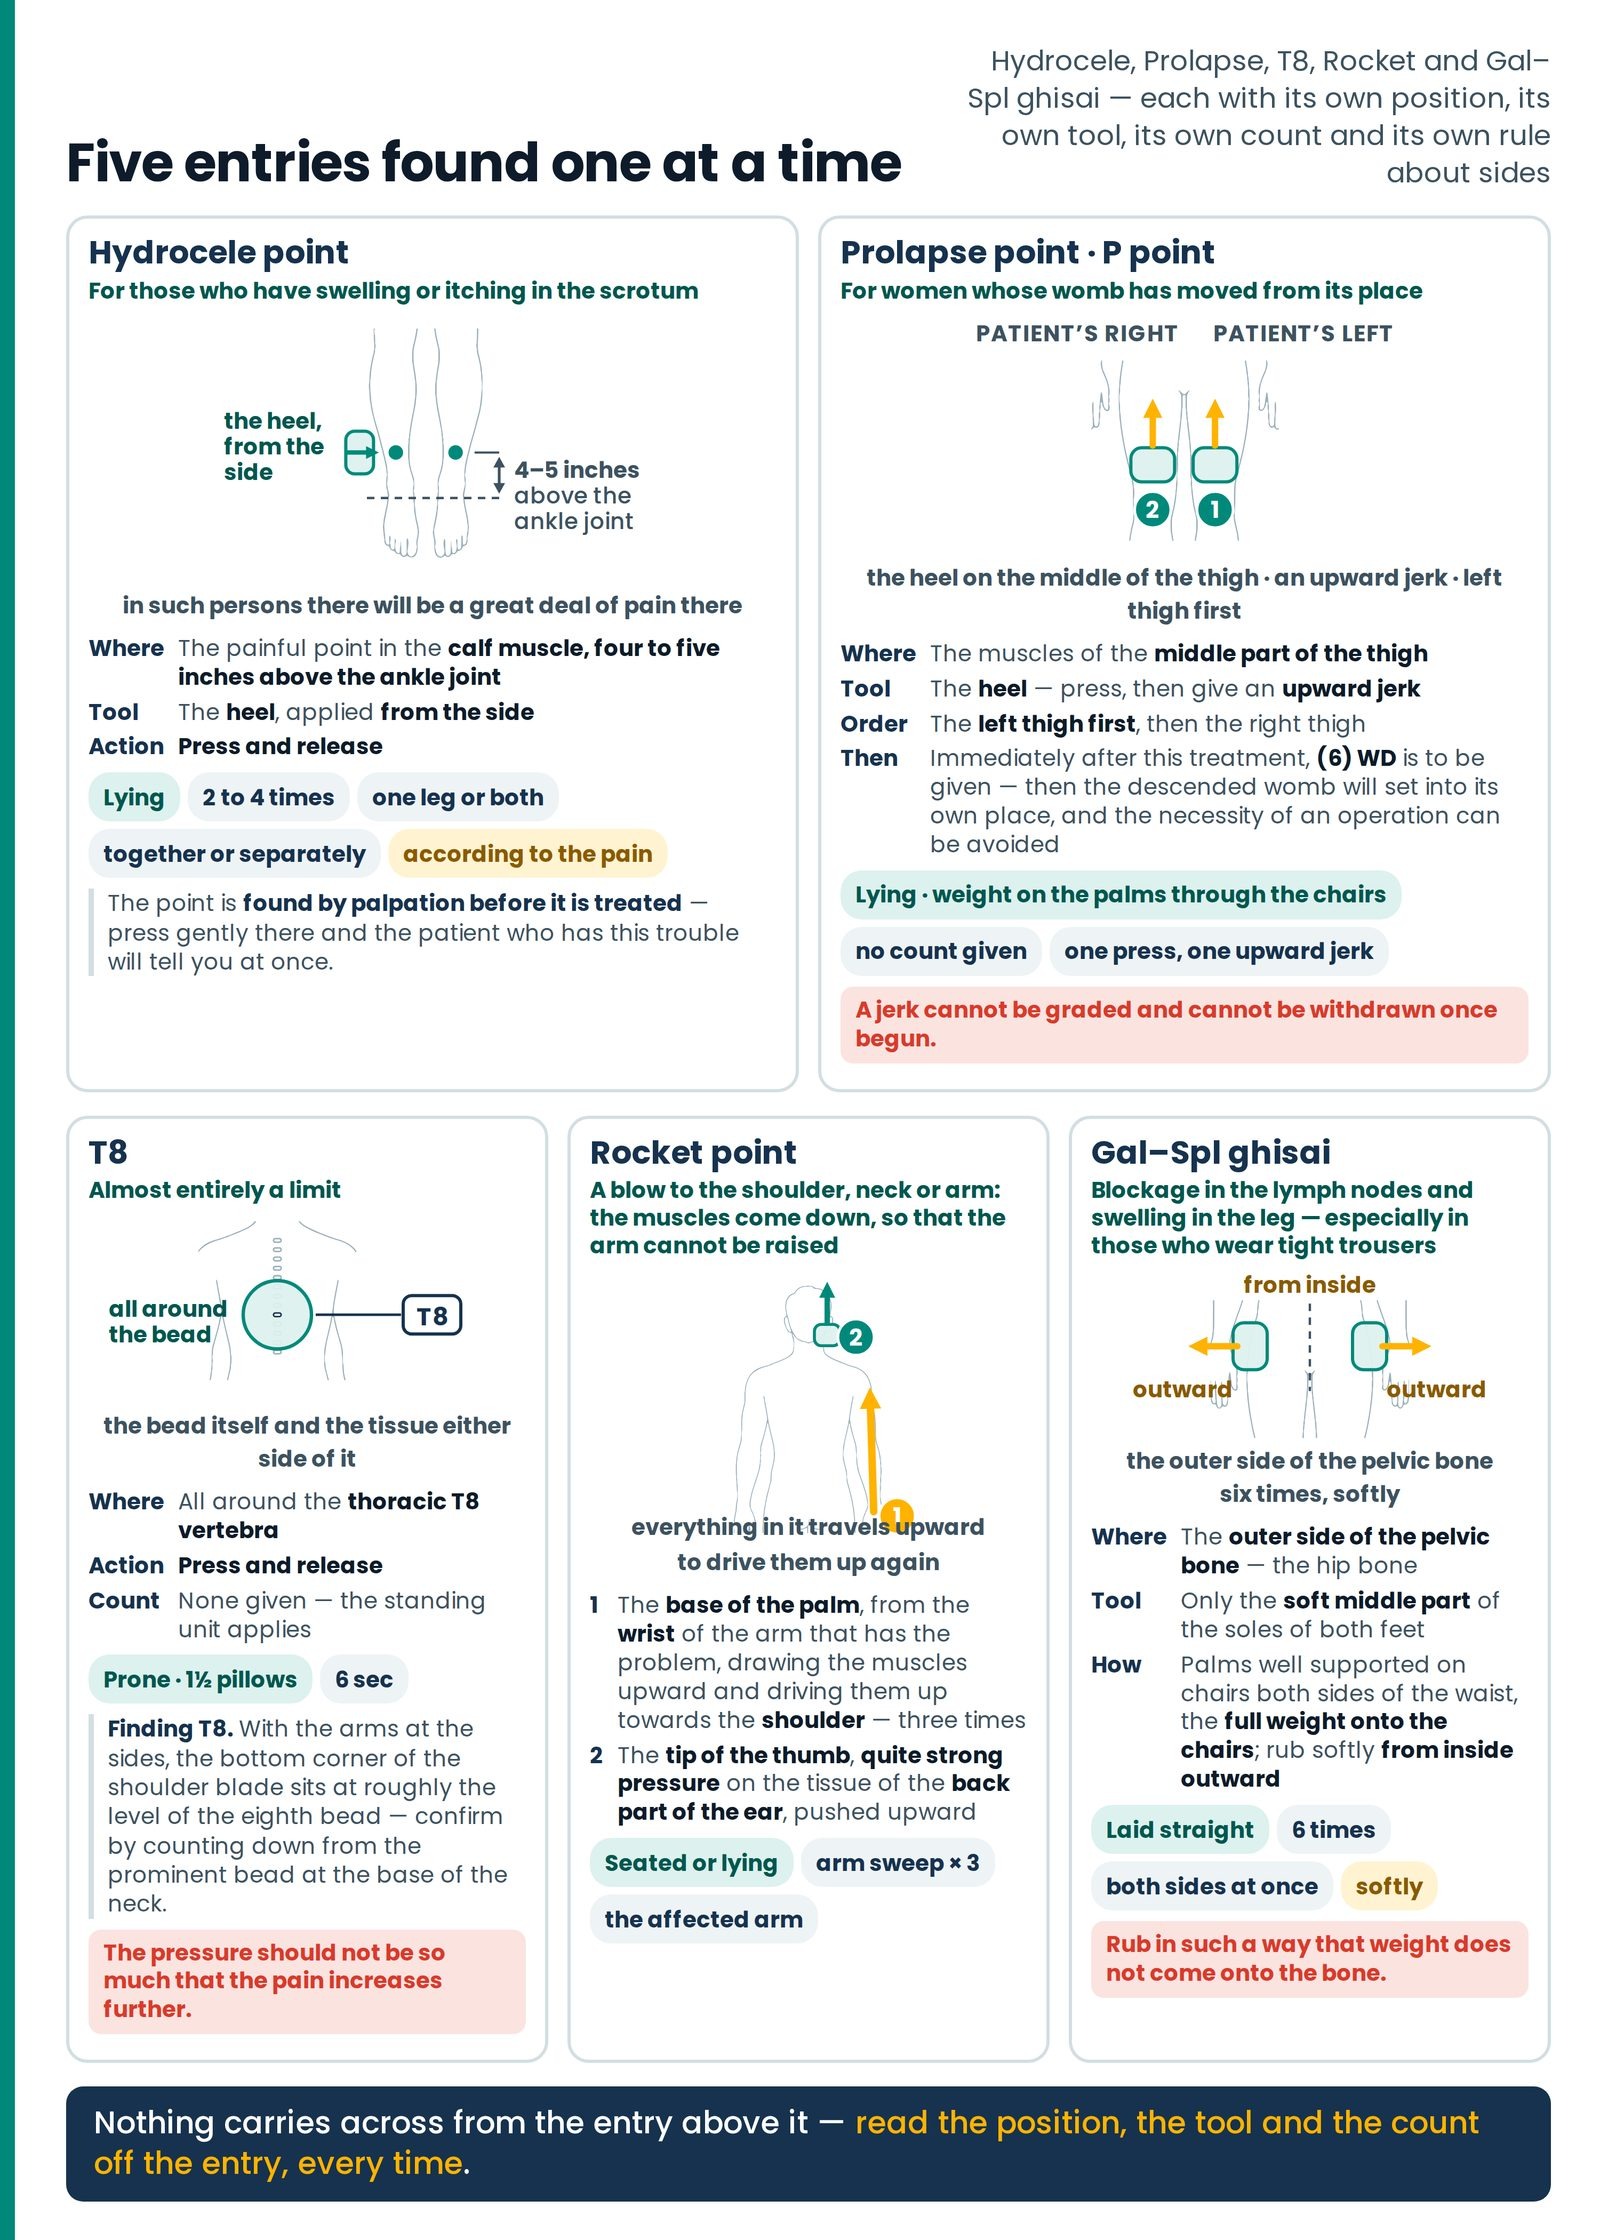
The tenderness is a finding, not a coincidence. The entry does not say press the calf and see; it says that in such persons there will be a great deal of pain at that place. So the point is found by palpation before it is treated — four to five inches above the ankle joint, roughly a hand's breadth up from the bony knob on the inside of the ankle, where the big soft calf muscle narrows into the tendon. Press gently there and the patient who has this trouble will tell you at once. (Figure 24.3)
Three details carry the treatment. The tool is the heel, and it comes in from the side — not down from above onto the back of the calf, which is a different contact on a different tissue. The action is press and release, the short loaded press that lifts off. And the count is two to four times — a very small number, which tells you how sharp the point is under a heel.
And "according to the pain" decides the sides. One leg or both; together or separately. The finding chooses, not the habit.
PROLAPSE POINT — also written P point
Left thigh first, an upward jerk — and (6) WD immediately after
It is also written as P point.
This is useful for those women whose womb has moved from its place.
Press the muscles of the middle part of the thigh with the heel and give an upward jerk.
Do the left thigh first, then the right thigh.
Bear in mind that immediately after this treatment, (6) WD is to be given — then the descended womb will set into its own place, and the necessity of an operation can be avoided.
| Patient's position | Lying; both thighs reachable, the therapist's weight carried on the palms through the chairs Supine |
|---|---|
| Where the foot is placed | The heel on the muscles of the middle part of the thigh — pressing, and then giving an upward jerk |
| Order of the sides | The left thigh first, then the right thigh Left Right |
| Duration and repetitions | No count is given. The action is one press and one upward jerk |
| What must follow it | Immediately after this treatment, (6) WD is to be given 6 sec |
| What it is for | Women whose womb has moved from its place — with the (6) WD following, the descended womb will set into its own place, and the necessity of an operation can be avoided |
| Sign | A figure with two arrows converging downward onto the thighs |
This is a two-part instruction and the second half is not optional. Bear in mind that immediately after this treatment, (6) WD is to be given. P point alone is half a treatment. WD — the womb displacement point — is taught in full in the supine atlas, with its bracketed count of six; it is not restated here. Immediately means in the same breath, not later in the session.
The jerk is upward and the order is fixed. Left thigh first, then the right thigh — written out, like Pradeep's left knee first in Knee, Leg, Foot, and not to be swapped because the right thigh happens to be nearer you.
T8 — a point that is almost entirely a limit
Press and release, and never enough to increase the pain
Press and release the region all around the thoracic T8 vertebra — but the pressure should not be so much that the pain increases further.
| Patient's position | Prone — the standing arrangement applies, 1½ pillows under the chest Prone |
|---|---|
| Where the hands are placed | All around the thoracic T8 vertebra — the bead itself and the tissue on either side of it |
| Duration and repetitions | Press and release. No count is given, so the therapy's standing unit applies — six seconds to the application 6 sec |
| The condition on the force | The pressure should not be so much that the pain increases further ▲ Take care |
This is the shortest entry in the atlas and half of it is a restraint. That is the teaching. Most points tell you what to do and then what it is for; this one tells you what to do, and then sets a ceiling on how hard you may do it, and stops.
Finding T8. Count is slow and honest work. With the arms resting at the sides, the bottom corner of the shoulder blade sits at roughly the level of the eighth thoracic bead — a useful first landmark, to be confirmed by counting from the big prominent bead at the base of the neck downward.
ROCKET POINT — driving the muscles back up
Everything in it travels upward — the arm three times, then the ear
When some blow has been taken on the shoulder, neck or arm, the muscles come down, so that they cannot raise the arm; to drive them up again, this is given.
With the base of your palm, from the wrist of the arm that has the problem, draw the muscles upward and drive them up towards the shoulder. Do this three times.
Then with the tip of the thumb, giving quite strong pressure to the tissue of the back part of the ear, push it upward.
The patient may be given it either seated or lying down.
| Patient's position | Either seated or lying down — both are given, neither preferred Seated Supine |
|---|---|
| Where the hands are placed | 1 — the base of the palm, starting at the wrist of the arm that has the problem, drawing the muscles upward and driving them up towards the shoulder. 2 — the tip of the thumb, on the tissue of the back part of the ear, pushing it upward |
| Pressure | The arm sweep, drawing the muscles as it travels. At the ear, quite strong pressure |
| Duration and repetitions | The arm sweep three times. The ear component is given once, and is not counted × 3 |
| Which side | The arm that has the problem |
| What it is for | When some blow has been taken on the shoulder, neck or arm, the muscles come down, so that they cannot raise the arm — this drives them up again |
Now the name. Everything in this point travels in one direction: up. The palm goes up the arm; the thumb goes up behind the ear; the whole idea named in the first sentence is that something has come down and must be driven up again. The atlas has techniques named for a sound, for a place and for a person. This one is named for a direction of travel — and a rocket is a thing that is entirely about going up. Once you have seen that, the name tells you the treatment.
The tool in stage 1 is the base of the palm — the firm heel of the hand at the wrist, not the fingers and not the flat of the palm — and it starts at the patient's wrist, the far end, and travels to the shoulder. Three times. Stage 2 is a separate action with a separate tool at a completely different place: the tip of the thumb, behind the ear, on the tissue there, pushed upward, with quite strong pressure. It is the only place in this article where those words appear, and they appear about a thumb rather than a foot. Behind the ear you are on the hard knob of bone below and behind the ear lobe — firm bone under the thumb, and the front of the throat nowhere near it.
GAL–SPL GHISAI — the pelvic rim, softly, six times
Soft mid-soles, inside outward, and no weight onto the bone
Lay the patient straight. On both sides of the waist, support your palms well on chairs. Then, putting the full weight onto the chairs, at one and the same time rub softly from inside outward on the outer side of the patient's pelvic bone — the hip bone — 6 times.
Bear in mind that only the soft middle part of the soles of both your feet is to be used, and rub in such a way that weight does not come onto the bone.
This corrects blockage in the lymph nodes and reduces swelling in the leg. Especially for those who wear tight trousers, if they have this kind of trouble, this treatment is very beneficial.
| Patient's position | Laid straight Supine |
|---|---|
| The therapist | Standing, palms well supported on chairs on both sides of the waist, the full weight put onto the chairs |
| Where the feet are placed | Only the soft middle part of the soles of both feet, on the outer side of the pelvic bone — the hip bone — both sides at one and the same time Both sides |
| Direction | From inside outward |
| Duration and repetitions | 6 times, softly, rubbing in such a way that weight does not come onto the bone ▲ Take care |
| What it is for | Correcting blockage in the lymph nodes and reducing swelling in the leg. Especially for those who wear tight trousers, if they have this kind of trouble |
The name records the method's parents. GAL and SPL are the gall bladder and spleen codes of the supine atlas; ghisai is the therapy's own word for a rubbing, sliding application rather than a still press. This entry is that pair of actions performed at the rim of the pelvis.
Three instructions here are all about keeping force off a bone. Putting the full weight onto the chairs — more of the therapist's weight goes into his arms in this treatment than in almost any other. Only the soft middle part of the soles — the softest tool there is, on both feet. And rub in such a way that weight does not come onto the bone — the hip bone's front rim lies just under the skin and is sharp to a sole. The stroke crosses it; the weight does not rest on it.
And the direction is written: from inside outward, both sides at once, six times. Not up, not down, not round — outward from the midline, the same idea as the widening actions of The Low Back and Knee, Leg, Foot, arriving here at a new border.
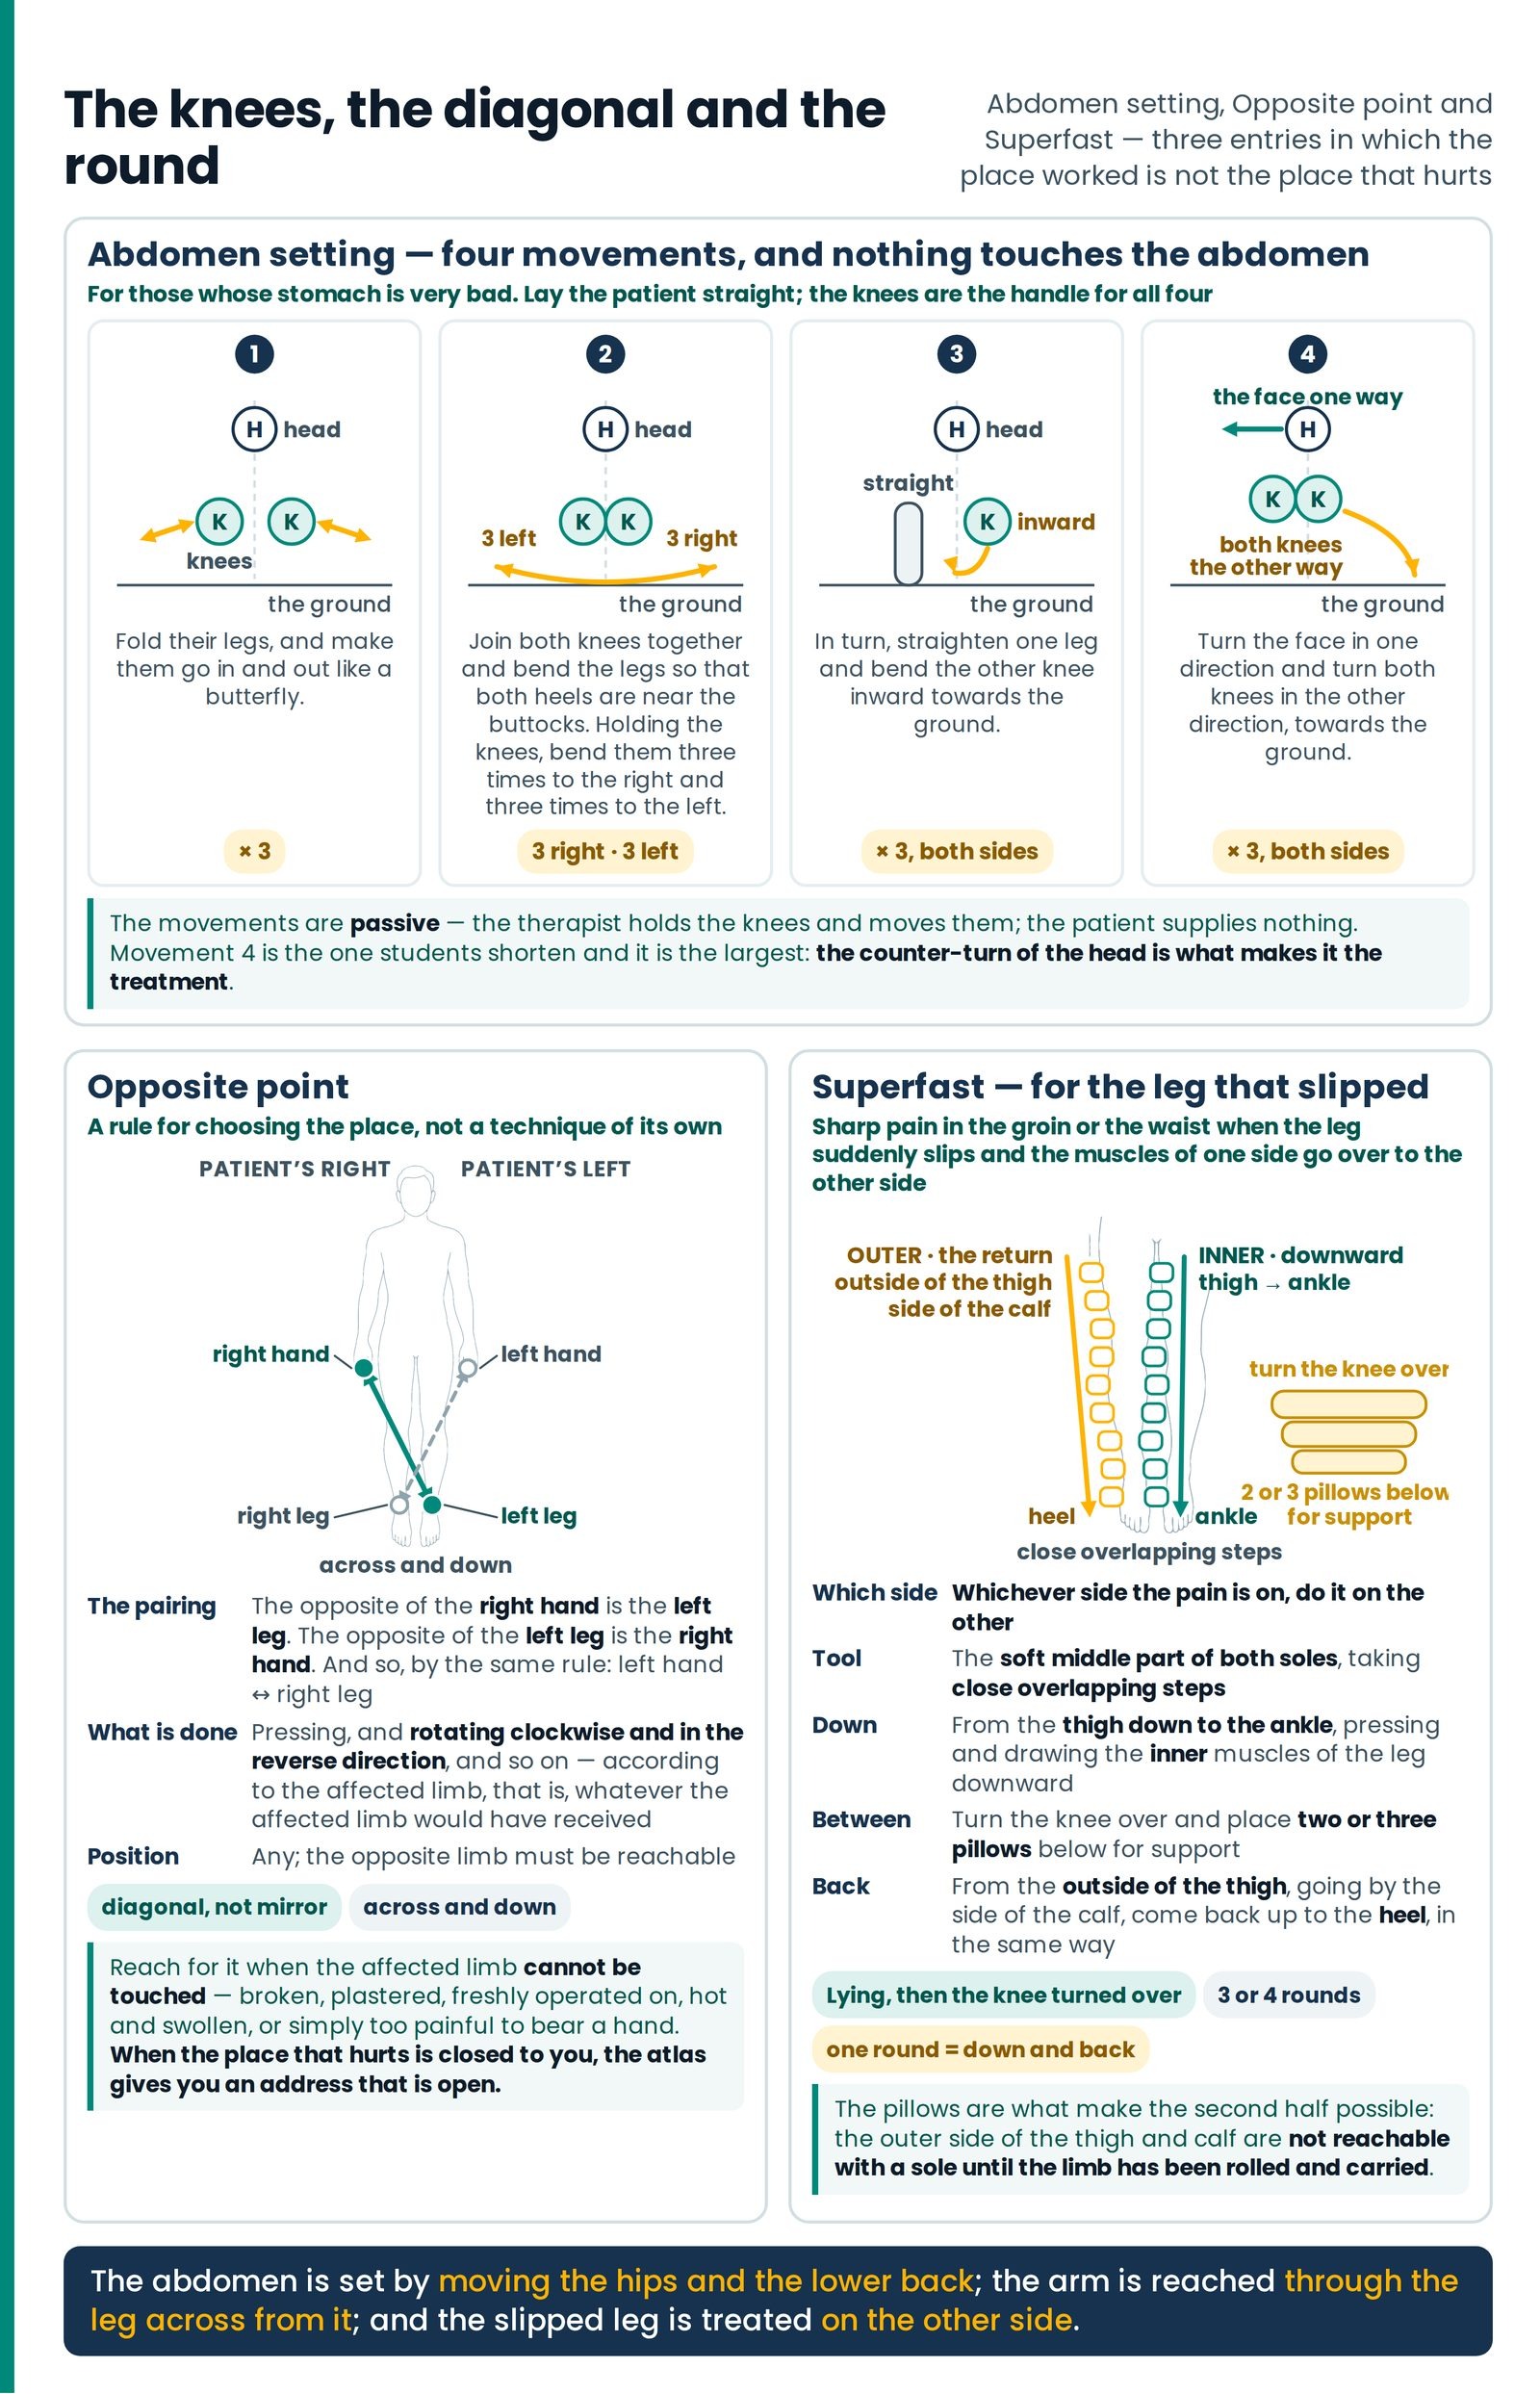
ABDOMEN SETTING — four movements, and nothing touches the abdomen
The knees are the handle, and every count is three
For those whose stomach is very bad, this is one more excellent treatment for setting the abdomen.
Read that sentence and then read the method, and notice what is missing: no hand goes near the belly at all. Every one of the four movements is done by holding the knees. The abdomen is set by moving the hips and the lower back through directions they have stopped going in. (Figure 24.4)
| Summary card | Laid straight throughout; the hands on the knees for every movement. Butterfly ×3 · knees joined, heels at the buttocks, three to the right and three to the left · one leg straight, the other knee inward to the ground, three on both sides · face one way, both knees the other way towards the ground, three on both sides. For those whose stomach is very bad Supine Both sides × 3 |
|---|
Every count in this treatment is three, and every movement but the first is done to both sides. Movement 4 is the one students shorten, and it is the largest: the face turns one way and both knees turn the other. Turning only the knees is a different, smaller movement. The counter-turn of the head is what makes it the treatment.
And the movements are passive. The therapist holds the knees and moves them; the patient supplies nothing. A patient who "helps" has tightened the very muscles the movement is meant to lengthen. Tell her, once: let your legs be heavy and let me do the work.
OPPOSITE POINT — the mirror across the body
Diagonal, not mirror — the address that stays open
According to the affected limb, pressing the opposite hand and foot, rotating clockwise and in the reverse direction, and so on. — The opposite of the right hand — that is, the reverse side — is the left leg; and the opposite of the left leg is the right hand: treatment is to be given there.
| What it is | A rule for choosing the place, not a technique of its own |
|---|---|
| The pairing | The opposite of the right hand is the left leg. The opposite of the left leg is the right hand. And so, by the same rule: left hand ↔ right leg Left Right |
| What is done there | Pressing, and rotating clockwise and in the reverse direction, and so on — according to the affected limb, that is, whatever the affected limb would have received |
| Patient's position | Any; the opposite limb must be reachable |
"Opposite" here means diagonal, and the entry spells it out so that it cannot be mistaken for the mirror limb. Not right hand to left hand. Right hand to left leg. The diagonal partner, across and down.
And this is the rule to reach for when the affected limb cannot be touched — broken, plastered, freshly operated on, hot and swollen, or simply too painful to bear a hand. There is still somewhere to work that reaches the same nervous system, and the entry tells you where. That is the version of this rule most worth learning: when the place that hurts is closed to you, the atlas gives you an address that is open.
Say it to the patient plainly, because it sounds like a trick until it is explained: the two sides of your body are wired together and cross over on the way to your brain; when I cannot reach the arm, I work the leg that shares its circuit.
SUPERFAST — for the leg that slipped
Down the inside, pillows, back up the outside — on the other leg
When the leg suddenly slips, the muscles of one side go over to the other side, because of which sharp pain comes in the groin or the waist. This is useful for giving relief in that. Whichever side the pain is on, do it on the other.
With the soft middle part of both your soles, from the thigh down to the ankle, taking close overlapping steps, press and draw the inner muscles of the leg downward and come down. Then, turning the knee over, place two or three pillows below for support.
From the outside of the thigh, going by the side of the calf, come back up to the heel in the same way. Doing three or four such rounds gives considerable relief.
| Which side | Whichever side the pain is on, do it on the other — the Opposite point rule applied to a fresh strain Left Right |
|---|---|
| Patient's position | Lying. Then the knee is turned over and two or three pillows are placed below it for support, before the return journey Supine Side-lying |
| Where the feet are placed | The soft middle part of both soles, taking close overlapping steps |
| The two halves | Down: from the thigh down to the ankle, pressing and drawing the inner muscles of the leg downward. Up: from the outside of the thigh, going by the side of the calf, back up to the heel, in the same way |
| Duration and repetitions | Three or four such rounds gives considerable relief × 3 |
| What it is for | Sharp pain in the groin or the waist after the leg suddenly slips and the muscles of one side go over to the other side |
The instruction you will be tempted to skip is the pillows. Turning the knee over, place two or three pillows below for support sits between the two halves of the journey, and it is what makes the second half possible: the outer side of the thigh and calf are not reachable with a sole until the limb has been rolled and carried. Angle the leg instead of turning it and you will be walking down the front of a thigh calling it the outside — the same shortcut Knee, Leg, Foot blocks in writing at BOF.
Note the shape of the round. Down the inside from thigh to ankle; turn; back up the outside, and the return ends at the heel — not at the thigh. One round is down-and-back. Three or four rounds is the treatment. And the counts belong to rounds, not to steps: the steps are close and overlapping, as many as the limb is long.
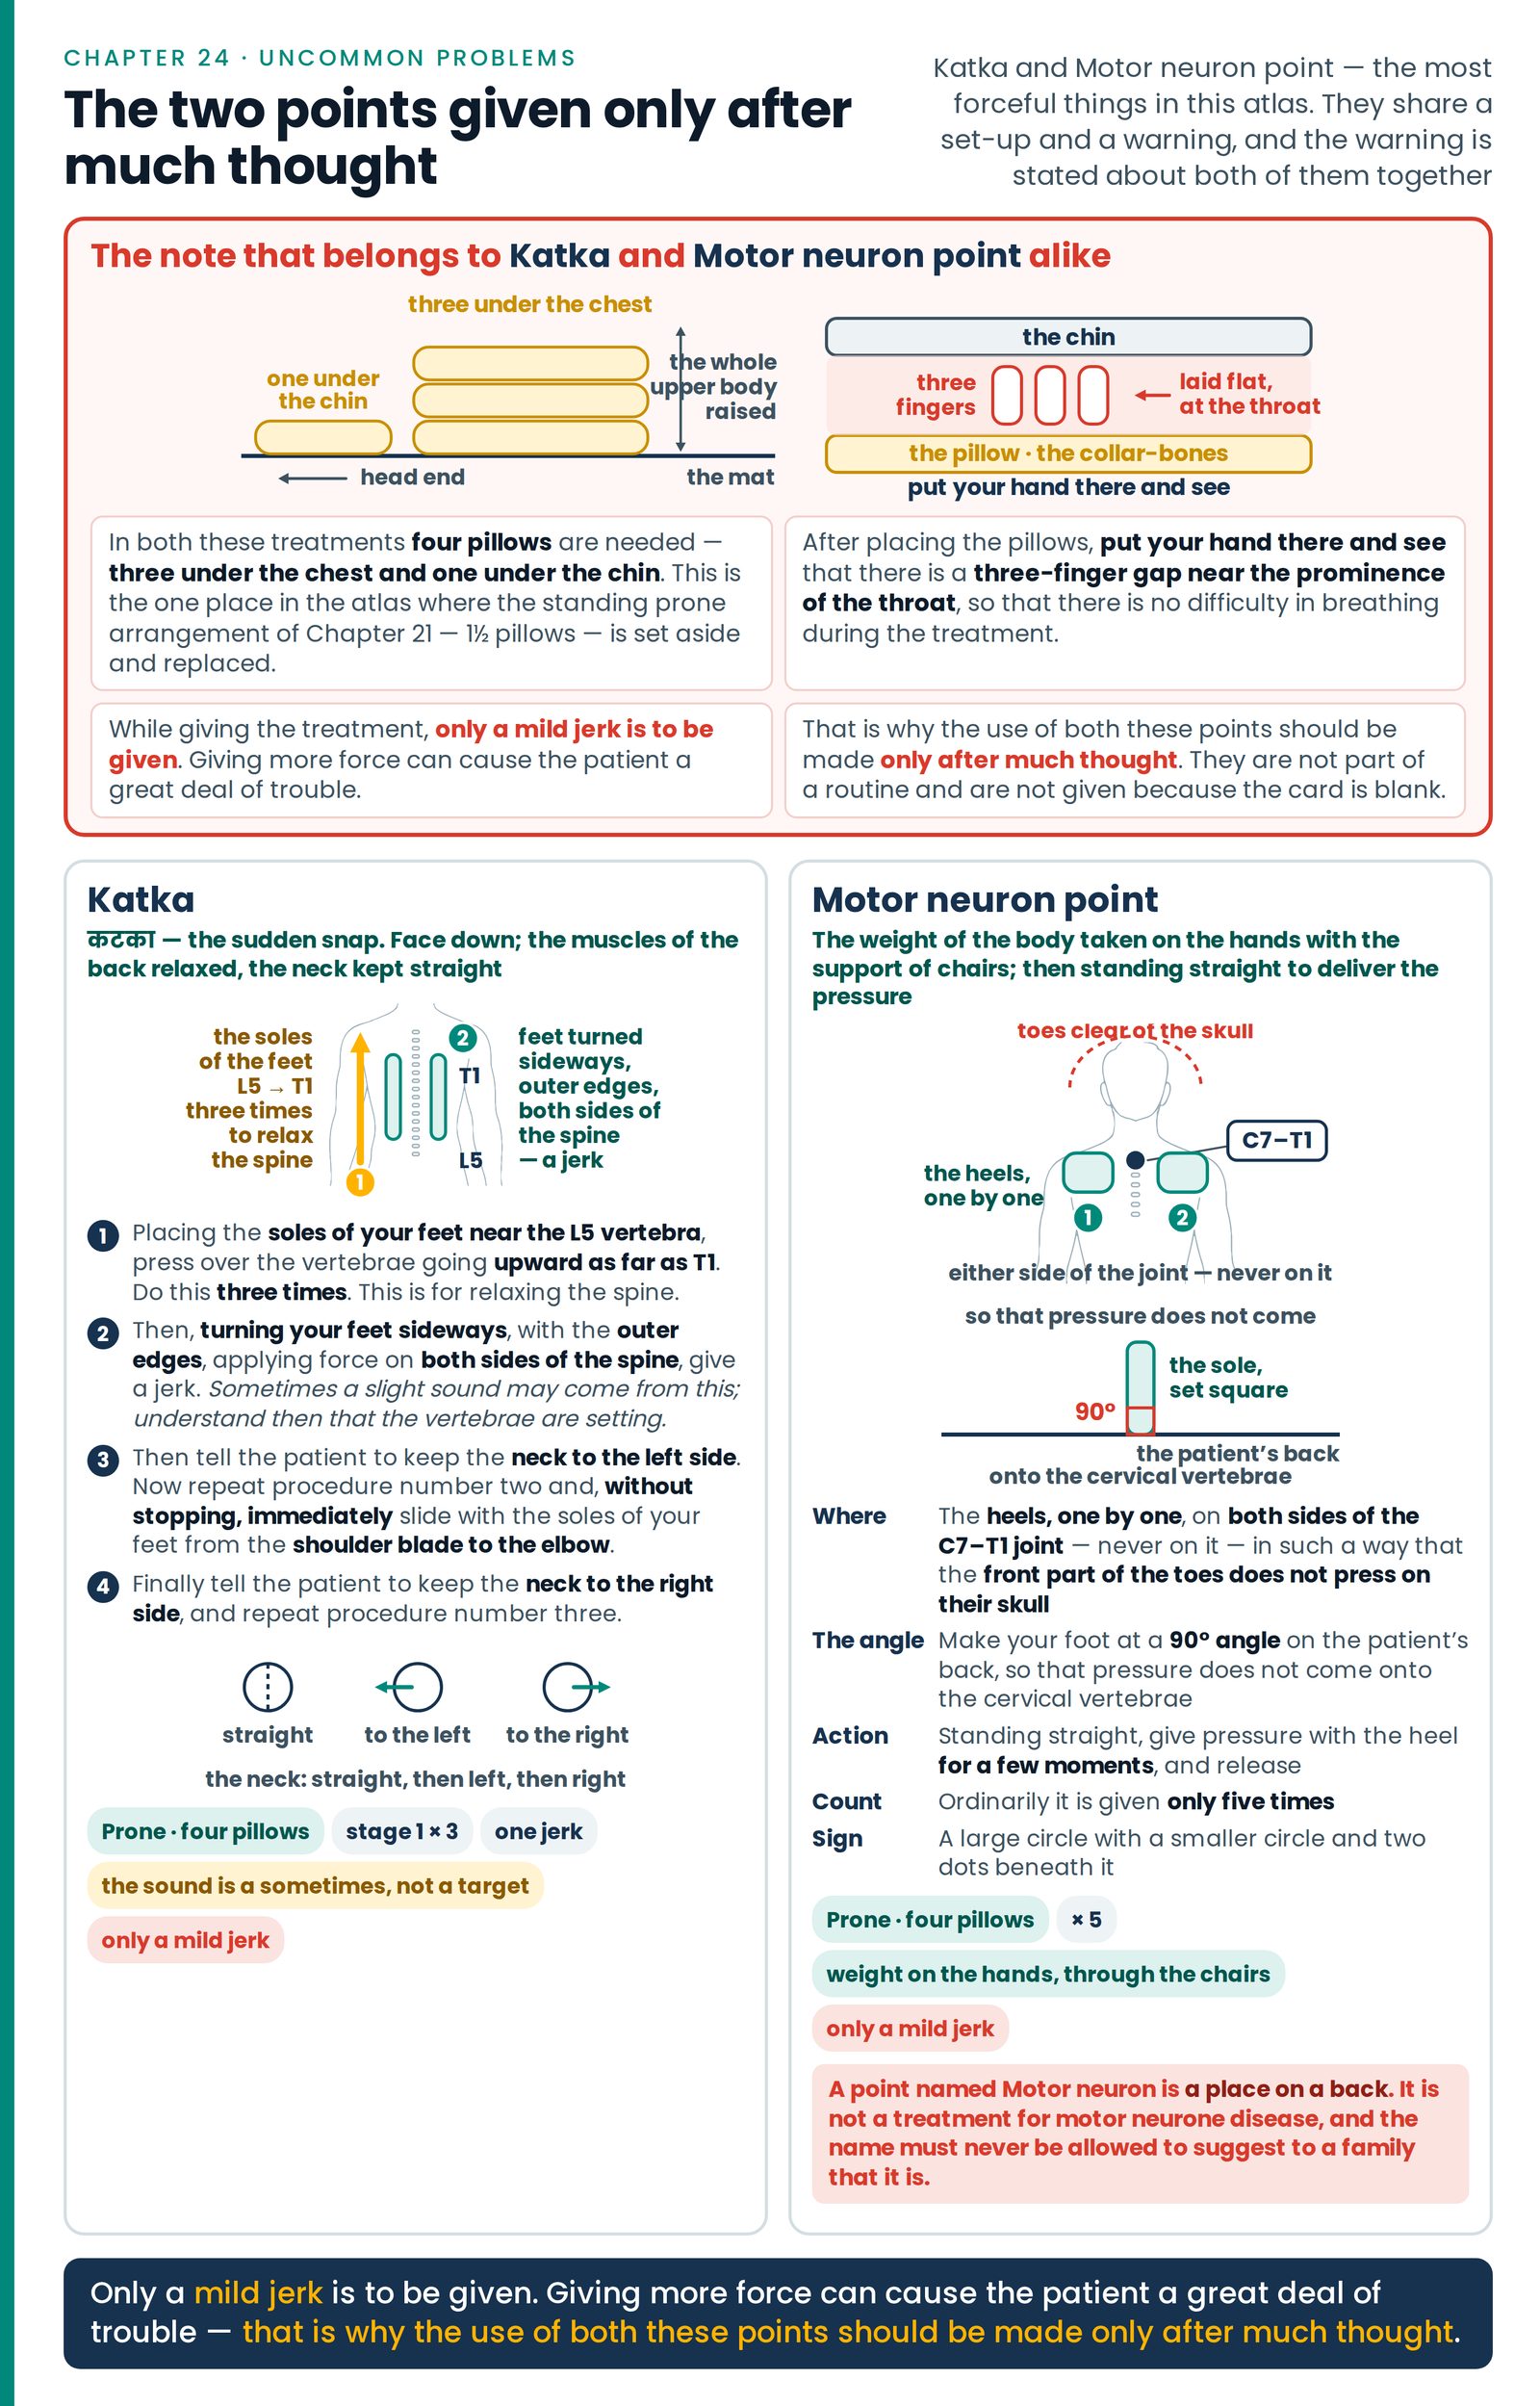
The two points that are given only after much thought
Four pillows, a three-finger gap, and only a mild jerk
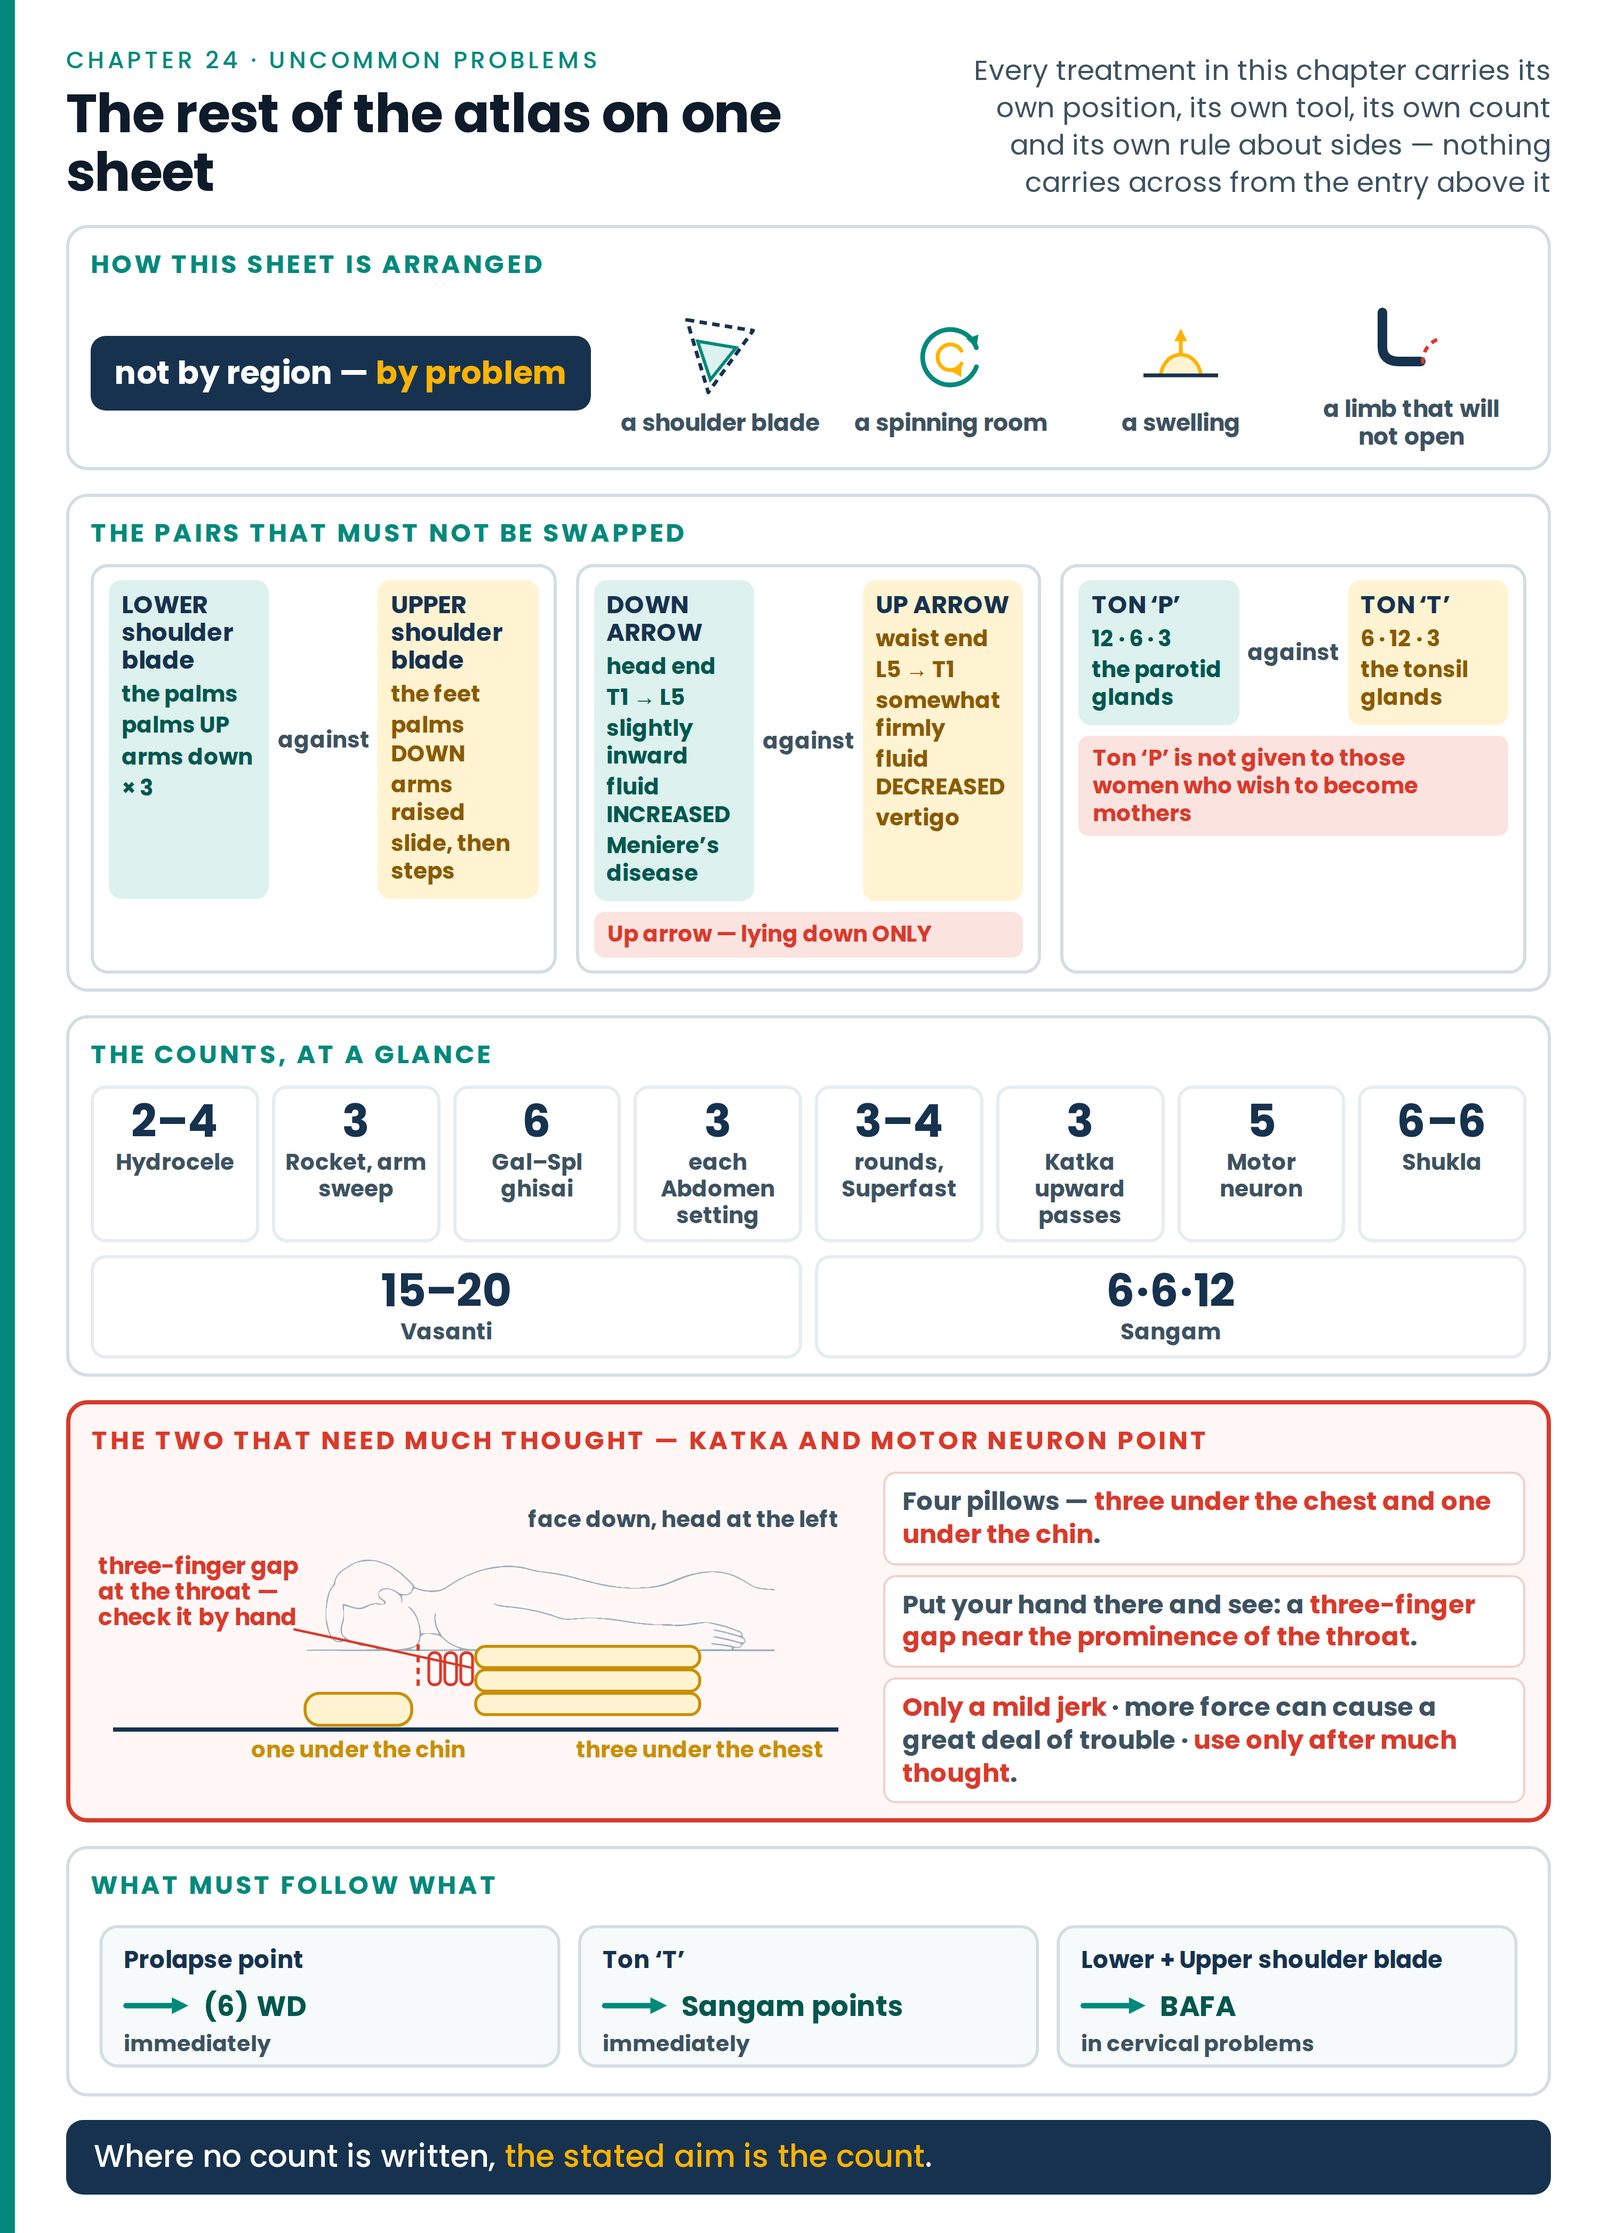
Katka and Motor neuron point are the most forceful things in this atlas. They share a set-up, they share a warning, and the material states that warning about both of them together rather than separately. Read the shared note before either method, every time, and read it again before you use them on a patient you have not used them on before.
Three things in that note are instructions and not advice. (Figure 24.5)
Four pillows, not one and a half. This is the one place in the atlas where the standing prone arrangement of Face Down is set aside and replaced. Three under the chest raise the whole upper body; one under the chin carries the head so the neck is not left hanging.
The three-finger gap is a check you perform with your hand, not an estimate you make with your eye. Put your hand there and see — two fingers or three, laid flat at the front of the throat between the chin and the collar-bones, and there must be room for them. A patient face down on a stack of pillows can have her chin pushed down onto her own windpipe and will be too polite, too old, or too short of breath to say so. Check it after the pillows are placed and before a foot goes anywhere near her.
"Only after much thought" is written by the material about its own technique. Take it at its word. These two are not part of a routine and are not given because the card is blank.
KATKA
| Summary card | Prone, four pillows, three-finger gap, back relaxed. Neck straight, then left, then right. Soles from L5 upward to T1, three times · feet turned sideways, outer edges, force on both sides of the spine, a jerk · neck left: the jerk again, then without stopping slide shoulder blade → elbow · neck right: the same again. For relaxing the spine Prone Left Right × 3 |
|---|
Stage 1 is the preparation and it has the only count in the treatment. Soles near L5, pressing over the vertebrae, travelling upward as far as T1 — the full length of the back — three times, and the entry states its own purpose: this is for relaxing the spine. Nothing is jerked until that has been done three times.
Stage 2 changes the tool. The feet are turned sideways and it is the outer edges — the narrow little-toe borders — that deliver force, on both sides of the spine, not on the beads. Then the jerk. One. And the entry tells you what the noise means if it comes: sometimes a slight sound may come from this; understand then that the vertebrae are setting. It may equally not come, and the entry does not make the sound a requirement. Do not chase it. A therapist working for a click is a therapist adding force.
Stages 3 and 4 are the same thing with the head turned, plus a new action. Neck to the left: the jerk again, and then — without stopping, immediately — the soles slide from the shoulder blade to the elbow. Neck to the right: repeat procedure number three, which is the whole of stage 3, jerk and slide together. The words without stopping, immediately join the jerk and the slide into one movement. Give them as two and you have given something else.
MOTOR NEURON POINT
Taking the weight of the body on the hands with the support of chairs, place your heels one by one on both sides of the C7–T1 joint, in such a way that the front part of the toes does not press on their skull. Then, standing straight, give pressure with the heel for a few moments, and release. Ordinarily it is given only five times.
Take note — while giving the pressure, make your foot at a 90° angle on the patient's back, so that pressure does not come onto the cervical vertebrae.
| Patient's position | Prone, four pillows — three under the chest and one under the chin — with the three-finger gap at the throat checked by hand Prone ▲ Take care |
|---|---|
| The therapist | The weight of the body taken on the hands with the support of chairs; then standing straight to deliver the pressure |
| Where the heels are placed | The heels, one by one, on both sides of the C7–T1 joint — not on the joint — in such a way that the front part of the toes does not press on their skull |
| The angle | The foot at a 90° angle on the patient's back, so that pressure does not come onto the cervical vertebrae |
| Duration and repetitions | Pressure with the heel for a few moments, then release. Ordinarily it is given only five times |
| The limit on force | Only a mild jerk is to be given. Giving more force can cause the patient a great deal of trouble. The point is to be used only after much thought |
| Sign | A large circle with a smaller circle and two dots beneath it |
Four safeguards are written into eight lines, which tells you what the material thinks of this point.
"One by one" — the heels are placed separately, one and then the other, never both dropped together. "On both sides of the C7–T1 joint" — either side of the bead, never on it. "The front part of the toes does not press on their skull" — with the heel at the base of the neck the toes point up over the head, and they must be clear of it. "The foot at a 90° angle on the patient's back" — the sole set square across the body, so the load runs into the muscle beside the spine and not down into the neck bones. And the count is a small, specific number: ordinarily only five times.
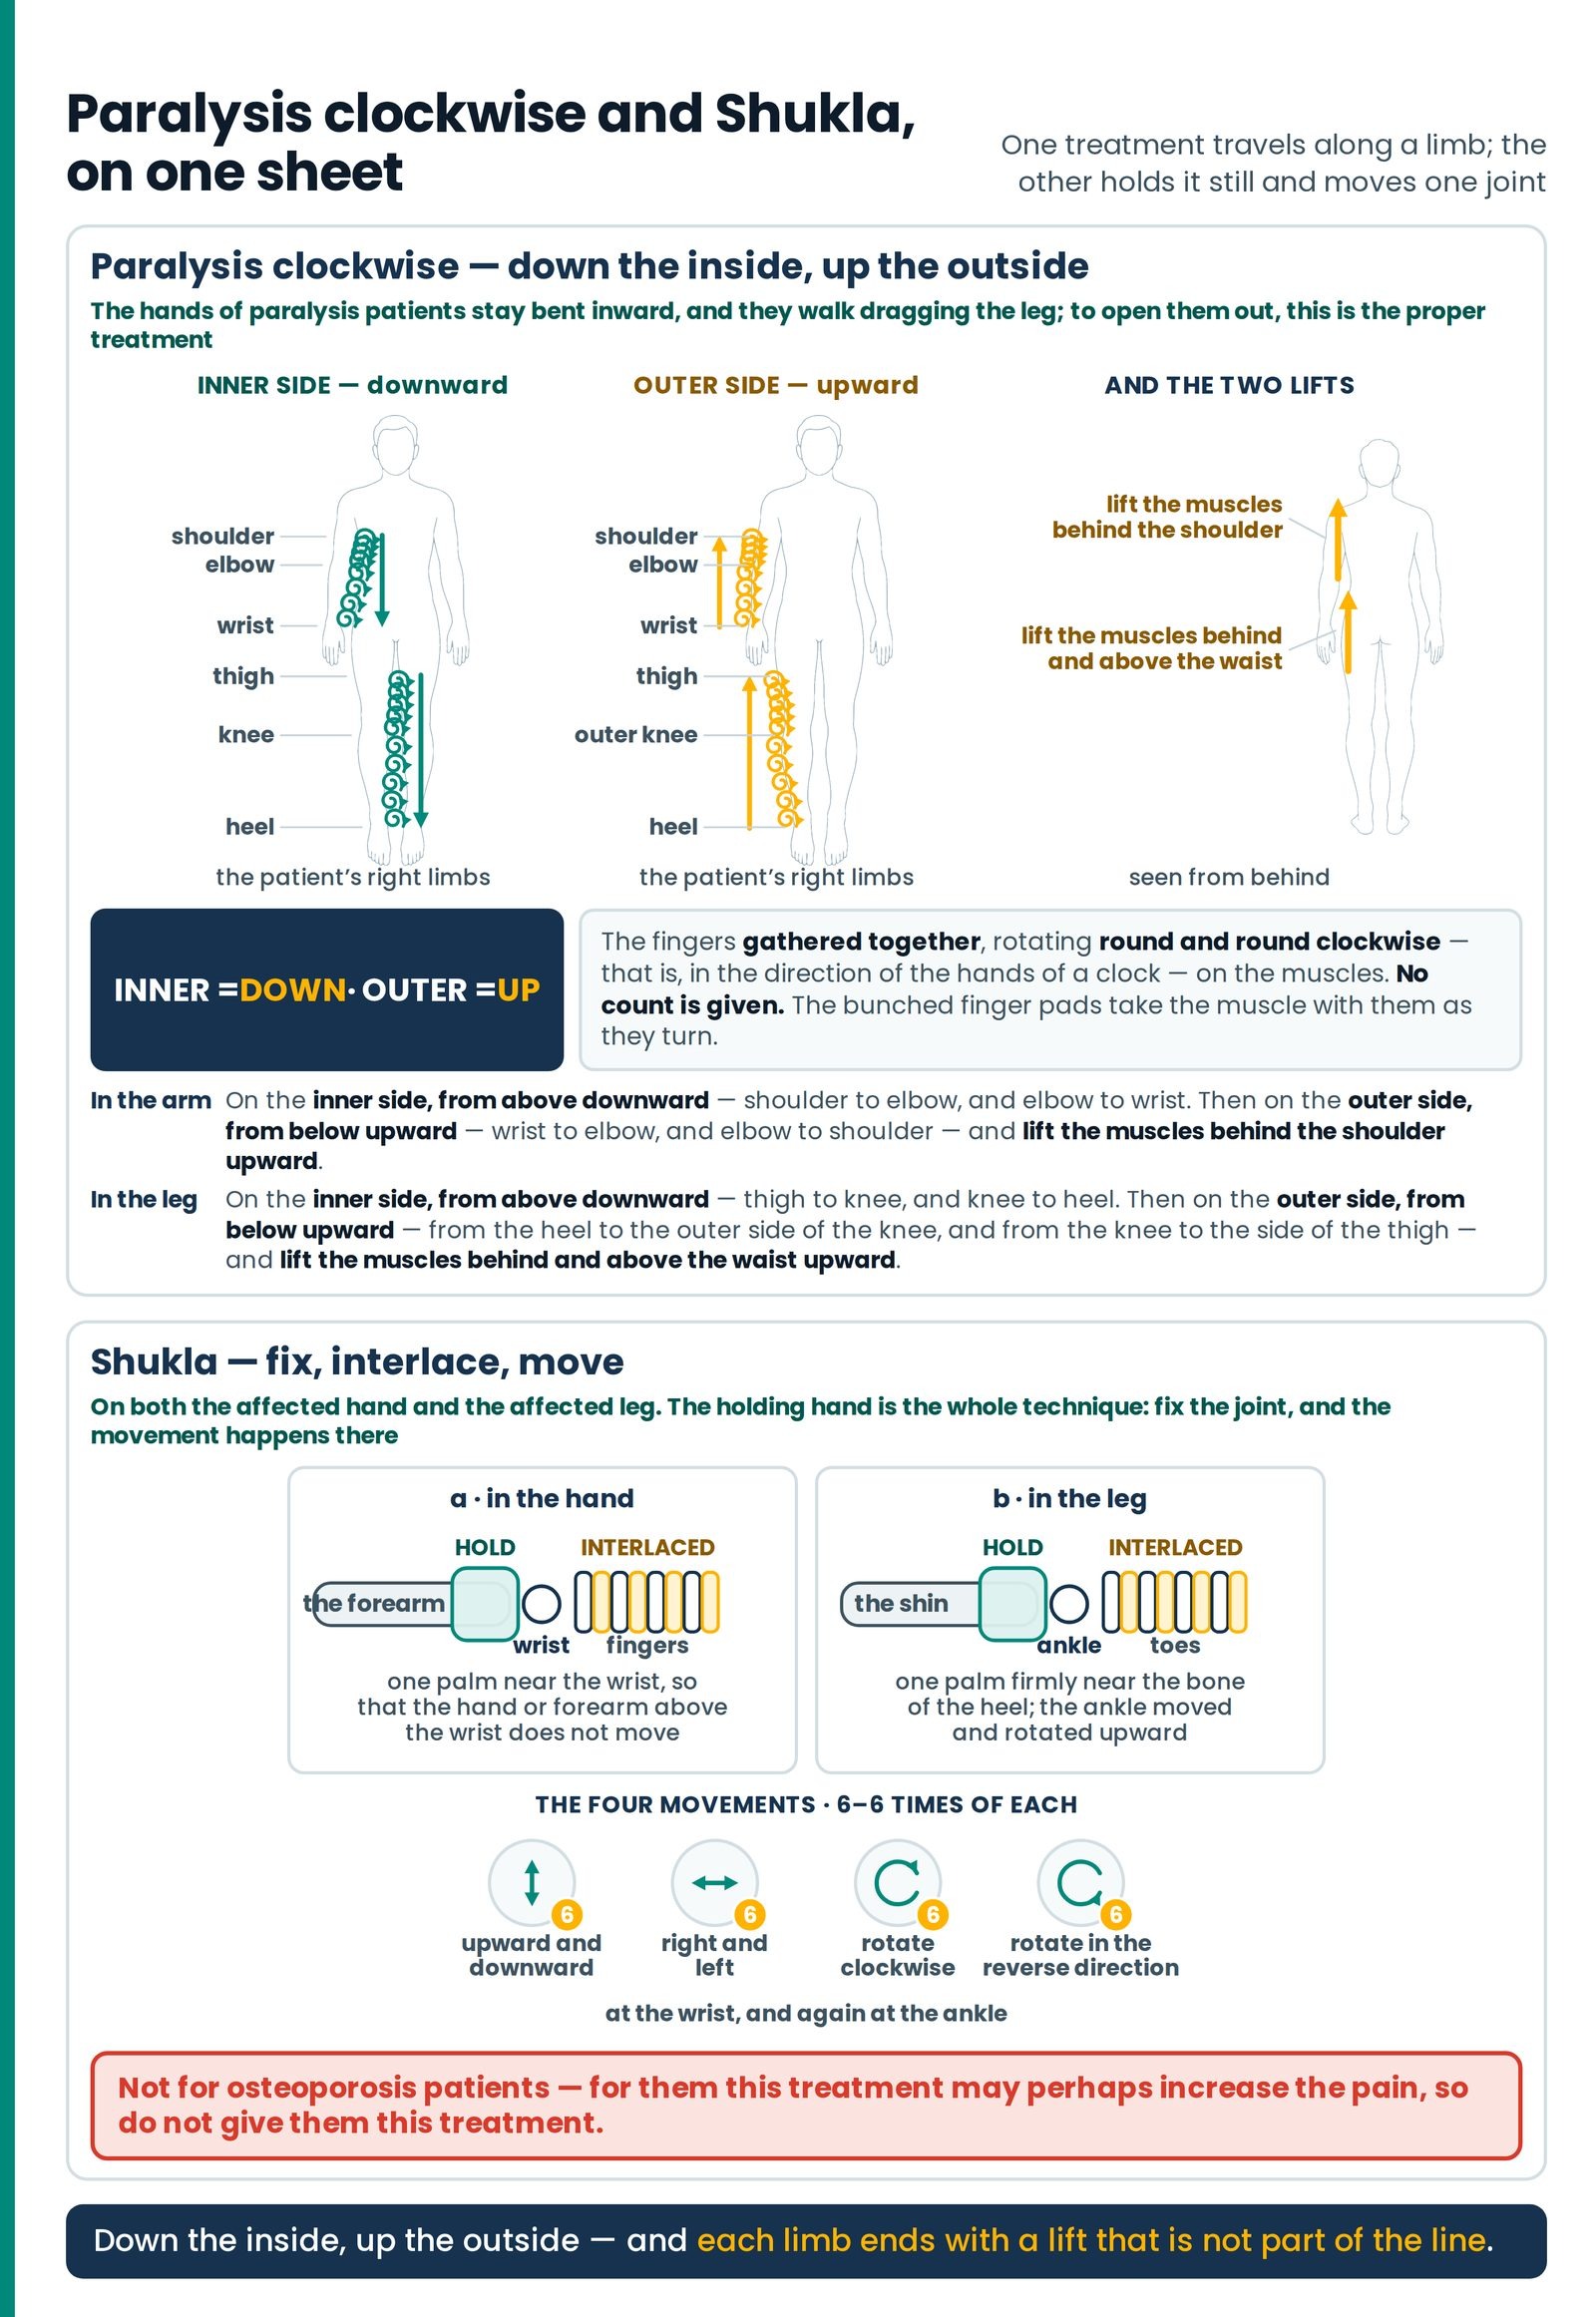
PARALYSIS CLOCKWISE — down the inside, up the outside
One pattern for both limbs, and a lift at the end of each
The hands of paralysis patients stay bent inward, and they walk dragging the leg; to open them out, this is the proper treatment.
The therapist is to gather the fingers together and rotate them round and round clockwise — that is, in the direction of the hands of a clock — on the muscles of the hand and of the leg.
| Patient's position | Not specified — the limb must be reachable on both its inner and its outer side |
|---|---|
| The tool and the action | The fingers gathered together, rotating round and round clockwise — that is, in the direction of the hands of a clock — on the muscles |
| In the arm | On the inner side, from above downward — that is, shoulder to elbow, and elbow to wrist. Then on the outer side, from below upward — that is, wrist to elbow, and elbow to shoulder — and lift the muscles behind the shoulder upward |
| In the leg | On the inner side, from above downward — that is, thigh to knee, and knee to heel. Then on the outer side, from below upward — that is, from the heel to the outer side of the knee, and from the knee to the side of the thigh — and lift the muscles behind and above the waist upward |
| Duration and repetitions | No count is given |
| What it is for | The hands of paralysis patients that stay bent inward, and the leg that is dragged in walking — to open them out |
One pattern governs both limbs: inner side downward, outer side upward. Learn it as a single sentence and you have the whole treatment. Down the inside, up the outside — and each half is covered in two named segments, so that nobody sweeps the whole limb in one pass. Arm: shoulder→elbow, elbow→wrist; then wrist→elbow, elbow→shoulder. Leg: thigh→knee, knee→heel; then heel→outer knee, knee→side of thigh. (Figure 24.6)
And each limb ends with a lift that is not part of the line. In the arm, lift the muscles behind the shoulder upward. In the leg, lift the muscles behind and above the waist upward. Both of those are past the end of the limb — the shoulder blade for one, the buttock and low back for the other — and both are easy to leave out because the hand has by then arrived where it thought it was going.
"Clockwise" is defined for you and is the same action as in Giriraj: the bunched finger pads take the muscle with them as they turn, rolling the tissue rather than stroking the skin, and each turn carries it along the named direction before the hand lifts and moves on.
Why down the inside and up the outside? Because that is where the limb has gone. The material's own first sentence describes the posture exactly: the hand stays bent inward, the leg is dragged. The inner surfaces are the ones that have shortened; the outer surfaces are the ones that have been overpowered. The directions run along the shortened tissue in the direction of its lengthening, and along the slack tissue in the direction of its work.
SHUKLA — the wrist and the ankle, four ways each
Fix the joint, interlace, six of each — never in osteoporosis
To be done on both the affected hand and the affected leg. It is given in two stages — a. in the hand; b. in the leg.
In the hand. With one palm, hold their hand near the wrist so that the hand or forearm above the wrist does not move. Then, interlacing the fingers of your other hand inside their fingers, move their palm in the following ways, 6–6 times.
In the leg. With one palm, hold firmly near the bone of their heel. Then, interlacing their toes well in the fingers of the other hand, move and rotate the ankle upward in the same four ways.
| # | The movement | At the wrist | At the ankle |
|---|---|---|---|
| 1 | Upward and downward | 6 | |
| 2 | Right and left | 6 | |
| 3 | Rotate clockwise | 6 | |
| 4 | Rotate in the reverse direction — anti-clockwise | 6 |
| Patient's position | Any. To be done on both the affected hand and the affected leg |
|---|---|
| The holding hand | In the hand: one palm near the wrist, so that the hand or forearm above the wrist does not move. In the leg: one palm firmly near the bone of the heel |
| The moving hand | In the hand: the fingers of your other hand interlaced inside their fingers. In the leg: their toes interlaced well in the fingers of the other hand, the ankle moved and rotated upward |
| Duration and repetitions | 6–6 times of each of the four movements, at the wrist and at the ankle 6 sec |
| What it is for | Paralysis, and stiffness of the hands and feet and so on |
| Who it is not given to | Osteoporosis patients — for them this treatment may perhaps increase the pain, so do not give them this treatment ▲ Take care |
The holding hand is the whole technique. Fix the forearm and the movement happens at the wrist; let the forearm travel and the movement dissipates up the arm and nothing has been lengthened. The instruction says so in as many words: so that the hand or forearm above the wrist does not move. At the leg, the same job is done by holding firmly near the bone of the heel.
The interlacing does a second job. Fingers laced into fingers, toes laced into fingers, spreads the small joints apart and opens the webs between them — and the webs are exactly where a hand that has been closed for a year stiffens first and yields last.
"6–6 times" means six of each, in both places — six up-and-down, six right-and-left, six clockwise, six the reverse way, at the wrist; then all four again at the ankle. Twenty-four movements a limb, forty-eight in all, for a patient who can supply none of them himself.
The material states its own contraindication, and gives its reason
For osteoporosis patients this treatment may perhaps increase the pain — so do not give them this treatment.
Notice what kind of sentence that is. It does not say give it gently, or reduce the count. It says do not give them this treatment, and it gives the reason in the same breath. Where the material writes a rule in that form, it is not to be softened by a therapist who thinks the patient looks sturdy.
Ask the question that finds these patients: not "do you have osteoporosis?" — which many will answer no to, having never been told the word — but "have you ever broken a bone from a small fall or a knock that should not have broken anything? Have you lost height? Are you taking a monthly or yearly injection or tablet for your bones?"
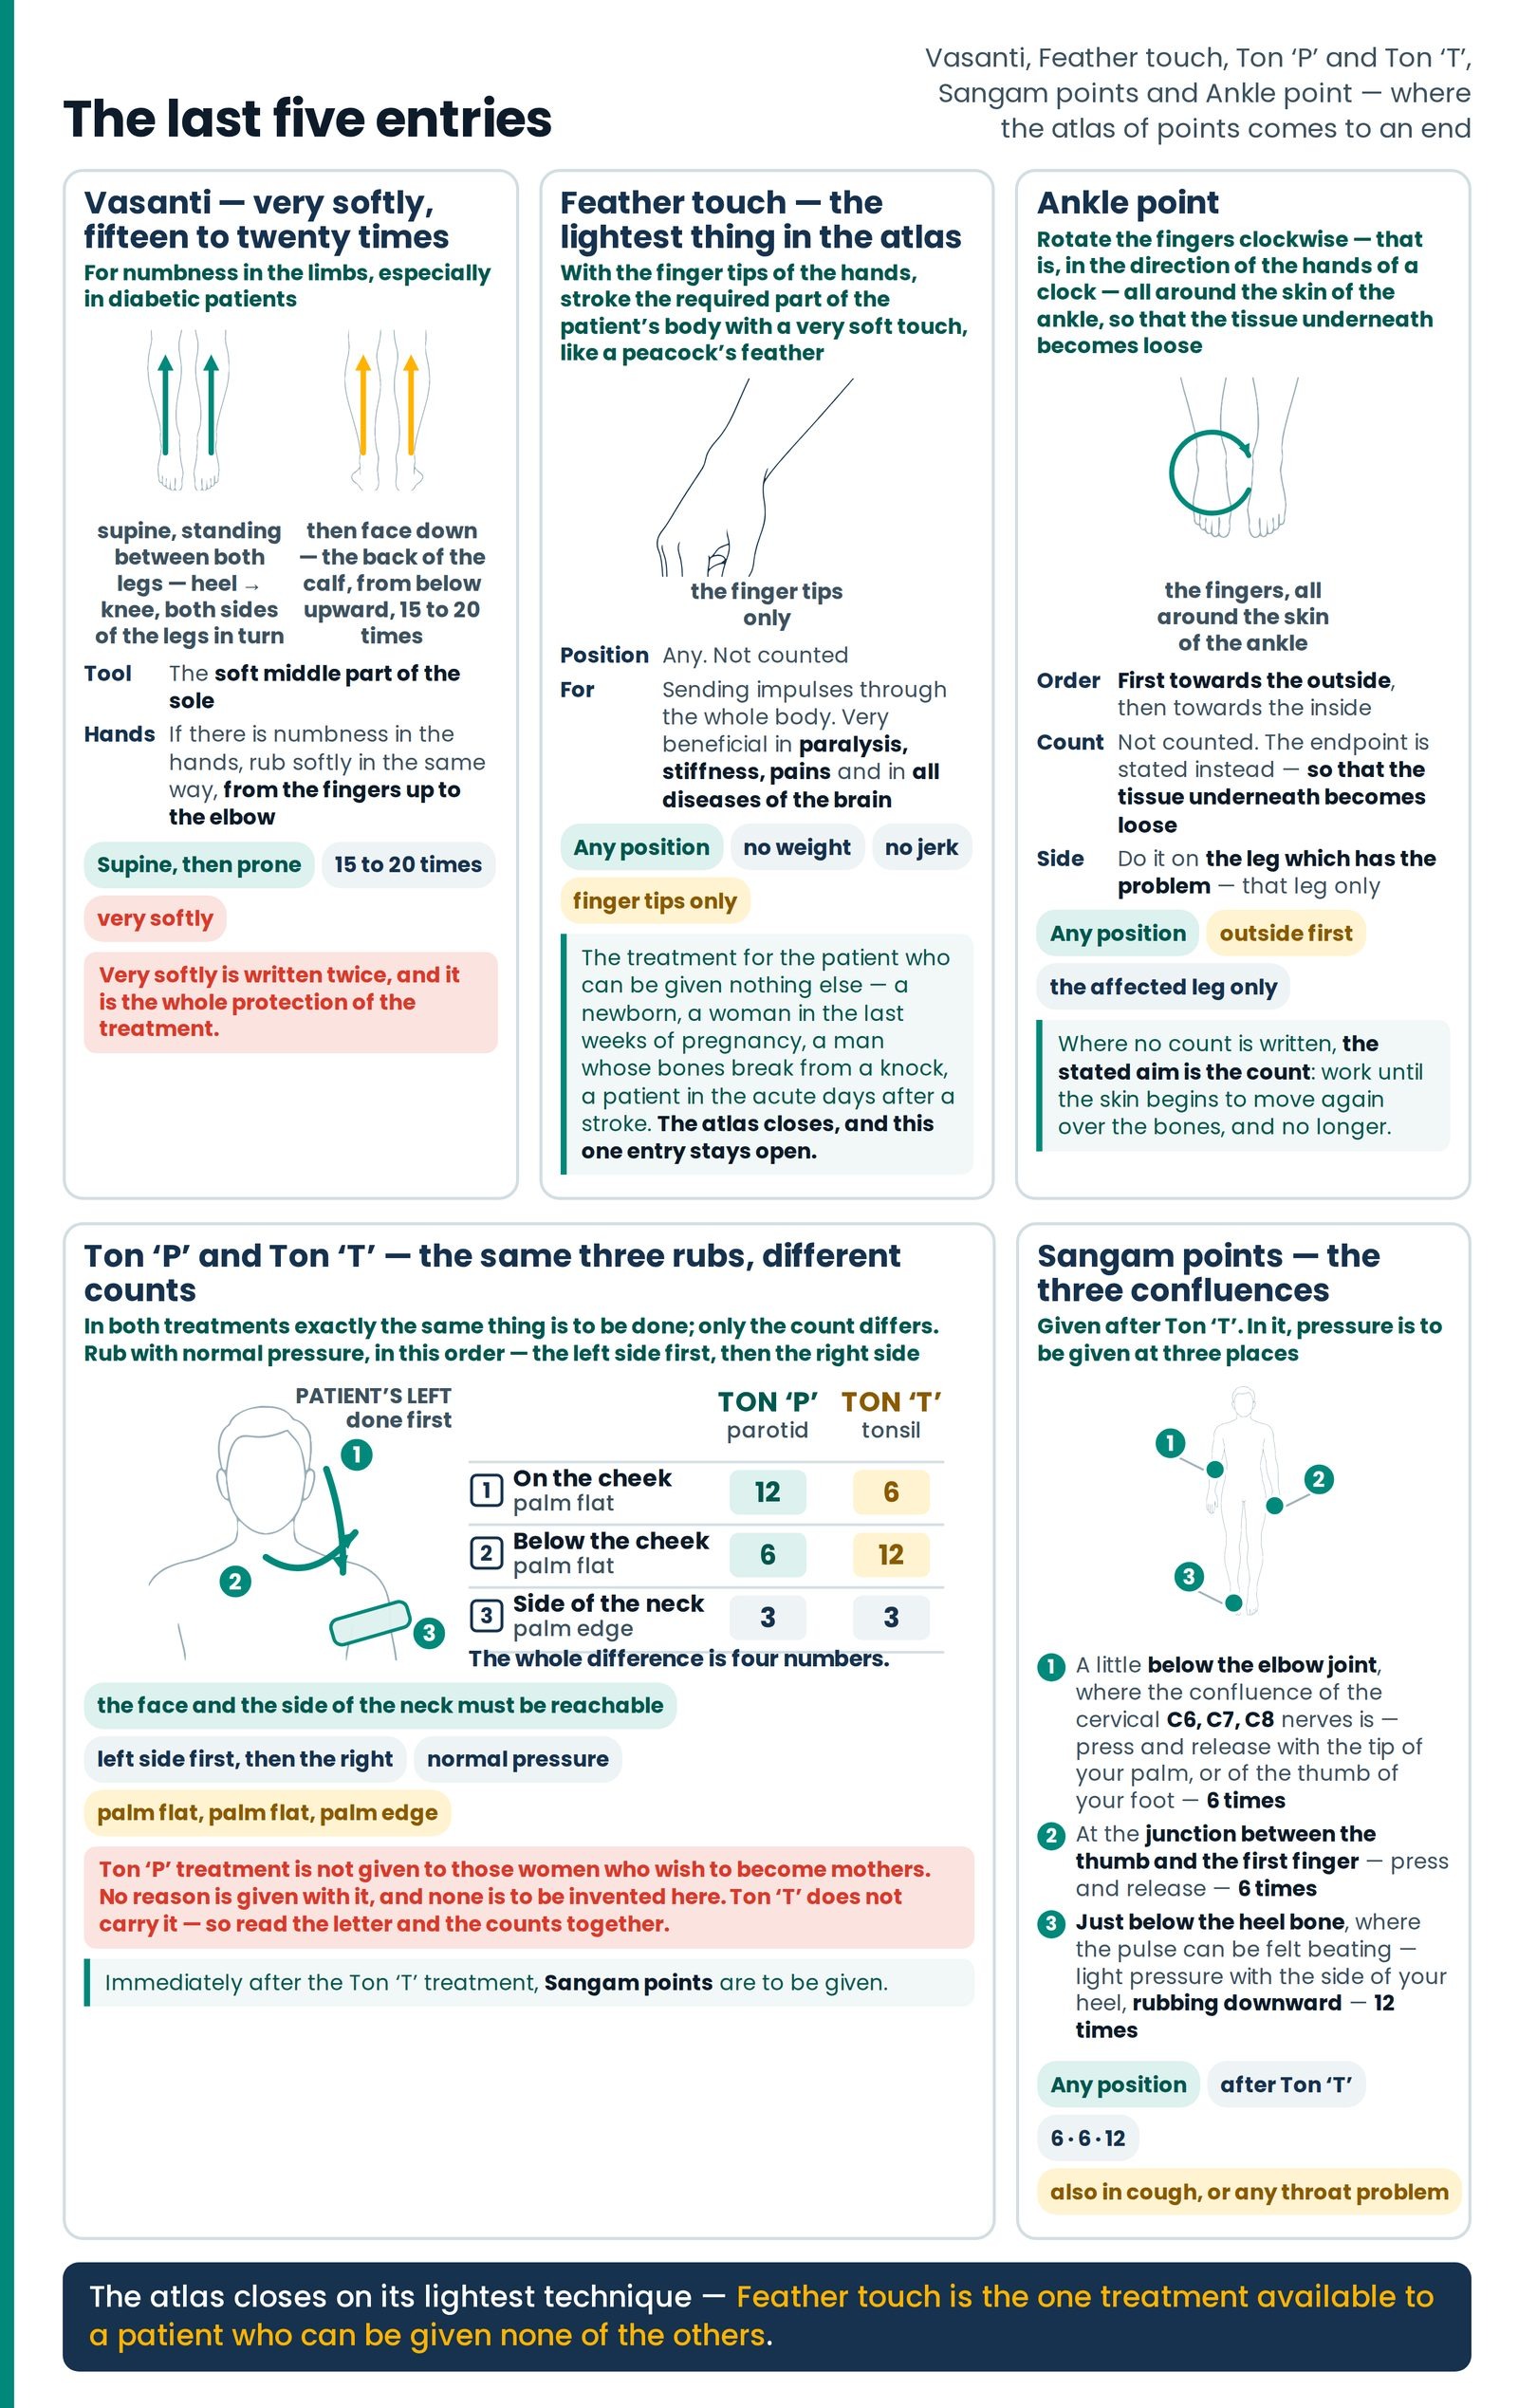
VASANTI — very softly, fifteen to twenty times
Numbness in diabetes, and softness as the whole safeguard
Lay the patient straight and stand between both their legs. Then, with the soft middle part of your sole, rub very softly from the heel up to the knee, on both sides of the legs in turn.
After that, lay them face down and, in the same way, rub the back part of the calf from below upward, 15 to 20 times.
This is especially beneficial for removing numbness in the limbs in diabetic patients.
If there is numbness in the hands, then rub softly in the same way with the sole, from the fingers up to the elbow.
| Patient's position | Laid straight first, the therapist standing between both the patient's legs; then laid face down Supine Prone |
|---|---|
| Where the foot is placed | The soft middle part of the sole — heel up to the knee, on both sides of the legs in turn; then, face down, the back part of the calf, from below upward. For numbness in the hands, from the fingers up to the elbow |
| Pressure | Very softly — written twice, and it is the whole protection of the treatment ▲ Take care |
| Duration and repetitions | 15 to 20 times on the back of the calf. The first phase is not counted |
| What it is for | Removing numbness in the limbs, especially in diabetic patients |
Two positions, three territories. Face up, between the legs: both sides of each leg in turn, heel to knee. Face down: the back of the calf, from below upward, 15 to 20 times. And a fourth territory for a different complaint — the hand, if that is where the numbness is, worked from the fingers up to the elbow with the same sole and the same softness. (Figure 24.7)
The direction is always towards the body — heel to knee, fingers to elbow. And "very softly" is not a style; it is the safeguard. The patients this treatment names are the patients least able to tell you that you are pressing too hard.
FEATHER TOUCH — the lightest thing in the atlas
The one entry that stays open when every other one has closed
With the finger tips of the hands — that is, with the tips of the fingers — stroke the required part of the patient's body with a very soft touch, like a peacock's feather.
This is given for sending impulses through the whole body. It is very beneficial in paralysis, stiffness, pains and in all diseases of the brain.
| Patient's position | Any |
|---|---|
| Where the hands are placed | The finger tips only — stroking the required part of the patient's body with a very soft touch, like a peacock's feather |
| Duration and repetitions | Not counted |
| What it is for | Sending impulses through the whole body. Very beneficial in paralysis, stiffness, pains and in all diseases of the brain; and, in Guruji's own account of it, by this treatment the muscles will relax to a depth of four inches |
This is the treatment for the patient who can be given nothing else. No weight, no jerk, no position that must be held, no bone under a heel. A newborn, a woman in the last weeks of pregnancy, a man whose bones break from a knock, a patient in the acute days after a stroke, a child who will not tolerate being handled, somebody in too much pain to bear a palm — for every one of them the atlas closes, and this one entry stays open. Learn it as the point of last resort and you will use it more than you expect to.
Take that passage as the instruction it is. It says three things a therapist can act on tonight. The body answers to expectation — the mouth waters at the name of a fried thing, without any fried thing. The therapist's own state is part of what is delivered — hurry, irritation and distraction travel down an arm as surely as pressure does. And hold no enmity, which is put as a condition of skill rather than as a piety.
TON 'P' and TON 'T' — the same three rubs, different counts
Twelve, six, three against six, twelve, three — read the letter
TON 'P' — this is for stimulating the parotid glands situated at the side of the cheek.
TON 'T' — this is for stimulating the tonsil glands situated in the neck.
In both treatments exactly the same thing is to be done; only the count differs. In the following three places, rub with normal pressure, in this order. The first two treatments are to be given keeping the palm flat, but the number three treatment is to be given with the edge of the palm. Do the left side first, then the right side.
| # | Where to rub | Tool | Ton 'P' | Ton 'T' |
|---|---|---|---|---|
| 1 | On the cheek — from above, in front of the ear, down to the neck | Palm flat | 12 times | 6 times |
| 2 | Below the cheek — from the chin in front, to behind and below the ear | Palm flat | 6 times | 12 times |
| 3 | On the side of the neck, where the neck and the shoulder meet | The edge of the palm | 3 times |
| Patient's position | Not stated; the face and the side of the neck must be reachable Seated |
|---|---|
| Pressure | Normal pressure, in the order given — 1, then 2, then 3 |
| Order of the sides | The left side first, then the right side Left Right |
| What they are for | Ton 'P': stimulating the parotid glands at the side of the cheek. Ton 'T': stimulating the tonsil glands in the neck |
| The restriction | Ton 'P' treatment is not given to those women who wish to become mothers ▲ Take care |
| What must follow | Immediately after the Ton 'T' treatment, Sangam points are to be given |
The whole difference between two treatments is four numbers. Rub 1 is 12 for P and 6 for T; rub 2 is 6 for P and 12 for T; rub 3 is 3 for both. Everything else — the three places, the order, the flat palm for the first two, the palm edge for the third, the left side before the right — is identical. Which is exactly why a card that reads only Ton has told you nothing, and why the letter must be read.
SANGAM POINTS — the three confluences
Six below the elbow, six in the web, twelve below the heel bone
This treatment is given after Ton 'T'. In it, pressure is to be given at three places.
| # | The place | What is done | Count |
|---|---|---|---|
| 1 | A little below the elbow joint, where the confluence of the cervical C6, C7, C8 nerves is | Press and release with the tip of your palm, or of the thumb of your foot | 6 times |
| 2 | At the junction between the thumb and the first finger | Press and release | 6 times |
| 3 | Just below the heel bone, where the pulse can be felt beating | Light pressure with the side of your heel, rubbing downward | 12 times |
| Patient's position | Any; given after Ton 'T' |
|---|---|
| Where the hands or feet are placed | The tip of the palm, or the thumb of the foot, at place 1; the fingers at place 2; the side of the heel at place 3 |
| Duration and repetitions | 6, 6 and 12 6 sec |
| What it is for | The treatment that follows Ton 'T'; and all these points are also useful in cough, or in any problem of the throat |
Two of the three are press-and-release; the third is a rub, and it runs downward. Places 1 and 2 are the short loaded press that lifts off, six each. Place 3 is different in tool, action, direction and count: the side of the heel, light, rubbing downward, twelve times.
Place 3 also teaches you something worth more than the treatment. Just below the heel bone there is a place where the pulse can be felt beating. Learn to find that pulse and you have learnt to check the blood supply of a foot — and a foot with no pulse there, in a patient with diabetes, is a referral and not a treatment site.
ANKLE POINT
Clockwise all round, outside first, until the tissue is loose
Rotate the fingers clockwise — that is, in the direction of the hands of a clock — all around the skin of the ankle, so that the tissue underneath becomes loose. First do it towards the outside, then towards the inside. Do it on the leg which has the problem.
| Patient's position | Any; the ankle reachable all round |
|---|---|
| Where the hands are placed | The fingers, rotating clockwise, all around the skin of the ankle |
| Order | First towards the outside, then towards the inside |
| Duration and repetitions | Not counted. The endpoint is stated instead: so that the tissue underneath becomes loose |
| Which side | Do it on the leg which has the problem — that leg only |
Where no count is written, the stated aim is the count. The entry gives you an endpoint you can feel: the skin and the layer beneath it, which after a sprain or a plaster or a long stillness lose their ordinary glide, begin to move again over the bones. Work until they do, and no longer.
The order is written and it is outside first. And the side is written too — only the leg that has the problem, unlike several treatments in Knee, Leg, Foot that are given to both. Each entry names its own sides; none of them carries across.
T8, Rocket, Katka — and how these names were made
Four kinds of name: a sound, a place, a metaphor, a person
The atlas ends, and the number under it
Where no number is written, six seconds is still the unit
That is the last point. Every physical point in this therapy has now been taught — where it lies, how the patient is placed, what the hand or the foot does, how many times, in which direction, on which side, and under what condition it is withheld. (Figure 24.8)
And under almost all of it sits one number. Six seconds. The material stops at exactly this place, having finished the atlas, and turns round to ask why the pressure should be six — why a contraction should last six and no longer, what the agonist and the antagonist are and why their rhythm must be kept, what happens to the oxygen and the glucose in the blood held ahead of a pressure and behind it, and why lactic acid rises on release if the hold has run long. That whole account, with the comparison to the mathematician whose results were proved by experience long before anyone proved them by explanation, is taught in full in Six Seconds. It is not repeated here.
What belongs here is only the reminder it leaves behind. Where an entry in this article gives no count, the standing unit still applies — T8, whose only instruction is press and release, is pressed for six. And where an entry gives its own number, that number replaces the unit and is not negotiable: two to four, three, five, six, twelve, fifteen to twenty.
After the treatment is over
Re-check, write the plus and the minus, and get her up slowly
The atlas closes and the session does not. What happens in the last ten minutes decides whether the patient comes back, whether you can tell next week what worked, and — occasionally — whether somebody goes home safely.
Re-check every pain point, and write it down
After the treatment, check again for pain or stiffness at all the pain points, and write it in the proper place on the card.
If before the treatment he had extreme pain at Pan, then write Pan⁺⁺⁺⁺. After the treatment, check again. If the pain has become somewhat less than before, then below the place where four plus was written, write two plus — Pan⁺⁺. If the pain became considerably less but a little remained, write Pan⁺. If the pain went away completely, then below where Pan⁺⁺⁺⁺ was first written, write a single minus — Pan ₋.
| Written on the card | What it means |
|---|---|
| Pan⁺⁺⁺⁺ | Extreme pain at the point, written before the treatment |
| Pan⁺⁺ | The pain has become somewhat less than before — written below the first entry |
| Pan⁺ | The pain became considerably less, but a little remained |
| Pan ₋ | The pain went away completely — a single minus |
Along with checking the pain, also show or tell the patient at which places, and by how much, the pain has decreased. Guruji gives two reasons for that instruction, and the second is the one students underrate.
"By showing or telling them in this way that the pain is decreasing, their faith in this therapy increases greatly. They feel that this is magic!
Apart from this there is one more principal use — sometimes patients, after taking two or four days of treatment, do not come for many days. When they have trouble again, they come and say that they got no benefit from the treatment, because their pain came back just as it was. In this therapy, removing or finishing the pain of the pain points is the main aspect of the treatment. In such a situation, by looking at their card from the previous day — which point has a + and which has a – before the treatment and after the treatment — we will come to know whether the patient really did benefit from that day's treatment or not. Then we can decide whether the old treatment is to be given again, or a different treatment is to be given. The thing to note here is that so long as any treatment reduces the pain of the pain points, there is no need to change it and give another."
That last sentence is a decision rule, and it is worth learning by heart. The card decides whether the plan continues, not the patient's memory of how last month felt.
Getting up, and going home. After the treatment is over, tell the patient to turn onto their side and get up comfortably, and to gather their things. If it is a pain patient, tell them to walk about a little, and then ask how the treatment felt — certainly they will say that they felt good. Then tell them that they may eat food after half an hour. And give them the assurance that if they keep taking treatment regularly and observe the dietary restrictions, they will feel very well indeed.
If the patient feels giddy. If, during the treatment or after getting up, the patient feels somewhat giddy, do not be alarmed. It means that by the treatment the digestive system has improved so much that insulin has come out from the pancreas, on account of which the quantity of sugar in the blood has become less. This is momentary. Sit them on a chair, and stand near them giving support until their nervousness has gone. If need be, dissolve a little jaggery in half a glass of water and give it to them to drink, and tell them to rest for some time and only then to set out for home.
If the head feels heavy. Some people, because the flow of blood in the forehead has increased, may feel the head heavy for a little while. If this happens, tell the patient not to be alarmed. Sit them on a chair, place your palm behind their neck like a cup, draw the muscles and nerves backward for a second or so and release them slowly — the heaviness of the head will go.
The telephone. Only after doing all this may you, or they, talk to anyone on the mobile — not before this. If you yourself observe the rules, the patient too will observe this rule, and from that the feeling of respect towards you and towards the therapy will increase.
Before the next patient. Clean the mat below and spread the pillows properly again, so that no dust, dirt or any unwanted fold remains in it.
| The instruction | What it asks |
|---|---|
| Getting up | Turn onto the side and get up comfortably; gather their things |
| A pain patient | Walk about a little, then ask how the treatment felt |
| Food | After half an hour |
| The assurance to give | Regular treatment and the dietary restrictions kept — and you will feel very well indeed |
| If giddy | Do not be alarmed. Sit them on a chair, stand near them giving support until the nervousness has gone; if need be, a little jaggery dissolved in half a glass of water; rest before setting out for home |
| If the head is heavy | Sit them on a chair, the palm behind the neck like a cup, muscles and nerves drawn backward for a second or so and released slowly |
| The mobile phone | Only after all this — yours as well as theirs |
| Before the next patient | Clean the mat and spread the pillows properly again — no dust, no dirt, no unwanted fold |
Questions students ask
1. I am nineteen and this article feels like a list with nothing to hold on to. How do I learn it? By the problem, not the name. Ask yourself what walked in: an arm that will not lift after a blow → Rocket. A womb that has descended → P point and (6) WD. A leg that slipped and a sharp groin pain → Superfast, on the other side. A hand closed since a stroke → Paralysis clockwise and Shukla. The earlier articles were learnt by walking down a body; this one is learnt by walking down a list of troubles.
2. I am a retired bank manager learning this for my wife, who is seventy and has thin bones. How much of this article is open to me? Less than half, and that is the correct answer rather than a disappointing one. Shukla is closed — the material names osteoporosis and says do not give it. Katka, Motor neuron point and P point are closed, because each carries a jerk. Abdomen setting is closed if a spinal bone has already crumbled. What stays open is a great deal: Vasanti, Feather touch, Ankle point, Paralysis clockwise, Sangam, Ton 'T'. Learn those to a high standard.
- 3. T8 has no count and Knee cap free had none either. What am I supposed to do? Two different answers, and each entry tells you which. Where the entry states an aim you can feel — the cap loose, the ankle tissue loose — the aim is the count. Where it states only press and release, as T8 does, the therapy's standing unit applies: six seconds. See also → Six Seconds, "Six Seconds".
4. I am a physician. What is actually being claimed by Down arrow and Up arrow — that a stroke along the back alters the fluid in the inner ear? Separate the parts, as you would anywhere else. The clinical distinction the entries draw is a real one and drawn more carefully than you might expect: Meniere's disease genuinely is understood as a disorder of too much fluid in the inner ear. The claim of effect is the therapy's own, made from a long clinical experience, and you are entitled to hold it as unproven. What is not in dispute is that a dizzy patient is usually a guarding patient, and that a long, slow, even stroke along the spine reliably reduces that guarding. Be honest with a patient about which of those you are promising.
5. Why is Motor neuron point called that if it is not a treatment for motor neurone disease? Because it lies over the stretch of the spinal cord from which every nerve of the arm departs, and those cells are motor nerve cells. It is an anatomical name, not an indication — like T8 or Ankle point. The material never claims the disease; it names the place and then spends most of its eight lines telling you to be careful. Never let a family hear the name as a promise.
6. I am a village therapist with one mat and no spare pillows. Can I give Katka with the usual one and a half? No. The four pillows are part of that treatment, not part of the furniture: three under the chest and one under the chin, and then the three-finger gap checked by hand. Without them the patient's chin goes down onto her own windpipe while you deliver a jerk. If the pillows are not there, the treatment is not given today. Write on the card why.
- 7. A patient wants me to make the click come. It came last week and she liked it. Then tell her what the material says, which is sometimes a slight sound may come from this. Sometimes. It is not the treatment and it is not a measure of the treatment. A therapist adding force to produce a noise has left the instruction behind — and the same entry says only a mild jerk is to be given.
8. I have no science at all. Why does pressing a calf help a swelling in the scrotum? I will give you the honest version, because you will be asked it. The material's claim is that such a patient has a great deal of pain at that place in the calf, and that relieving it helps. The relief in the calf you will see for yourself in ten minutes. Whether the swelling changes is a separate question and belongs to a doctor who can examine it. Give the point; make the referral; do not join the two sentences together.
9. Opposite point says right hand to left leg. Why not right hand to left hand? Because the entry says diagonal and spells it out twice so that nobody takes the easy reading. Right hand ↔ left leg; left leg ↔ right hand. And its practical value is in the patients for whom the affected limb cannot be touched at all — plastered, freshly operated, too painful — where the atlas would otherwise close and this rule keeps it open.
- 10. Our card says Ton. Nothing else. Can I just give both? No. They are two treatments with a restriction attached to one of them, and Ton 'P' is not given to a woman who wishes to become a mother. Go back and ask which was meant. A code with the discriminating letter missing is not a prescription. See also → The Record That Shows the Truth, "The Record That Shows the Truth".
- 11. A woman came for Abdomen setting and stopped me at the third movement. Do I finish it next time from where I stopped? No — you begin it again from the butterfly. These four are a sequence and each prepares the one after it. And find out what stopped her: a movement that meets a wall has reached its end for today, and a movement that meets a wince has reached somebody else's question.
- 12. How often should Katka and Motor neuron point appear on my records? Rarely. That is the whole force of use only after much thought. If you look at three months of your own cards and find either of them given routinely, something has drifted — not in the material, in you.
Questions patients ask
1. "You are pressing my leg. My problem is in my private parts. Are you avoiding it because you are embarrassed?" No — I am treating a point that is genuinely there in the calf and that I expect will give you relief in that leg today. But I want to be very clear with you about the other thing, because it matters more than anything I will do: I cannot examine a swelling like that and I am not going to pretend otherwise. You need a doctor to look at it, this week. What I do here goes alongside that, never instead of it.
2. "The doctor says the womb must be removed. If I come to you, can I cancel the operation?" Please do not cancel anything on my account. Here is what I honestly expect: this treatment often gives real relief from the dragging and the heaviness, and there are other things — how you lift, your cough, your constipation — that we can change and that matter as much as anything I do. But whether the womb has moved back is decided by an examination, not by how you feel, and I am not the person who examines. Take what changes back to your doctor and let her tell you what it means.
- 3. "You made a cracking sound in my back. Did something break?" No. That sound is a small pop from inside a joint — the same kind of noise your knuckles make — and it means nothing has broken. It is not the point of the treatment either. Some people make the sound and some never do, and both get the same benefit. I will not be trying to make it happen.
4. "My father has had a stroke. Will this bring his hand back?" I will not promise you that, and please be careful of anyone who does. What I expect is that the hand becomes easier to open and to clean, that the stiffness settles, and that he is more comfortable — and every bit of that matters daily to the person who cares for him. The bigger gains come from doing a little several times a day, so I am going to teach you. We work alongside his doctors and his physiotherapist, and I would like them to know exactly what he is getting here.
5. "Why did you press so gently? I hardly felt it." Because for what you have, gentle is the treatment and not a soft version of it. The instruction for numbness says very softly, in those words. And there is a plain reason: where feeling in a foot is reduced, the foot cannot warn you that it is being hurt — so my hands have to be careful on its behalf. Pressing harder would not help you and could harm you.
6. "I felt dizzy getting up. Is something wrong?" Very likely not, and it is common after lying still and warm for half an hour — the body needs a moment to gather itself. Sit here; I will stay with you. If it does not settle in a few minutes I will take that seriously rather than wave it away, and there are a few things I always check before you leave. Next time, turn onto your side first and come up through your side rather than straight up. Eat something in about half an hour.
- 7. "Why can't I take my phone call? It is my son." Because the treatment is not finished until you have got up, walked a little and told me how it went — and I will not take calls during your session either. I keep the rule first so that I can ask you to keep it. Two more minutes and the phone is yours.
Words used here
| Hindi | English | Neurotherapy code / usage |
|---|---|---|
| कंधे की हड्डी | The shoulder blade | Lower shoulder blade pain — palms, palms up, ×3; Upper shoulder blade pain — feet, palms down, arms raised. Then BAFA in cervical problems Prone |
| चक्कर | Giddiness, dizziness | Two kinds are named: fluid increased → Meniere's → Down arrow; fluid decreased → vertigo → Up arrow |
| — | Down arrow | Head end · palm under the neck · middle of the palm on T1 · slightly inward · T1 → L5. Also allowed seated on a chair Supine Seated |
| — | Up arrow | Waist end · palm over L5 · somewhat firmly · L5 → T1. Lying down only. Its sign is the bare ring-and-stem — not On the spine Supine |
| — | Hydrocele point | Heel from the side, calf 4–5 inches above the ankle, press and release 2–4 times; one leg or both, according to the pain. For swelling or itching in the scrotum |
| — | Prolapse point · P point | Heel on the middle of the thigh, upward jerk, left thigh first. (6) WD immediately after ▲ Take care |
| — | T8 | Press and release all around the T8 bead — never enough to increase the pain Prone 6 sec |
| — | Rocket point | Base of the palm, wrist → shoulder, ×3; then the thumb tip behind the ear, quite strong, pushed upward. Seated or lying |
| घिसाई | Rubbing — a sliding application | Gal–Spl ghisai — soft mid-soles, outer side of the pelvic bone, inside → outward, both sides at once, 6 times, no weight on the bone Supine |
| — | Abdomen setting | Butterfly ×3 · knees joined, 3 right and 3 left · one leg straight, other knee inward, 3 both sides · face one way, knees the other, 3 both sides. For a very bad stomach Supine |
| — | Opposite point | Right hand ↔ left leg; left leg ↔ right hand. Press, and rotate clockwise and in reverse |
| — | Superfast | The side opposite the pain. Inner, thigh → ankle, downward; knee turned over on 2–3 pillows; outer thigh → calf → heel. 3–4 rounds |
| कटका | The snap, the sudden jerk | Katka — L5 → T1 ×3 · feet sideways, outer edges, a jerk · neck left, jerk then slide shoulder blade → elbow · neck right, the same Prone ▲ Take care |
| — | Motor neuron point | Heels one by one either side of C7–T1 · toes clear of the skull · foot at 90° · ordinarily five times. Four pillows · three-finger gap · only a mild jerk Prone ▲ Take care |
| — | Paralysis clockwise | Fingers gathered, clockwise. Inner side downward, outer side upward, in named segments, each limb ending in a lift |
| शुक्ला | Shukla — a personal name | Fix the wrist or the heel bone · interlace the fingers or toes · up-down, right-left, clockwise, anti-clockwise, 6–6 each. Not for osteoporosis ▲ Take care |
| वसंती | Vasanti — a personal name | Very softly. Supine, between the legs, heel → knee both sides; then prone, back of the calf, 15–20. Hands: fingers → elbow. Numbness, especially in diabetes |
| — | Feather touch | Finger tips only, very soft, like a peacock's feather. Impulses through the whole body; paralysis, stiffness, pains, all diseases of the brain |
| — | Ton 'P' / Ton 'T' | Same three rubs; only the count differs. Cheek 12/6 · below the cheek 6/12 · side of the neck 3/3. Palm flat, flat, edge. Left side first. Ton 'P' not to women who wish to become mothers ▲ Take care |
| संगम | Sangam — a confluence | After Ton 'T'. Below the elbow (C6, C7, C8) — 6 · thumb-and-first-finger junction — 6 · below the heel bone where the pulse beats, rubbing downward with the side of the heel — 12. Also cough and any throat problem 6 sec |
| — | Ankle point | Fingers clockwise all round the ankle skin, outside first then inside, until the tissue underneath becomes loose. The affected leg only |
| — | Pan⁺⁺⁺⁺ · Pan⁺⁺ · Pan⁺ · Pan ₋ | The card notation: extreme · somewhat less · considerably less, a little left · gone completely, each written below the last |