The Low Back walked a foot from a hip to a heel four different ways and stepped over the same joint three times without once landing on it. This article turns round and treats that joint directly — and then keeps going, down the calf, across the foot, and out to the big toe.
Two things change with the region. This is the one group in the atlas that tells you why the therapy is built in two halves, in a single plain sentence, before it teaches a single technique. And the knee group is not a list of options. It is a sequence, in a fixed order, in which each treatment prepares the tissue for the one after it.
Watch


Why the chemical points come first
Chemical first to change the conditions, physical after to put back
This group carries a heading of its own — घुटने के दर्दों के लिए कुछ उपचार, some treatments for pains of the knee — and it opens with an explanation rather than an instruction.
The order of the two halves, and what the physical points are for
First the appropriate chemical points are given, to improve the internal environment of the cells.
After that, physical points are chosen such that the tissues above and below the knee-cap — which get pulled during work and become caught in the knee-cap — are, by various methods, returned to their own place.
And the claim that follows it:
In knee problems we have had such success that all knee problems are put right without any operation at all. Yes, full recovery certainly takes time, but relief in the pain comes after only a few treatments.
The chemical points change the conditions the tissue is living in. The physical points change where the tissue is sitting. A knee in a body that is not digesting has no raw material to repair itself with; a knee full of good raw material still hurts if a sheet of tissue is caught where it should be gliding. The order is chemical first, physical second, and the order is the instruction.
Note the mechanism the therapy names for itself — the tissues get pulled during work and become caught in the knee-cap — because the whole sequence follows from it. Back of knees softens what is behind. Knee Cap Free unsticks the cap. Giriraj carries the thigh tissue back upward, the direction it was pulled down from; the calf ghisai does the same below; Pradeep works the region from four sides. Every one is a putting-back, not a rubbing-away.
And the claim is to be handled plainly, because a student will be asked about it across a mat one day. All knee problems are put right without any operation at all is a very large sentence; the sentences on either side of it are not. Relief in the pain comes after only a few treatments is modest and testable. Full recovery certainly takes time is an honest warning against exactly the over-promise the middle sentence invites. And keep one distinction the words knee problems hide: a worn joint, a torn cartilage, a snapped ligament, a cap that tracks badly, a hip sending its pain down to the knee, and a hot infected joint are six different things wearing one name.
| Where the therapist stands or sits | Named in |
|---|---|
| Beside the patient, the usual way, weight on the palms through the chairs | Back of knees, BOF Prone |
| Hands only, no chairs | Knee Cap Free, Giriraj, calf muscle ghisai Supine Seated |
| Between the patient's legs, looking at the knee | Pradeep Supine |
| Beside the patient, heel or palm sole, working up a line | JJ Groin Supine · JJ Back Prone |
| Standing over the foot, supported on the chairs | Big Toe Gas |
The chairs are the load control, not the furniture — wherever a foot is used here, the therapist's weight hangs from his arms, so what reaches the patient is exactly as much of him as he lets down.
The two treatments that make the cap supple
Behind the joint face down, in front of it face up — 20–25, 6 and 6
The order, and the sign
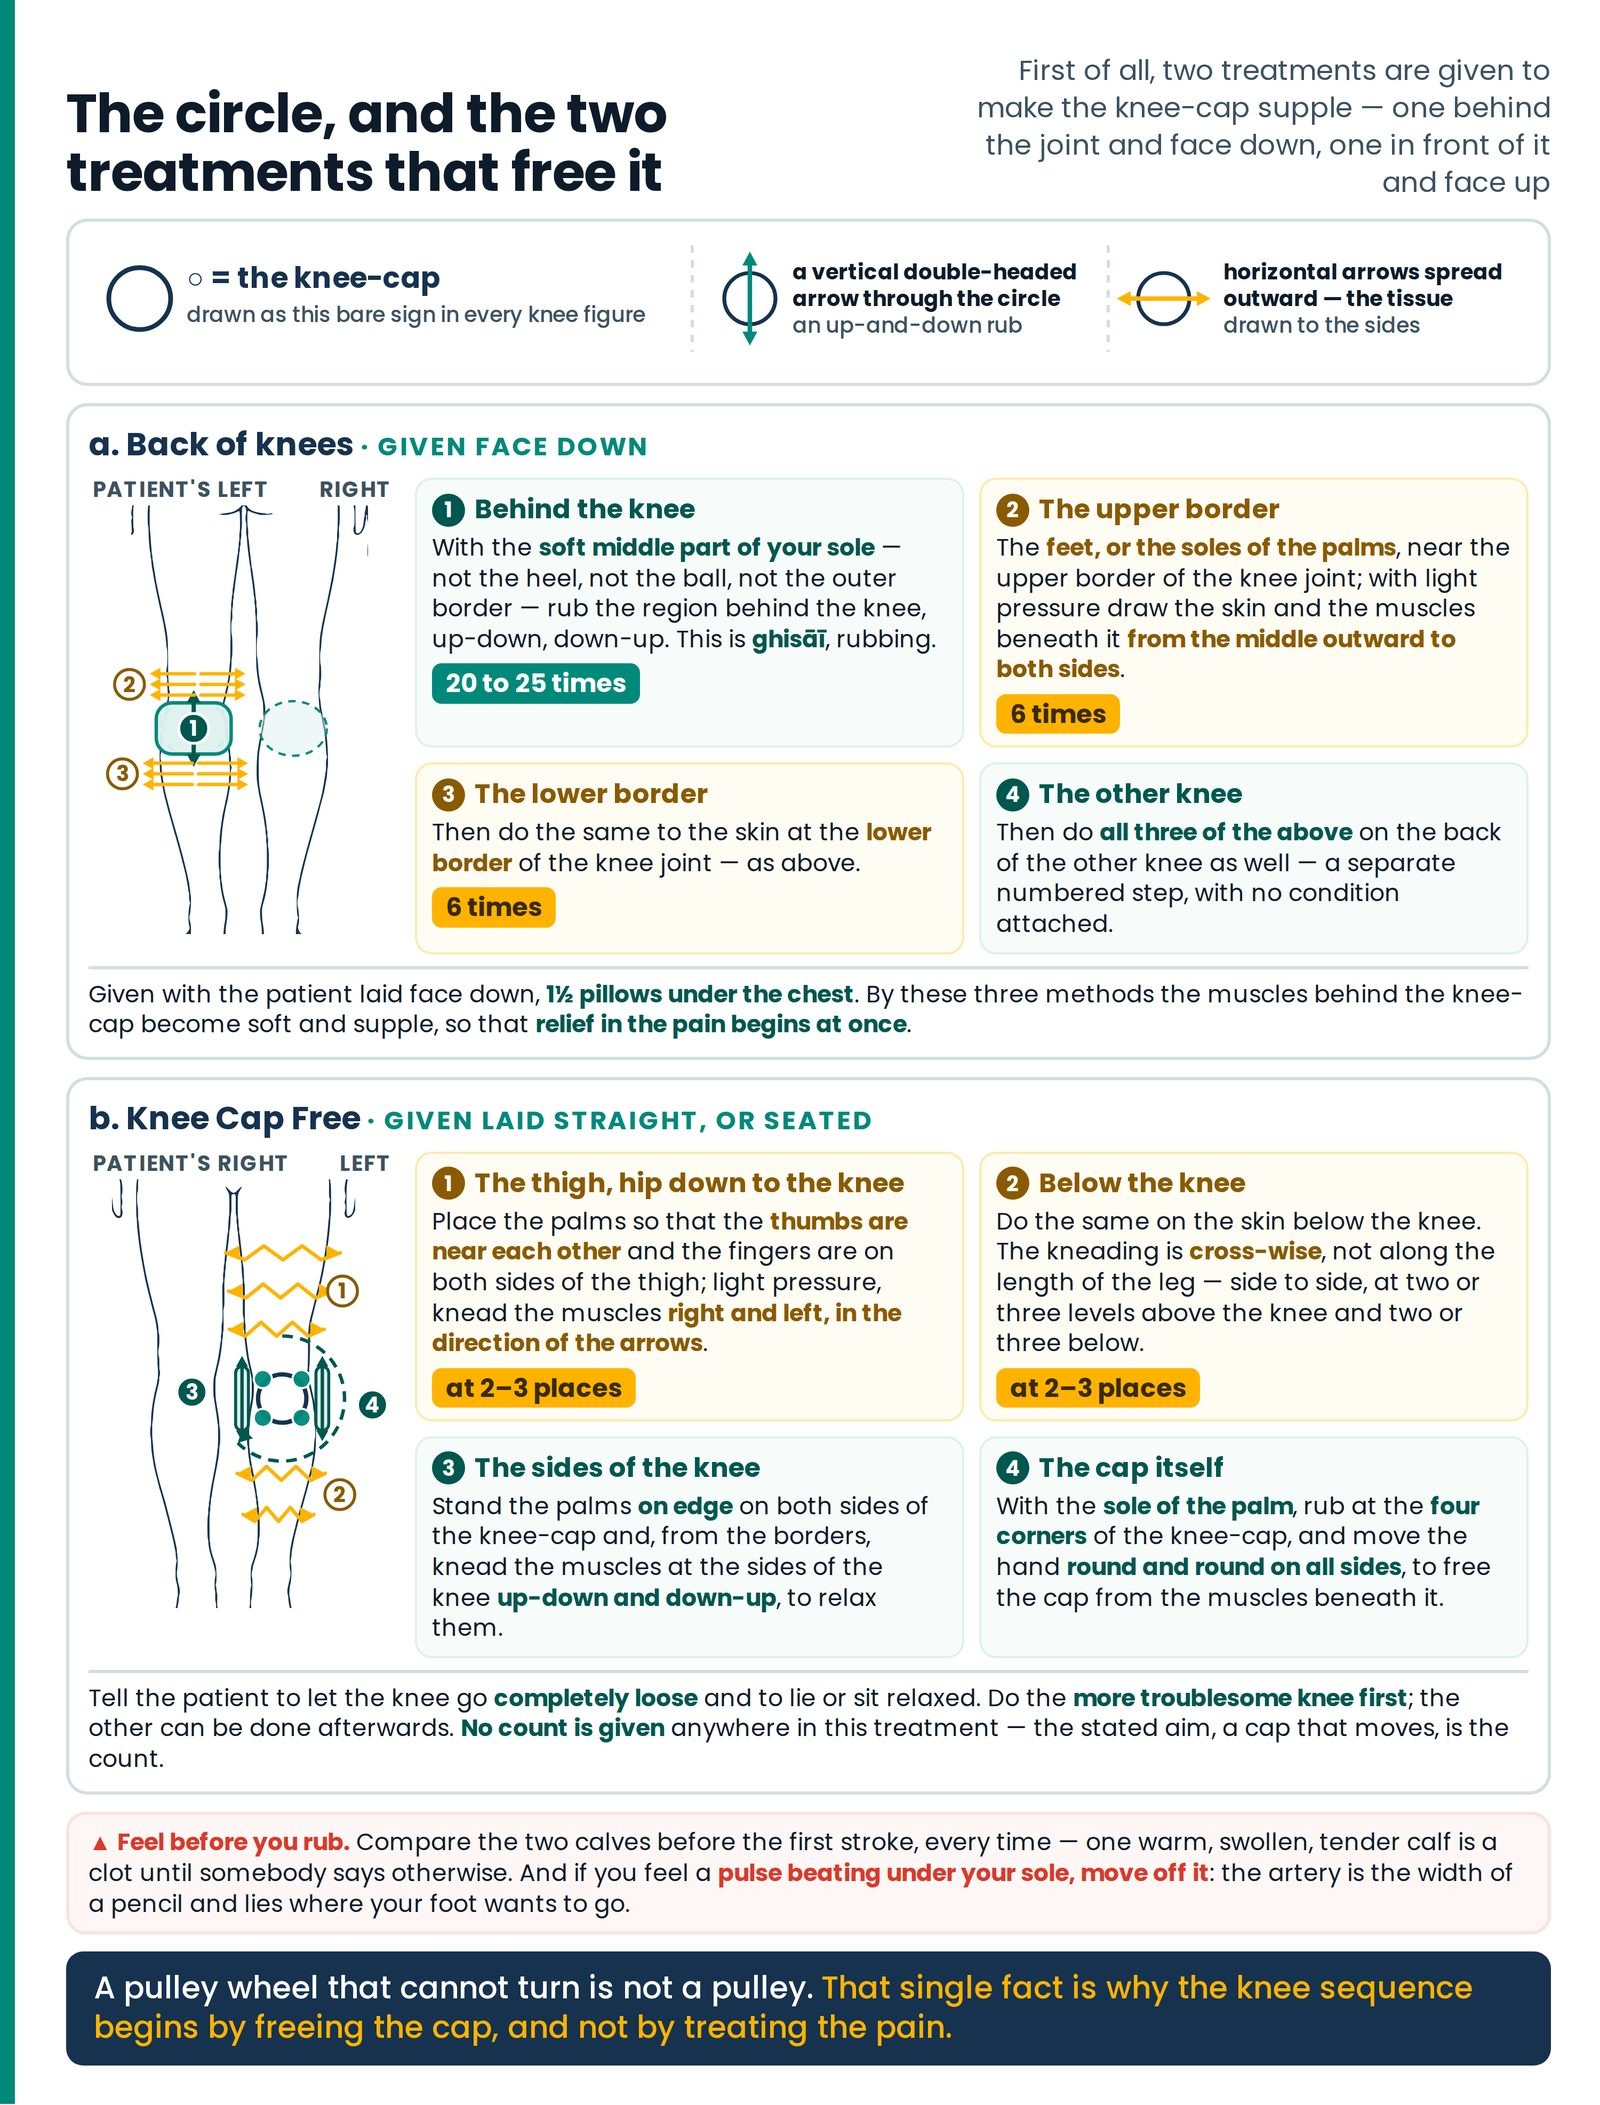
First of all, two treatments are given to make the knee-cap supple.
In these figures the knee-cap is drawn as this sign → ○
A bare open circle. Wherever it appears in a knee figure, it is the cap, and the arrows drawn through it tell you what is being done. A vertical double-headed arrow through the circle is an up-and-down rub; horizontal arrows spreading outward are tissue drawn away to the sides.
Back of knees is given face down and works behind the joint. Knee Cap Free is given face up or seated and works in front of it. One patient, one session, two positions — which is precisely why students skip the first one. (Figure 23.1)
a. BACK OF KNEES — given face down
Pick up the thread The Low Back left you with. The last named method that article taught was Blood Supply to Sides — the soft inner part of the sole, at the side of the hip, from the side outward, at different places, 6 to 12 times, to relax the muscles around the hip. It was taught there in full and is not taught again here. But look at what stages 2 and 3 below ask of your hands and you will recognise its shape at once: a broad soft contact, a light pressure, tissue drawn from the middle outward to both sides, several times over, at a named border. Tool, place and count all differ. The idea — widen a tissue by carrying it away from its own midline — you already have.
Given with the patient laid face down, 1½ pillows under the chest. Prone Both sides
- 1. With the soft middle part of your sole, rub the region behind the knee, up-down, down-up — 20 to 25 times. This is ghisai, rubbing.
- 2. Then place your feet, or the soles of your palms, near the upper border of the knee joint, and with light pressure draw the skin and the muscles beneath it from the middle outward to both sides, so that the muscles there loosen. Do this 6 times.
- 3. Then do the same to the skin at the lower border of the knee joint — as above, 6 times.
By these three methods the muscles behind the knee-cap become soft and supple, so that relief in the pain begins at once.
- 4. Then do all three of the above on the back of the other knee as well.
| Patient's position | Laid face down, 1½ pillows under the chest Prone |
|---|---|
| Where the hands or feet are placed | 1 — the soft middle part of the sole, in the region behind the knee. 2 — the feet, or the soles of the palms, near the upper border of the knee joint. 3 — the same at the lower border. In 2 and 3, the skin and muscles beneath drawn from the middle outward to both sides, with light pressure |
| Duration and repetitions | 20 to 25 times behind the knee, up-down, down-up; 6 times at the upper border; 6 times at the lower border; then all three on the back of the other knee as well Both sides |
| What it is for | Making the muscles behind the knee-cap soft and supple, so that relief in the pain begins at once |
The tool in stage 1 is the soft middle part of the sole — not the heel, not the ball, not the outer border. Stages 2 and 3 may be given with the feet or with the soles of the palms: both are written, neither preferred, and a small patient, a frail one, a child, or a therapist who cannot place a foot accurately at a joint border all say hands. The pressure is light either way. The direction in 2 and 3 is outward from the middle — not up, not down, not round. And the counts are three different numbers: twenty to twenty-five, six, six.
The fourth instruction is written as a separate numbered step. Then do all three of the above on the back of the other knee as well. Both knees — even if only one hurts. Notice where it sits: the treatments that follow will be explicit about doing only the affected side when only one side is affected. This one is not.
b. KNEE CAP FREE — given laid straight, or seated
Tell the patient to let the knee go completely loose and to lie or sit relaxed. Do the more troublesome knee first; the other can be done afterwards. Supine Seated
- 1. Place the palms so that the thumbs are near each other and the fingers are on both sides of the thigh. With light pressure, knead the muscles right and left, in the direction of the arrows. Do this at two or three places on the thigh, from the hip down to the knee.
- 2. Do the same at 2–3 places on the skin below the knee.
- 3. Stand the palms on edge on both sides of the knee-cap and, from the borders, knead the muscles at the sides of the knee up-down and down-up, to relax them.
- 4. Then, with the sole of the palm, rub at the four corners of the knee-cap, and move the hand round and round on all sides, to free the cap from the muscles beneath it.
Doing all this makes the knee-cap completely loose, which reduces the stiffness of the knee — and that is exactly why it is called cap free.
| Patient's position | Laid straight, or seated; the knee completely loose, the patient relaxed. Do the more troublesome knee first Supine Seated |
|---|---|
| Where the hands are placed | Palms with thumbs near each other and fingers on both sides of the thigh, at two or three places from the hip down to the knee; then at 2–3 places on the skin below the knee; then the palms standing on edge on both sides of the knee-cap; then the sole of the palm at the four corners of the knee-cap, moving round and round on all sides |
| Duration and repetitions | Kneading with light pressure, right and left, in the direction of the arrows; at the sides of the knee up-down and down-up. No count is given |
| What it is for | Making the knee-cap completely loose and freeing the cap from the muscles beneath it, which reduces the stiffness of the knee |
"Let the knee go completely loose" is a technical precondition, not a pleasantry. The cap sits inside the tendon of the big thigh muscle, and when that muscle tightens — as it does the instant a patient braces, lifts the heel an inch, or holds the leg "helpfully" straight — the tendon pulls tight over the cap and clamps it into its groove. All four stages are then working against a locked bone. Hands off until the leg is heavy: lift the heel two inches and let it drop; a loose leg drops like a sandbag.
"Do the more troublesome knee first" runs against instinct, and it is written. The troublesome knee gets your freshest hands, before the session runs long — and it gets treated before the patient has decided, from ten comfortable minutes on a knee that was never the problem, how much she will let you do to the one that is.
"In the direction of the arrows" sends you to the figure, which shows zig-zag arrows running side to side at two or three levels above the knee and two or three below. The kneading is cross-wise, not along the length of the leg. Stage 3 turns the hands: the palms come up on edge, like two knife blades, one each side of the cap, and the sides of the knee are kneaded up-down and down-up. And stage 4 is the treatment the name is about — the sole of the palm, the soft pad at the base of the thumb, at the four corners first and then round and round on all sides. Do not shorten it to the circle.
GIRIRAJ — carrying the thigh back upward
Fingers together, clockwise, knee → groin, along three or four lines
Several treatments in this atlas carry a person's name rather than a place — Giriraj and Pradeep here, and elsewhere Loveleen, Raman, Shivaji, Mauneesh. The convention is that a technique is named for the student or patient in connection with whom it was found: the method and the story of its finding travel together, and the name is the index entry. The cost is that the name tells a newcomer nothing, which makes these the entries a student must actually learn rather than half-recall.
This is given to loosen the muscles above and below the knee. It can also be given with the patient seated. If treating them lying down, put a pillow under the thigh. Seated Supine Both sides
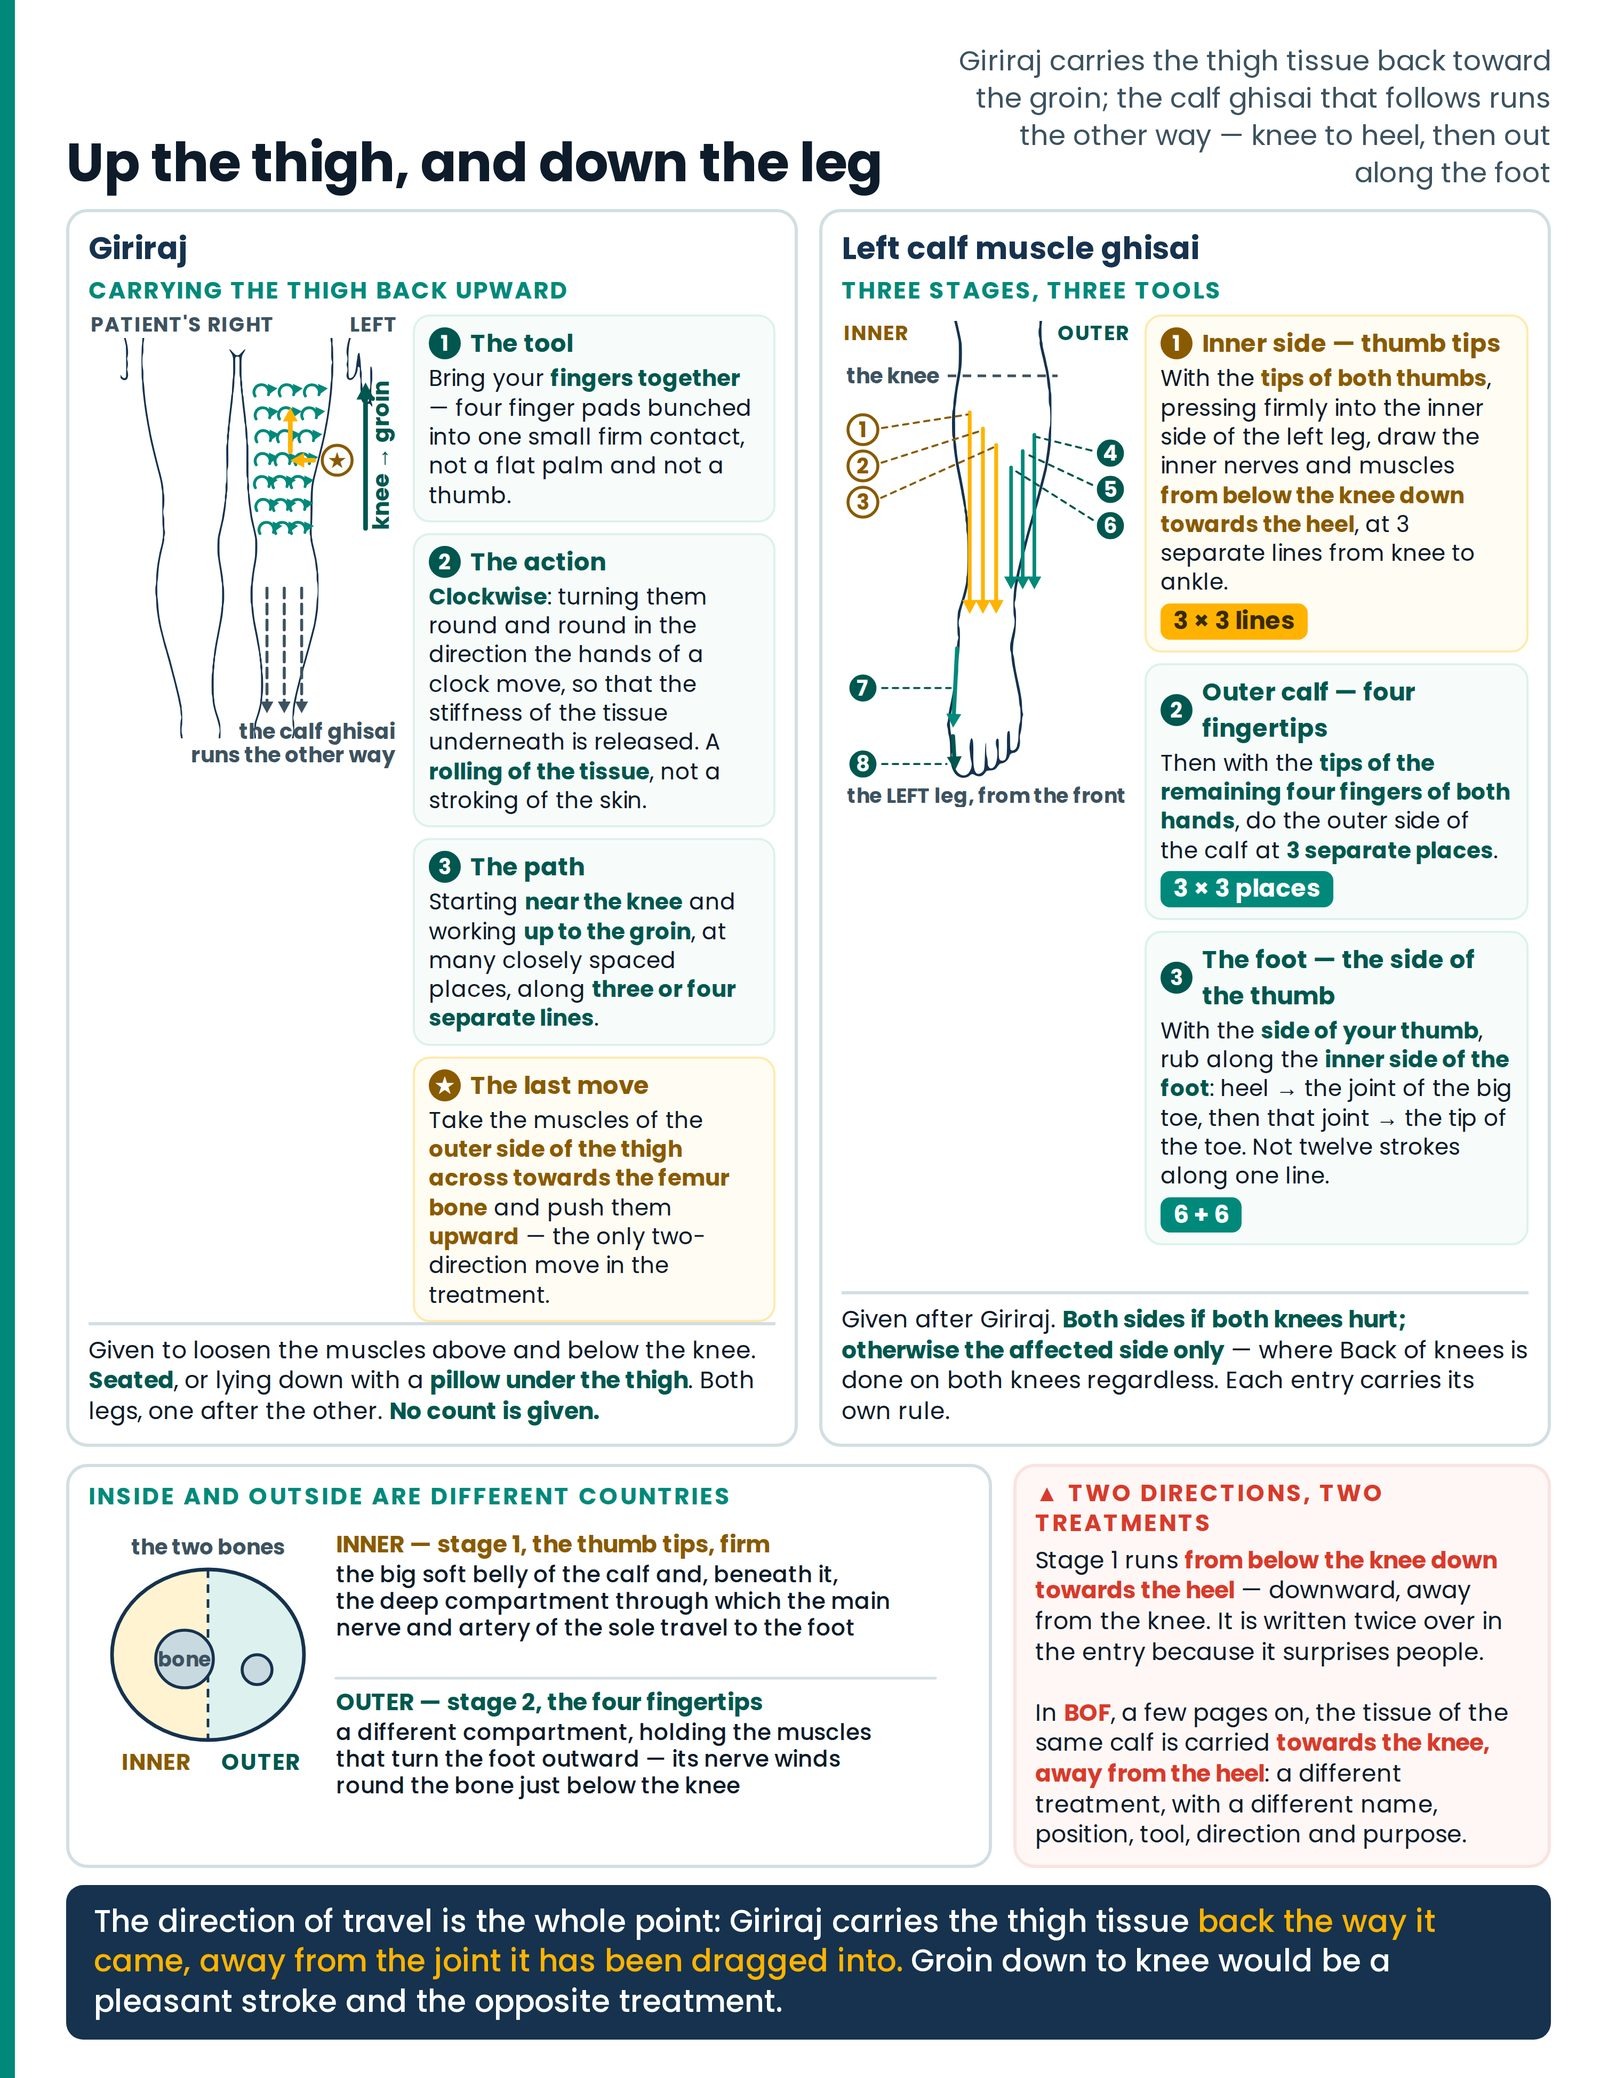
Bring your fingers together and, starting near the knee and working up to the groin, at many closely spaced places, carry the muscles upward with a clockwise action. Do the same along three or four separate lines. Finally, take the muscles of the outer side of the thigh across towards the femur bone and push them upward. Do both legs, one after the other.
After this, calf muscle ghisai is to be done. If both knees hurt, do both sides; otherwise do the affected side only.
| Patient's position | Seated, or lying down with a pillow under the thigh Seated Supine |
|---|---|
| Where the hands are placed | The fingers brought together, starting near the knee and working up to the groin, at many closely spaced places, carrying the muscles upward with a clockwise action, along three or four separate lines; finally the muscles of the outer side of the thigh taken across towards the femur bone and pushed upward |
| Duration and repetitions | Many closely spaced places along each of three or four lines; no count is given; both legs, one after the other Both sides |
| What it is for | Loosening the muscles above and below the knee |
| What follows it | Calf muscle ghisai — both sides if both knees hurt; otherwise the affected side only |
Clockwise is defined for you — "clockwise" means bringing the fingers together and turning them round and round in the direction the hands of a clock move, so that the stiffness of the tissue underneath is released. It is a rolling of the tissue, not a stroking of the skin: the bunched finger pads take the muscle with them as they turn, and each turn carries it upward before the hand lifts off and moves on to the next closely spaced place.
The direction of travel is the whole point. Giriraj runs from near the knee up to the groin — carrying the thigh tissue back the way it came, away from the joint it has been dragged into. Working from groin down to knee would be a pleasant stroke and the opposite treatment. "Bring your fingers together" gives the tool: four finger pads bunched into one small firm contact, not a flat palm and not a thumb. "At many closely spaced places" gives the spacing: you stop, roll, lift, move up a little, roll again, all the way to the groin. "Three or four separate lines" gives the coverage — inner thigh, middle, outer, and a fourth if the thigh is broad. (Figure 23.2)
The final move is a different action and is easy to lose. The muscles of the outer side of the thigh are taken across towards the femur bone and then pushed upward. Across, then up — the only two-direction move in the treatment, over the long tough band that so many painful knees complain from.
And the closing sentence is a prescription, not a note. If both knees hurt, do both sides; otherwise do the affected side only. Compare Back of knees, where both knees are done regardless. Different rules attached to different treatments, each complete where it stands.
LEFT CALF MUSCLE GHISAI — three stages, three tools
Thumb tips inside, fingertips outside, thumb edge along the foot
On the left leg, done in three stages. Supine Seated Left
- 1. With the tips of both thumbs, pressing firmly into the inner side of the left leg, draw the inner nerves and muscles from below the knee down to the ankle — that is, the heel — towards the heel. Do this 3 times. In the same way, at 3 separate lines from knee to ankle, as in the figure — see 1, 2, 3 in the picture.
- 2. Then with the tips of the remaining four fingers of both hands, do the outer side of the calf at three separate places, three times each — see 4, 5, 6 in the picture.
- 3. Then with the side of your thumb, rub along the inner side of the foot from the heel to the joint of the big toe, 6 times, and from that joint to the tip of the toe, 6 times — see 7, 8 in the picture.
| Patient's position | Follows Giriraj; the left leg as named — the affected side, or both if both knees hurt Left Right |
|---|---|
| Where the hands are placed | 1 — tips of both thumbs, pressing firmly into the inner side of the leg, along 3 separate lines from knee to ankle. 2 — tips of the remaining four fingers of both hands, on the outer side of the calf, at 3 separate places. 3 — the side of the thumb, along the inner side of the foot |
| Direction | 1 — from below the knee down towards the heel. 3 — heel → big-toe joint, then that joint → tip of the toe |
| Duration and repetitions | 3 times on each of the 3 inner lines; 3 times each at the 3 outer places; 6 times heel to the joint of the big toe, and 6 times that joint to the tip of the toe |
| What it is for | Given after Giriraj, as part of the knee sequence |
Two hands, three tools, named separately for a reason. Stage 1 is the tips of both thumbs, pressing firmly. Stage 2 is the tips of the remaining four fingers of both hands — the same two hands turned so that fingers rather than thumbs are the working surface. Stage 3 is the side of your thumb, the flat of its edge, not its tip. Thumb tips inward, fingertips outward, thumb edge along the foot.
The direction in stage 1 is written twice over, because it surprises people. From below the knee down to the ankle — that is, the heel — towards the heel. Downward, away from the knee. Note it, because in a few pages you meet BOF, where the tissue of the same calf is carried towards the knee, away from the heel — a different treatment, with a different name, position, tool, direction and purpose. Each is given as it is written; keep them apart and you will never give either by accident.
The three inner lines and three outer places are stations, not one long sweep — line 1, three strokes; line 2, three; line 3, three; then place 4, place 5, place 6, three each. And stage 3 leaves the calf for the foot, along the inner border, in two separate segments with separate counts: heel to the joint of the big toe, six; that joint to the tip of the toe, six. Not twelve strokes along one line.
PRADEEP — the pillow, the jerk, the walks and the stand
Five stages in order, and the first of them is the placing of a pillow
Five stages, given in order — and the first of them is the placing of a pillow, which tells you how much of this treatment is decided before a foot touches anybody.
The variant some therapists use in place of stages 3 and 4 {{x3}}
In place of numbers 3 and 4 above, some therapists do it this way → placing the soles on both sides of the knee, they move the two feet alternately in opposite directions — that is, the left foot travels from the knee towards the hip while at the same time the right foot travels from below the knee towards the heel.
Three rounds like that. After that, do number 5 above.
This is not a shortcut and not a correction. It is a second way of covering the same territory, in which the two halves happen together rather than one after the other. Both are given; neither is marked as preferred. What the variant does not replace is stage 5, which follows in either version. Learn both, give one, and write on the card which one you gave.
| Patient's position | Lying; the knee being treated kept bent inward; the pillow at an angle — corner slightly outside the knee, long side under the thigh, part of its width under the lower leg. Left knee first, then the right Supine Left Right |
|---|---|
| The therapist | Between the patient's legs, looking at the knee, body weight taken on the hands on the chairs |
| The five stages, in short | 1 the pillow · 2 the stance · 3 heels either side of the knee, one downward jerk, then from near the upper border walk knee → hip pressing inward, 3 rounds · 4 from just below the knee walk down to the heel pressing downward and inward, 3 rounds · 5 the soft middle of the sole exactly in the middle of the knee bone, whole weight, standing up straight. Then the whole process on the other knee × 3 |
| Variant | In place of 3 and 4 — the soles on both sides of the knee, the two feet moved alternately in opposite directions: left foot knee → hip while the right foot travels from below the knee → heel. Three rounds; then number 5 |
| What it is for | Part of the knee sequence, following Giriraj and calf muscle ghisai |
Stage 1 is a treatment, not bedding. The pillow goes under the knee at an angle, its corner slightly outside the knee, its long side under the thigh, part of its width under the lower leg — three separate placements in one sentence. What it achieves is that thigh and lower leg are both carried and the knee rests in a little bend with nothing hanging, which is the position of greatest room inside the joint and least pressure across it. A knee held dead straight passes every downward force through the joint line. Set the pillow wrongly and you have changed what stage 5 lands on. And "kept bent inward" turns the limb so the inner side of the knee comes up toward you — the aspect the figure shows and the aspect your feet will meet.
"Stand between their legs, looking at the knee" — not beside the patient, as almost everywhere else. The walks run away from you and back towards you along the limb, and only from between the legs can one therapist reach them all.
The jerk comes first and is given once. Both feet on either side of the knee — not on it — and pressure downward through the heels with a jerk. One impulse, then the walking begins. A jerk is the one load a therapist cannot take back once begun, which is why it is given at the start, on a knee already softened by four treatments.
The two walks are mirror images with different pressure directions: upward from near the upper border of the knee, pressing the muscles inward, small close steps, three rounds; downward from just below the knee to the heel, pressing downward and inward, three rounds. Inward going up; downward and inward coming down. Both start beside the joint, not on it. The rule The Low Back states three separate times — by no mistake should the foot fall on the knee joint — governs every travelling step here. (Figure 23.3)
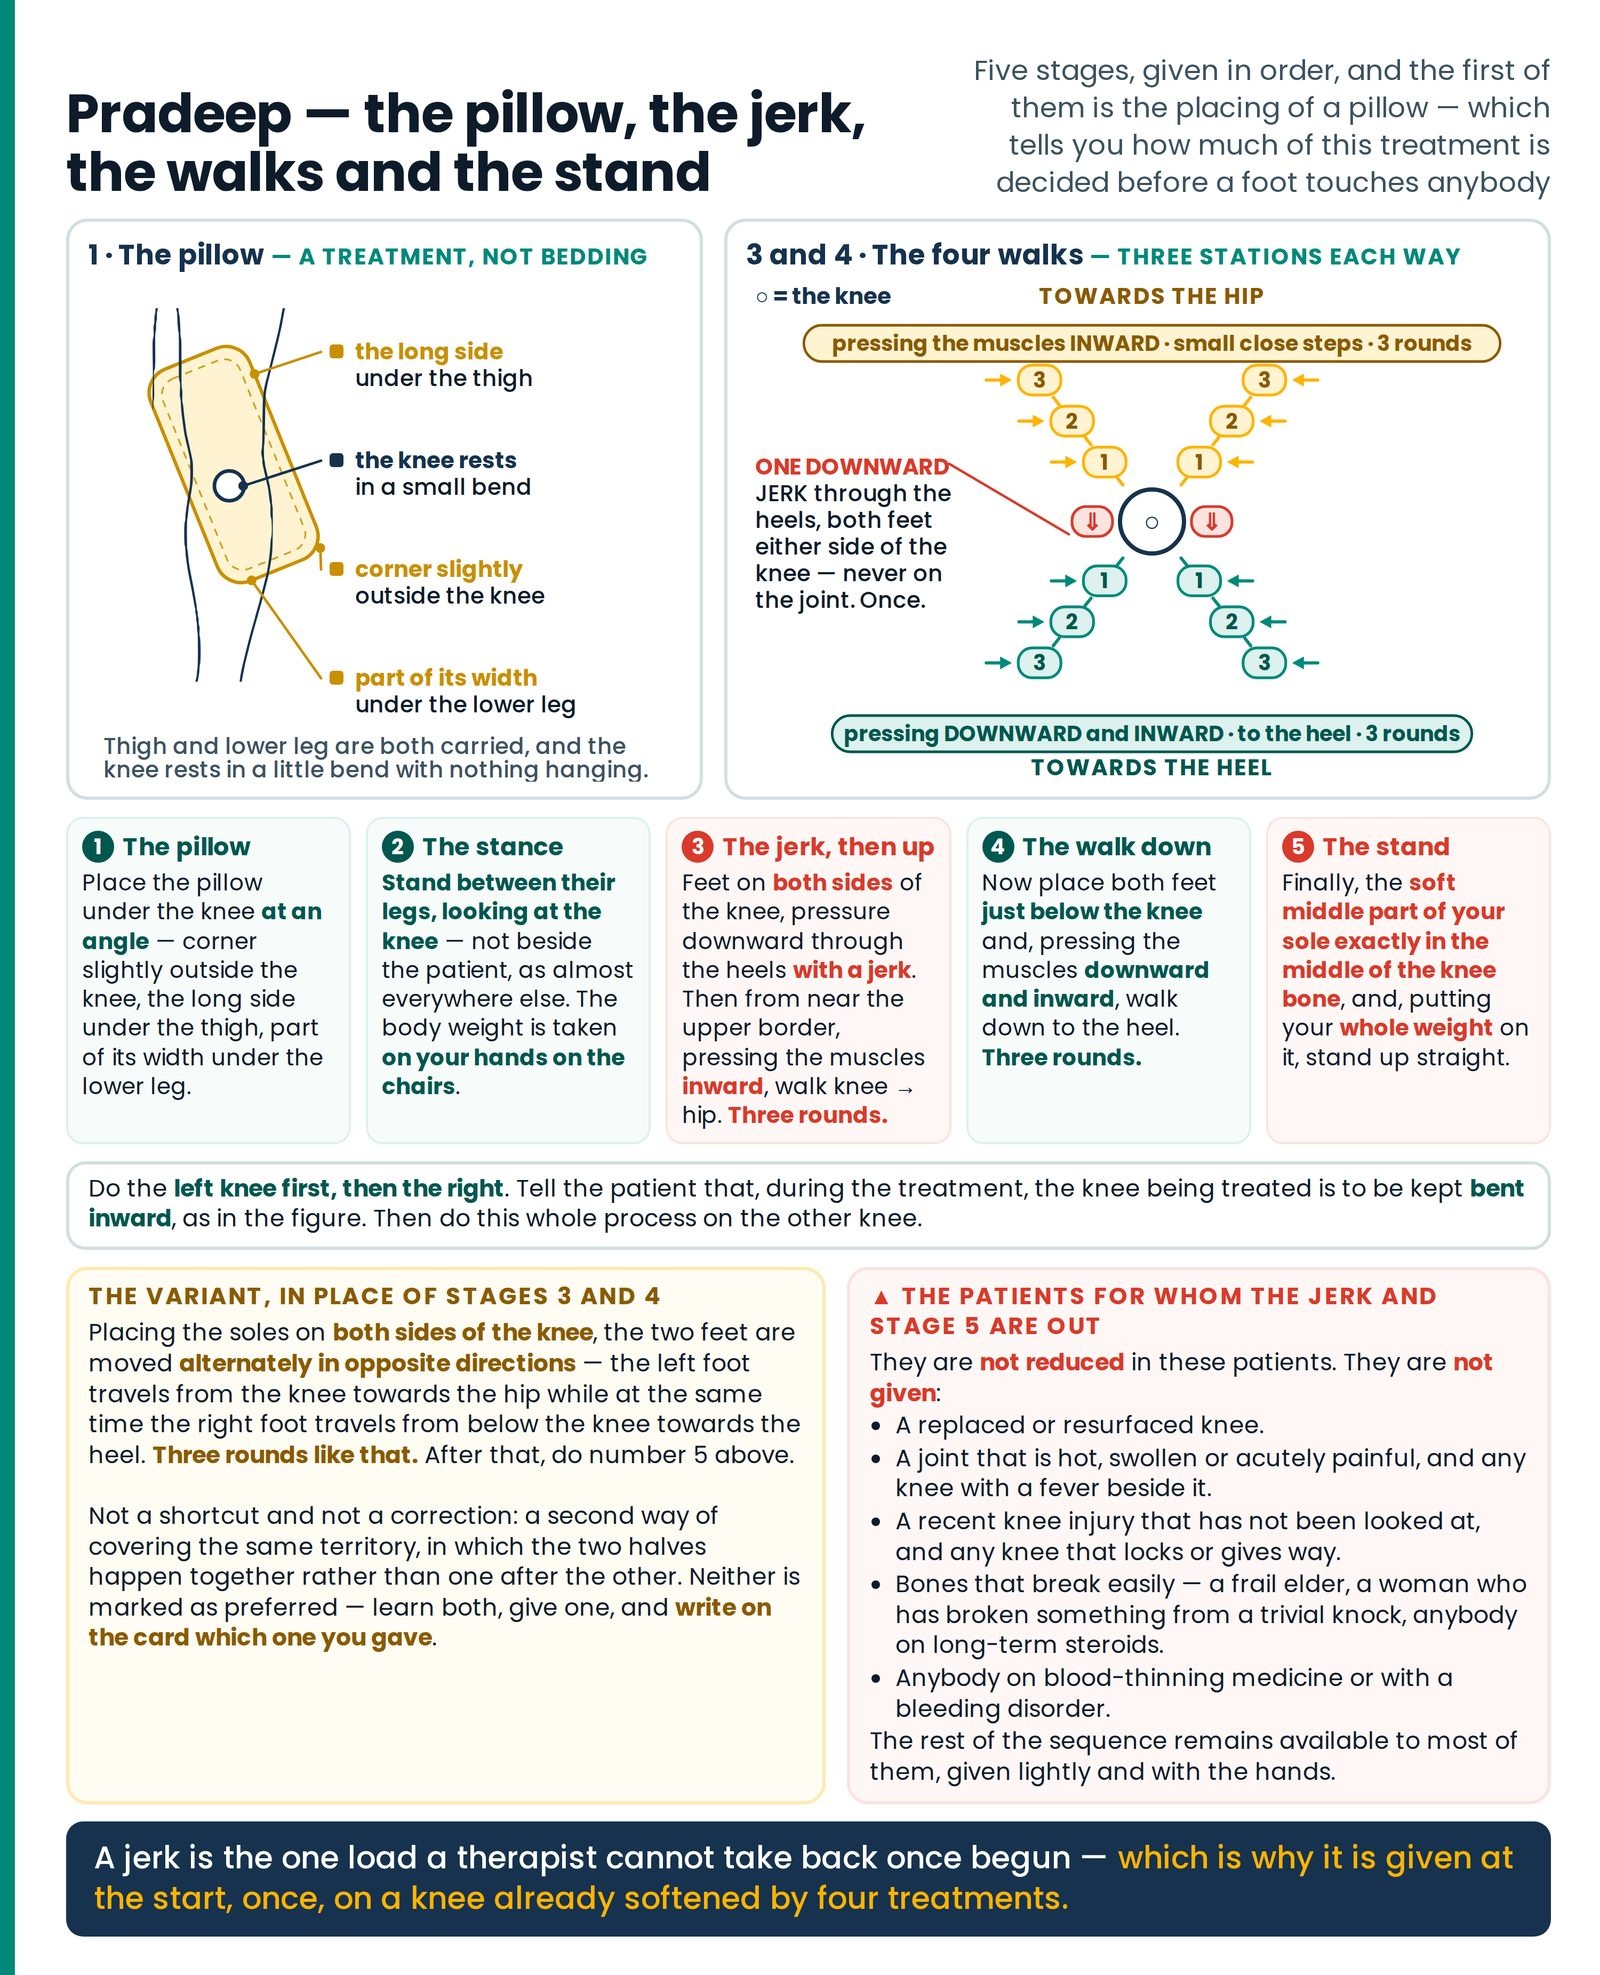
And stage 5 is not a step of the walk. It is a separate, named, final action, described in full. The soft middle part of the sole — the softest tool a therapist has — placed exactly in the middle of the knee bone, and then the whole weight put on it, standing up straight. It is placed, not walked onto; it is the mid-sole, not the heel; it lands on a knee bent inward on an angled pillow with thigh and lower leg both carried; and it comes after everything above. Every one of those clauses is part of the instruction. Give stage 5 as it is written, with the pillow as it is written, and give it last.
JJ GROIN and JJ BACK — for the pain that is left over
Inner side of the knee → Groin; outer side → Back. Two words decide
JJ GROIN — given supine only
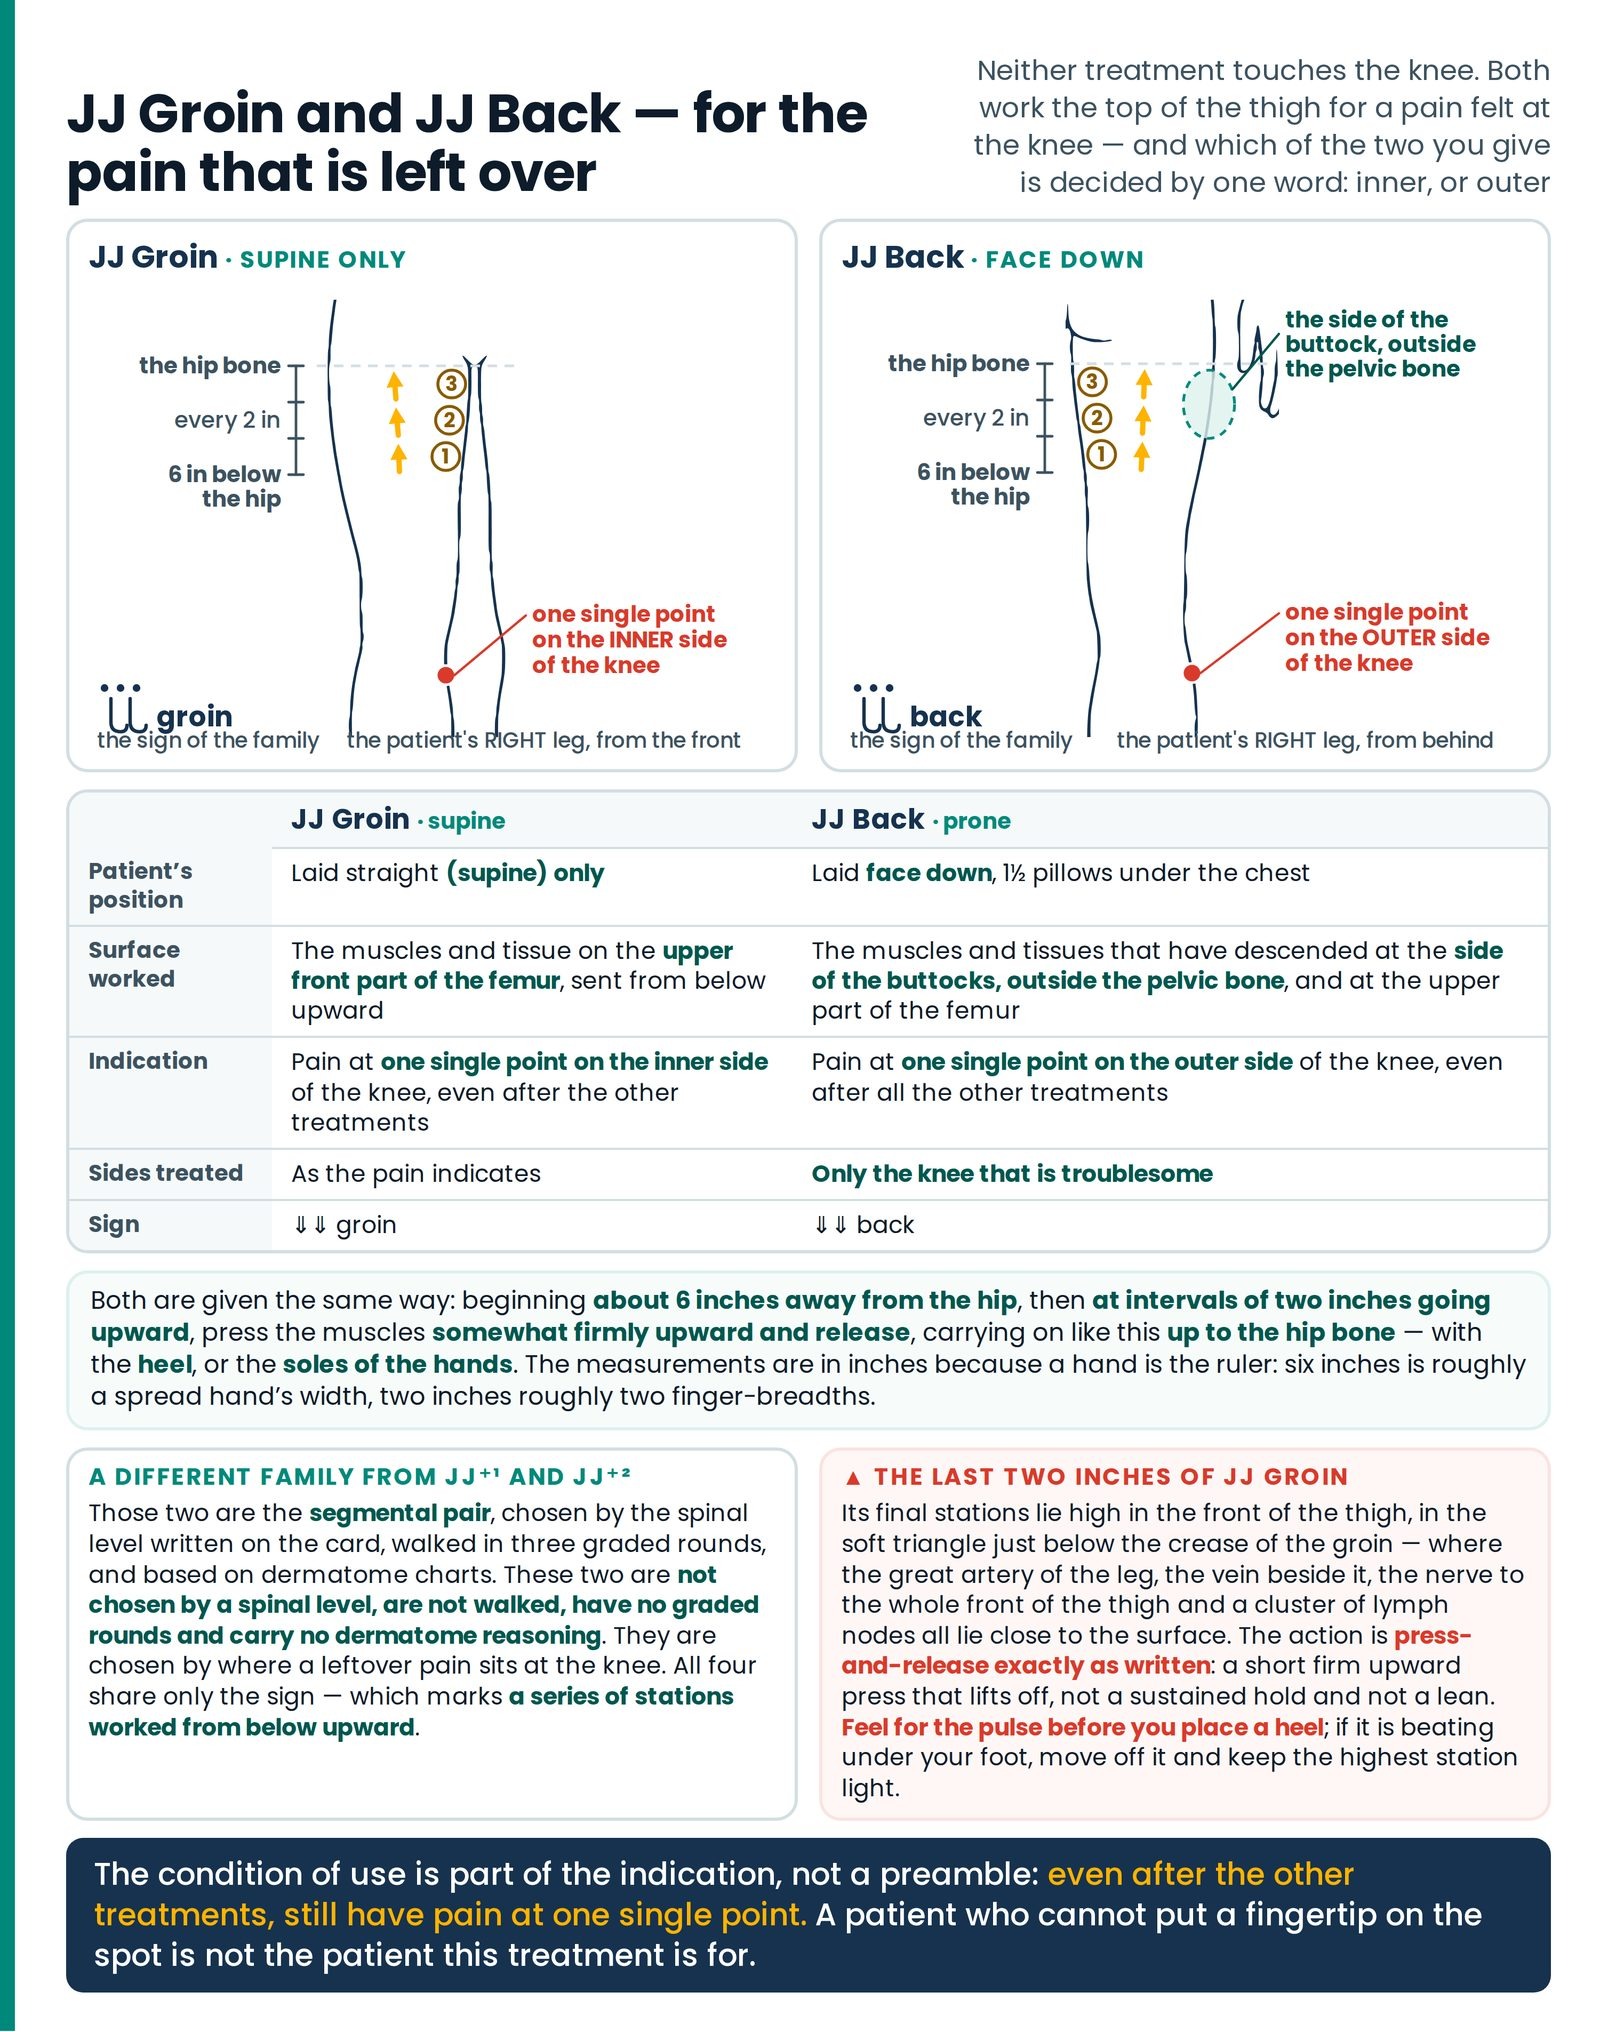
For those who, even after the other treatments, still have pain at one single point on the inner side of the knee — this treatment is given with the patient laid straight (supine) only. Supine
In this, the muscles and tissue on the upper front part of the femur are sent from below upward. Begin the treatment about 6 inches away from the hip. Then, as in the figure, at intervals of two inches going upward, press the thigh muscles somewhat firmly upward and release. Carry on like this up to the hip bone. The treatment may be given either with the heel, or the soles of the hands may be used. Its sign is ⇃⇃ groin.
JJ BACK — given face down
This treatment is given with the patient laid face down. It is for those who, even after all the other treatments, still have pain at one single point on the outer side of the knee. Prone
In this, the muscles and tissues that have descended at the side of the buttocks, outside the pelvic bone, and at the upper part of the femur, are to be carried from below upward. Beginning about 6 inches from the hip, as in the figure, at two-inch intervals going upward, press somewhat firmly and release. Carry on like this up to the hip bone. Give it with the heel, or the soles of the hands may also be used. Treat only the knee that is troublesome. Its sign is ⇃⇃ back.
| JJ Groin | JJ Back | |
|---|---|---|
| Patient's position | Laid straight (supine) only Supine | Laid face down, 1½ pillows under the chest Prone |
| Surface worked | The muscles and tissue on the upper front part of the femur, sent from below upward | The muscles and tissues that have descended at the side of the buttocks, outside the pelvic bone, and at the upper part of the femur, carried from below upward |
| Where it starts | About 6 inches away from the hip | About 6 inches from the hip |
| Stations | Every two inches, upward, to the hip bone | |
| Action and tool | Press the thigh muscles somewhat firmly upward and release — the heel, or the soles of the hands | Press somewhat firmly and release — the heel, or the soles of the hands |
| Indication | Pain at one single point on the inner side of the knee, even after the other treatments | Pain at one single point on the outer side of the knee, even after all the other treatments |
| Sides treated | As the pain indicates | Only the knee that is troublesome |
| Sign | ⇃⇃ groin | ⇃⇃ back |
The condition of use is written into both entries and is not decoration. Even after the other treatments, still have pain at one single point. These are not openers; they come after the sequence has been given long enough to show what it can do, and they are for one single point, not a knee that aches all over. A patient who cannot put a fingertip on the spot is not the patient this treatment is for. (Figure 23.4)
The inner–outer rule is the whole of the choosing. Inner side → JJ Groin, supine, front of thigh. Outer side → JJ Back, prone, back and outer thigh and side of the buttock. Two words, and they cannot be swapped. Neither treatment touches the knee — both work the top of the thigh for a pain felt at the knee, which is the logic running through this whole wiki and is worth saying to a patient in those words.
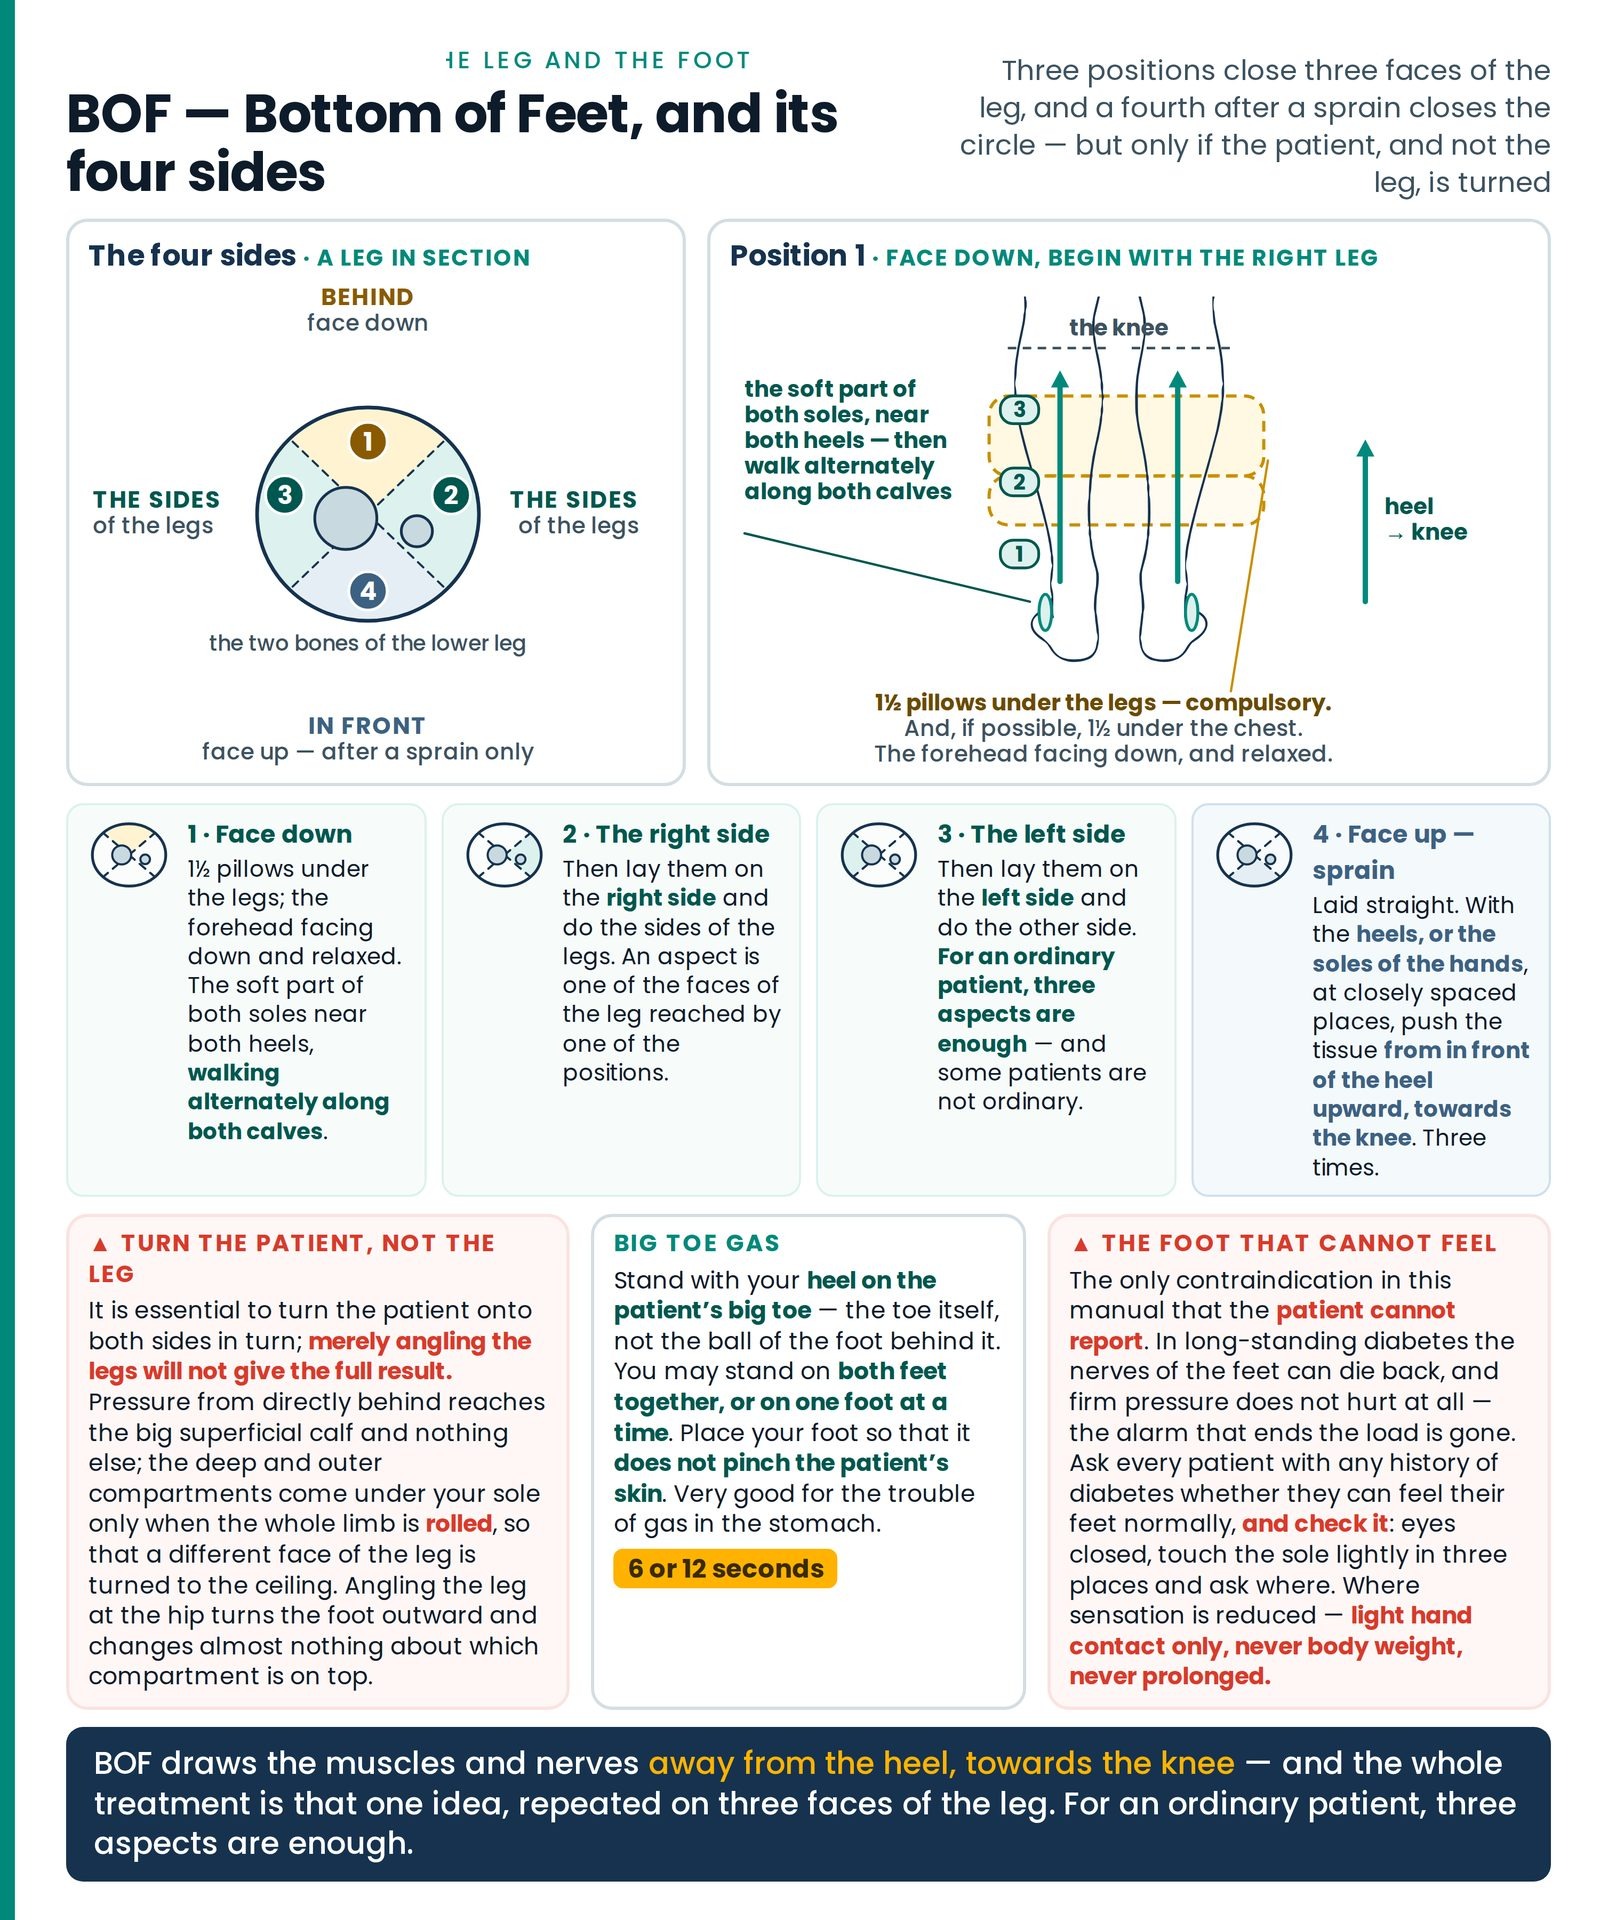
BOF — Bottom of Feet, and its four sides
Heel towards knee, in three positions — turn the patient, not the leg
It is written in short as BOF. It is a wonderful example of Guruji's unique way of thinking. In this, the muscles and nerves are drawn away from the heel, towards the knee. Prone Side-lying Right Left
There must be 1½ pillows under the legs. This treatment is done in three positions. Begin with the right leg and finish with the left.
- 1. If possible, give 1½ pillows under the patient's chest as well; ask them to keep the forehead facing down and relaxed; and, placing the soft part of both your soles near both their heels, walk alternately along both calves, pressing in such a way that their muscles are drawn upward.
- 2. Then lay them on the right side and do the sides of the legs.
- 3. Then lay them on the left side and do the other side.
This treatment is excellent for numbness, pain, burning or any kind of problem from the toes, the soles and the heel up to the calves. Note that it is essential to turn the patient onto both sides in turn; merely angling the legs will not give the full result. For an ordinary patient, three aspects are enough.
| Patient's position | Three positions in turn — face down with 1½ pillows under the legs (and, if possible, 1½ pillows under the chest), the forehead facing down and relaxed; then laid on the right side; then laid on the left side. Begin with the right leg and finish with the left Prone Side-lying |
|---|---|
| Where the feet are placed | The soft part of both soles near both heels, walking alternately along both calves, pressing so that the muscles are drawn upward — away from the heel, towards the knee |
| Duration and repetitions | Worked in each of the three positions. For an ordinary patient, three aspects are enough. It is essential to turn the patient onto both sides in turn; merely angling the legs will not give the full result |
| What it is for | Numbness, pain, burning or any kind of problem from the toes, the soles and the heel up to the calves |
One pillow instruction is compulsory and one is conditional, and students reverse them. There must be 1½ pillows under the legs — unqualified, and it is what lifts the calves clear so a sole can travel along them. If possible, 1½ pillows under the chest as well. And the forehead facing down and relaxed is written into the first position, not left to be assumed.
The direction is away from the heel and towards the knee, and the whole treatment is that idea repeated in three positions. Note it against the calf ghisai of a a little earlier, which runs the other way. "Walk alternately along both calves" describes a gait: the soft part of each sole starts near a heel and you walk — left, right, left, right — up along the calves, both legs under you at once. And "begin with the right leg and finish with the left" is the opposite of the order used elsewhere in this article — Knee Cap Free begins with the more troublesome knee, Pradeep with the left. Each entry names its own order. Do not carry one across. (Figure 23.5)
Three positions, and why angling will not do
It is essential to turn the patient onto both sides in turn; merely angling the legs will not give the full result.
The atlas states this as a rule, not a preference. Turning the patient and turning the leg are not the same movement and do not present the same tissue.
The lower leg is a set of separate compartments arranged around its two bones, like segments round the core of an orange. Pressure from directly behind reaches the big superficial calf and nothing else; the deep and outer compartments come under your sole only when the whole limb is rolled, so a different face of the leg is turned to the ceiling. Angling the leg at the hip turns the foot outward and changes almost nothing about which compartment is on top.
So the three positions are three treatments of three territories. Turn the patient.
"For an ordinary patient, three aspects are enough." An aspect is one of the faces of the leg reached by one of the positions — behind, and the two sides. The sentence says two things at once: three is the standard course; and "ordinary" implies that some patients are not ordinary and need the fourth. The atlas then names exactly who.
BOF — ALL 4 SIDES, for sprain
But if someone has had a sprain, the following treatment is also to be given. Lay the patient straight (supine), and with your heels, or with the soles of your hands, giving pressure at closely spaced places, push the tissue from in front of their heel upward, from below towards the knee. Do this three times. The relief will be so immediate that it will be hard to believe. Supine × 3
| Patient's position | Laid straight (supine) — the fourth aspect, added to the three of BOF Supine |
|---|---|
| Where the hands or feet are placed | The heels, or the soles of the hands, at closely spaced places, pushing the tissue from in front of the heel upward, from below towards the knee |
| Duration and repetitions | Three times × 3 |
| What it is for | Sprain — "the relief will be so immediate that it will be hard to believe" |
This is the fourth side, and it is the front of the leg. Behind, right side, left side, and now the front — the circle round the leg is closed. It is given in addition to the three, not instead of any of them, to somebody who has had a sprain, and its starting place is precise and is not the heel itself: from in front of their heel, upward, towards the knee, at closely spaced places, three times.
The claim attached to it is unusually loud. The relief will be so immediate that it will be hard to believe. Give the treatment exactly as written and let the patient judge — but do not put that sentence into her ears before you begin. A patient told to expect a miracle has been handed a ruler to measure you with.
BIG TOE GAS
Stand with your heel on the patient's big toe. You may stand on both feet together, or on one foot at a time. Normally you may stand for 6 or 12 seconds. But place your foot in such a way that it does not pinch the patient's skin. This is very good for the trouble of gas in the stomach. 6 sec Both sides ▲ Take care
| Patient's position | Lying; the therapist standing, supported on the chairs |
|---|---|
| Where the feet are placed | The therapist's heel on the patient's big toe — on both feet together, or on one foot at a time Both sides |
| Duration and repetitions | Normally 6 or 12 seconds 6 sec |
| What it is for | The trouble of gas in the stomach |
The tool is the heel and the site is the big toe — the toe itself, not the ball of the foot behind it. Both feet together, or one foot at a time, are both given and neither is preferred: both feet means both of the patient's big toes at once, one under each of your heels. And the count is six or twelve seconds — the therapy's own unit and its double. Not a range meaning somewhere between: six, or twelve.
Why a toe, for a belly? Say what can honestly be said: strong sensation delivered at one end of the body changes what the gut is doing at the other — the same ordinary reflex wiring by which a cold shock makes you gasp. What the therapy claims is that the effect can be aimed, by place and by count. What you can promise is that you will give it as taught and that she can judge the result herself in ten minutes. (Figure 23.6)
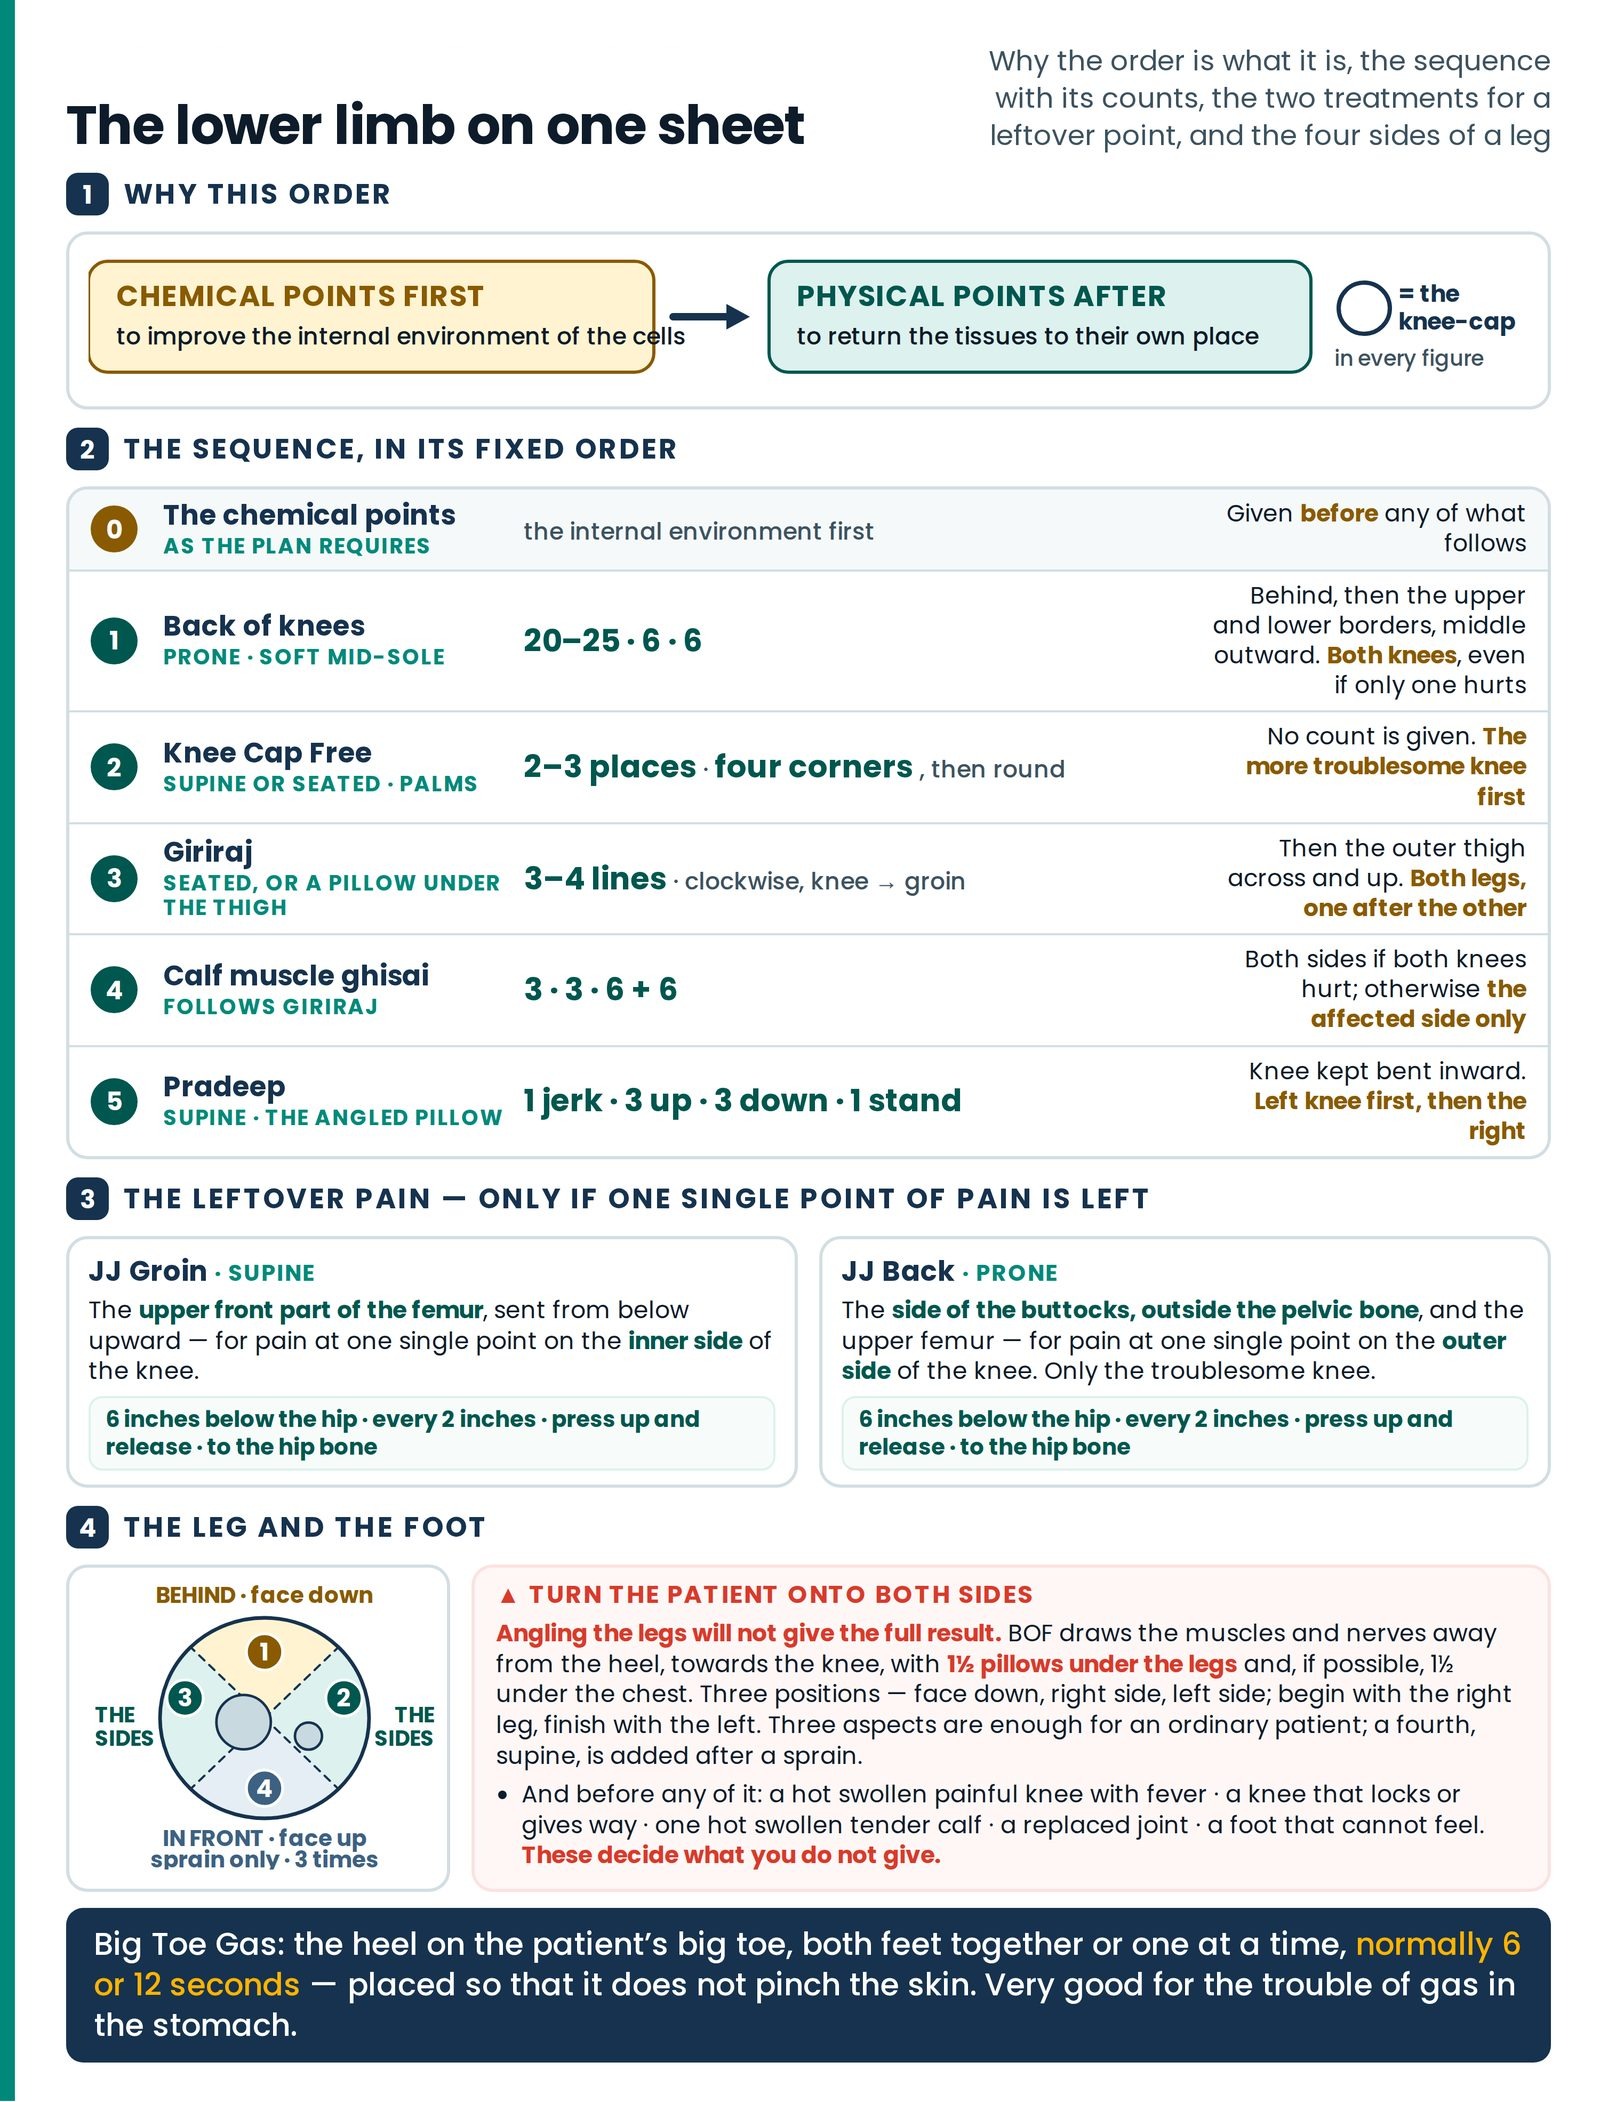
The knee sequence, said aloud
Nine separable treatments, their counts and their sides, in one order
Questions students ask
1. I am twenty and new. Back of knees says do the other knee as well, but Giriraj says only the affected side. Which is right? Both, and each belongs to its own treatment. Back of knees ends with a separate numbered instruction — then do all three of the above on the back of the other knee as well — with no condition attached. Giriraj ends with one that has a condition — if both knees hurt, do both sides; otherwise do the affected side only. Read the last line of every entry. That is where the sides are decided, and a rule carried across from one treatment to another is a rule invented.
2. I am a retired bank manager of sixty-six, learning this for my wife. Can I give Back of knees with my hands instead of my feet? For stages 2 and 3, yes — the entry gives you the feet, or the soles of the palms, as equal choices, light pressure either way. Stage 1, the rub behind the knee, names the soft middle part of the sole. If you cannot place a foot there safely and accurately, give the rest well and write honestly on the card what you did not give. A treatment honestly not given beats one given approximately.
3. Knee Cap Free gives no count at all. How do I know when to stop? By what your hand finds. The entry states the aim in plain words — the cap completely loose, freed from the muscles beneath it — so the test is the cap itself: at the start it will barely shift, and you work until it moves a little in each of the four directions. Where a count is written, keep it exactly. Where none is written, the stated aim is the count. See also → The Shorthand, "The Shorthand".
4. I am a physiotherapist. What is actually being claimed by "the tissues get caught in the knee-cap and are returned to their own place"? Two things worth separating. The descriptive claim — that tissue around a knee-cap can become tethered so the cap loses its glide, and that this both hurts and stiffens the knee — is recognisable, and is what four-direction patellar mobilisation exists for. The stronger claim, that tissue is literally pulled out of position by work and pushed back by hand, is a bigger statement. What you can honestly say of the technique is that it restores movement to a joint that had lost it, and that this reliably reduces pain — enough to be worth doing daily.
5. Why does Pradeep start with a jerk when everything else here is slow? Because it is a different kind of load doing a different job, given once, at the beginning, on a knee already softened by four treatments. Everything after it is sustained. And a jerk is the one load you cannot take back once begun, which is why it is given deliberately, with your weight on the chairs, at a moment you have chosen — never as part of a walk.
6. The Pradeep variant — is that the old way or the new way? Neither is marked as older or better. The entry gives the numbered stages, then says some therapists do it this way and gives the alternative: both feet moving at once in opposite directions, three rounds, in place of stages 3 and 4. Both are in the atlas; stage 5 follows either. Choose one, give it consistently through a course, and write on the card which you gave.
7. I practise in a village hall with one mat and no spare pillows. Can I do BOF with the patient just turning her legs? No — and the atlas says so in its own words: merely angling the legs will not give the full result. Give the face-down position today, properly, and write on the card that the two side positions were not given. Then arrange the hall so they can be. A leg rotated at the hip turns the foot; it barely turns the calf, and the calf is what you came for.
8. I have no science background at all. Why would pressing a big toe do anything for gas in the stomach? Because strong sensation at one end of the body changes what the organs do at the other — ordinary wiring, the same by which a cold shock makes you gasp or a fright turns your stomach over. What this therapy claims beyond that is that the effect can be aimed, by place and count. Give it as written, for six or twelve seconds, and let the patient tell you in ten minutes what happened.
9. My mother-in-law has had diabetes for twenty years. Is BOF safe for her? Ask her first whether she can feel her feet normally, then check it — eyes closed, touch three places on the sole and ask where. If sensation is normal, treat as taught. If it is reduced, no body weight goes onto that foot at all: light hand work only, never prolonged, and look at the skin before and after. That is the one contraindication in this article the patient herself cannot report to you.
10. JJ Groin and JJ⁺¹ are both on the front of the thigh. Why are they not the same treatment? Because almost nothing matches except the region. JJ⁺¹ is chosen by a spinal level — L1, L2, L3 — and is a walk from waist to knee in three graded rounds with a pillow under the thigh. JJ Groin is chosen by where a leftover pain sits at the knee, is a line of separate stations two inches apart running upward to the hip bone, has no rounds and no grading, and is supine only. The shared sign means only "worked from below upward". See also → The Low Back, "The Low Back".
11. Our centre's card for a knee just says "knee treatment". Is that acceptable? No, and you will feel the cost of it in six weeks when you cannot say what changed anything. This article holds at least nine separable treatments with different positions, tools, counts and sides. Write which you gave, on which side, and which variant of Pradeep — and if you gave JJ Groin or JJ Back, write which and why. See also → The Record That Shows the Truth, "The Record That Shows the Truth".
Questions patients ask
1. "The doctor says the cartilage is finished and I need an operation. Can you save me from it?" I am not going to promise you that, and please be careful of anybody who does. What I can tell you is what I will do and what I expect. I will work on your digestion first, because everything your knee repairs itself with comes out of what you eat. Then I will free the small round bone at the front of your knee, which in most people like you has stopped sliding, and loosen the muscles above and below it. Most people find the pain comes down well within a few weeks. Whether your bend improves depends on how much you use it. Come for six weeks, judge for yourself, and keep the surgeon's appointment meanwhile.
2. "Why are you pressing the top of my thigh when the pain is in my knee?" Because the tissue that has tightened around your knee runs all the way up, and it is easier to release from the top than at the sore spot itself. There is also a plain fact worth knowing: a pain is felt at one end of a line and very often comes from somewhere along it. You will feel me working six inches below your hip; you should feel the difference at the knee. If you do not, tell me and I will change what I am doing.
3. "You are going to stand on my knee with your whole weight?" At the very end, yes, and I will tell you before I do it. Two things make it what it is: my weight is hanging from these two chairs, so I control exactly how much comes down; and it is the soft middle of my sole, placed flat on the middle of the bone, with your knee resting bent on a pillow that carries both your thigh and your lower leg. It is the last thing I do, after everything else has loosened. Say stop at any moment and I stop — you do not need to explain why.
4. "My knee pain is on the inside. Why did you turn me on my face today when last week I was on my back?" Because the treatment changed, and the position is part of the treatment. Last week you had the general work. Now that everything has settled down to one small spot, I am giving the treatment made for that spot — and there are two of them, one for a spot on the inside of the knee and one for the outside. If I had turned you over I would have been giving you the other one. Yours is on the inside, so you stay on your back.
- 5. "It is only my right knee. Why are you doing the left as well?" For one of the treatments, yes — the one I give you face down, behind both knees. That one is written to be done on both sides. The others I am giving only on your right, because they are written that way. The instructions differ from treatment to treatment and I keep each as it stands rather than tidying them into one rule.
6. "Pressing my toe for my gas? That sounds like a trick." It sounds odd, and I would rather you were sceptical than polite. It is a short treatment — six seconds, or twelve — and it costs you nothing to find out. The body is wired end to end: a shock at one end changes what your stomach does, as you know from the last time somebody frightened you. Let me give it, and tell me honestly in ten minutes whether anything shifted. If nothing does, I will write that on your card and we will not pretend otherwise.
7. "I have had sugar for eighteen years. Does that change anything?" It changes one thing, and I am glad you told me. In long-standing diabetes the nerves of the feet sometimes stop reporting properly, so a foot can be hurt without the person feeling it. Before I put any weight near your feet I will check whether you can feel them normally — it takes a minute. If you can, we go ahead as usual. If the feeling is reduced, I will use only my hands there, lightly, and look at your skin before and after every time. That is not caution for its own sake; it is because your feet would not be able to tell you.
Words used here
| Hindi | English | Neurotherapy code / usage |
|---|---|---|
| घुटना | The knee | The region this group is named for — घुटने के दर्दों के लिए कुछ उपचार, some treatments for pains of the knee |
| चक्की | Grinding stone — the knee-cap | Drawn in the figures as a bare open circle ○; made supple first of all |
| घिसाई | Rubbing — a sliding application | Back of knees stage 1, 20–25 times; calf muscle ghisai, 3 · 3 · 6 + 6 |
| — | Back of knees | Prone. 20–25 behind · 6 upper border · 6 lower border, middle outward, light. Then all three on the other knee as well Prone |
| — | Knee cap free | Supine or seated, knee completely loose, more troublesome knee first. Thumbs together, knead right and left, 2–3 places above and below; palms on edge; palm sole at the four corners, then round. No count given Supine Seated |
| गिरिराज | Giriraj — a personal name | Fingers together, clockwise, knee → groin, many close places, 3–4 lines; then the outer thigh across to the femur and upward. Both legs, one after the other |
| — | Calf muscle ghisai | Thumb tips inner, knee → heel, 3 × 3 lines · four fingertips outer, 3 places × 3 · thumb side on the inner foot, 6 + 6. Both sides if both knees hurt; otherwise the affected side only |
| प्रदीप | Pradeep — a personal name | Left knee first. Angled pillow · jerk · 3 rounds knee → hip, pressing inward · 3 rounds down to the heel, downward and inward · mid-sole on the middle of the knee bone, whole weight, standing up straight. Variant: both feet in opposite directions, 3 rounds, then the stand |
| जे जे ग्रोइन | JJ groin | Supine only. Front of the thigh, 6 inches below the hip, stations every 2 inches upward to the hip bone, press up and release. Pain at one single point on the inner side of the knee. Sign ⇃⇃ groin Supine |
| जे जे बैक | JJ back | Prone. Side of the buttocks, outside the pelvic bone, and the upper femur; same 6 inches, same 2 inches. Pain at one single point on the outer side of the knee. Only the troublesome knee. Sign ⇃⇃ back Prone |
| — | BOF — Bottom of Feet | Heel → knee, 1½ pillows under the legs, three positions: face down, right side, left side; right leg first, left last. Turn the patient — angling the legs will not give the full result. Numbness, pain, burning, toes to calves Prone Side-lying |
| मोच | Sprain | The fourth side of BOF — supine, heels or palm soles, closely spaced, in front of the heel upward to the knee, three times Supine |
| — | Big toe gas | The heel on the big toe, both feet or one at a time, 6 or 12 seconds, not pinching the skin. Gas in the stomach 6 sec |
| — | Chemical points / physical points | Chemical first, to improve the internal environment of the cells; physical after, to return the tissues to their own place |