Watch


PARALYSIS CLOCKWISE — down the inside, up the outside
One pattern for both limbs, and a lift at the end of each
The hands of paralysis patients stay bent inward, and they walk dragging the leg; to open them out, this is the proper treatment.
The therapist is to gather the fingers together and rotate them round and round clockwise — that is, in the direction of the hands of a clock — on the muscles of the hand and of the leg.
| Patient's position | Not specified — the limb must be reachable on both its inner and its outer side |
|---|---|
| The tool and the action | The fingers gathered together, rotating round and round clockwise — that is, in the direction of the hands of a clock — on the muscles |
| In the arm | On the inner side, from above downward — that is, shoulder to elbow, and elbow to wrist. Then on the outer side, from below upward — that is, wrist to elbow, and elbow to shoulder — and lift the muscles behind the shoulder upward |
| In the leg | On the inner side, from above downward — that is, thigh to knee, and knee to heel. Then on the outer side, from below upward — that is, from the heel to the outer side of the knee, and from the knee to the side of the thigh — and lift the muscles behind and above the waist upward |
| Duration and repetitions | No count is given |
| What it is for | The hands of paralysis patients that stay bent inward, and the leg that is dragged in walking — to open them out |
One pattern governs both limbs: inner side downward, outer side upward. Learn it as a single sentence and you have the whole treatment. Down the inside, up the outside — and each half is covered in two named segments, so that nobody sweeps the whole limb in one pass. Arm: shoulder→elbow, elbow→wrist; then wrist→elbow, elbow→shoulder. Leg: thigh→knee, knee→heel; then heel→outer knee, knee→side of thigh. (Figure 24.6)
And each limb ends with a lift that is not part of the line. In the arm, lift the muscles behind the shoulder upward. In the leg, lift the muscles behind and above the waist upward. Both of those are past the end of the limb — the shoulder blade for one, the buttock and low back for the other — and both are easy to leave out because the hand has by then arrived where it thought it was going.
"Clockwise" is defined for you and is the same action as in Giriraj: the bunched finger pads take the muscle with them as they turn, rolling the tissue rather than stroking the skin, and each turn carries it along the named direction before the hand lifts and moves on.
Why down the inside and up the outside? Because that is where the limb has gone. The material's own first sentence describes the posture exactly: the hand stays bent inward, the leg is dragged. The inner surfaces are the ones that have shortened; the outer surfaces are the ones that have been overpowered. The directions run along the shortened tissue in the direction of its lengthening, and along the slack tissue in the direction of its work.
SHUKLA — the wrist and the ankle, four ways each
Fix the joint, interlace, six of each — never in osteoporosis
To be done on both the affected hand and the affected leg. It is given in two stages — a. in the hand; b. in the leg.
In the hand. With one palm, hold their hand near the wrist so that the hand or forearm above the wrist does not move. Then, interlacing the fingers of your other hand inside their fingers, move their palm in the following ways, 6–6 times.
In the leg. With one palm, hold firmly near the bone of their heel. Then, interlacing their toes well in the fingers of the other hand, move and rotate the ankle upward in the same four ways.
| # | The movement | At the wrist | At the ankle |
|---|---|---|---|
| 1 | Upward and downward | 6 | |
| 2 | Right and left | 6 | |
| 3 | Rotate clockwise | 6 | |
| 4 | Rotate in the reverse direction — anti-clockwise | 6 |
| Patient's position | Any. To be done on both the affected hand and the affected leg |
|---|---|
| The holding hand | In the hand: one palm near the wrist, so that the hand or forearm above the wrist does not move. In the leg: one palm firmly near the bone of the heel |
| The moving hand | In the hand: the fingers of your other hand interlaced inside their fingers. In the leg: their toes interlaced well in the fingers of the other hand, the ankle moved and rotated upward |
| Duration and repetitions | 6–6 times of each of the four movements, at the wrist and at the ankle 6 sec |
| What it is for | Paralysis, and stiffness of the hands and feet and so on |
| Who it is not given to | Osteoporosis patients — for them this treatment may perhaps increase the pain, so do not give them this treatment ▲ Take care |
The holding hand is the whole technique. Fix the forearm and the movement happens at the wrist; let the forearm travel and the movement dissipates up the arm and nothing has been lengthened. The instruction says so in as many words: so that the hand or forearm above the wrist does not move. At the leg, the same job is done by holding firmly near the bone of the heel.
The interlacing does a second job. Fingers laced into fingers, toes laced into fingers, spreads the small joints apart and opens the webs between them — and the webs are exactly where a hand that has been closed for a year stiffens first and yields last.
"6–6 times" means six of each, in both places — six up-and-down, six right-and-left, six clockwise, six the reverse way, at the wrist; then all four again at the ankle. Twenty-four movements a limb, forty-eight in all, for a patient who can supply none of them himself.
The material states its own contraindication, and gives its reason
For osteoporosis patients this treatment may perhaps increase the pain — so do not give them this treatment.
Notice what kind of sentence that is. It does not say give it gently, or reduce the count. It says do not give them this treatment, and it gives the reason in the same breath. Where the material writes a rule in that form, it is not to be softened by a therapist who thinks the patient looks sturdy.
Ask the question that finds these patients: not "do you have osteoporosis?" — which many will answer no to, having never been told the word — but "have you ever broken a bone from a small fall or a knock that should not have broken anything? Have you lost height? Are you taking a monthly or yearly injection or tablet for your bones?"
VASANTI — very softly, fifteen to twenty times
Numbness in diabetes, and softness as the whole safeguard
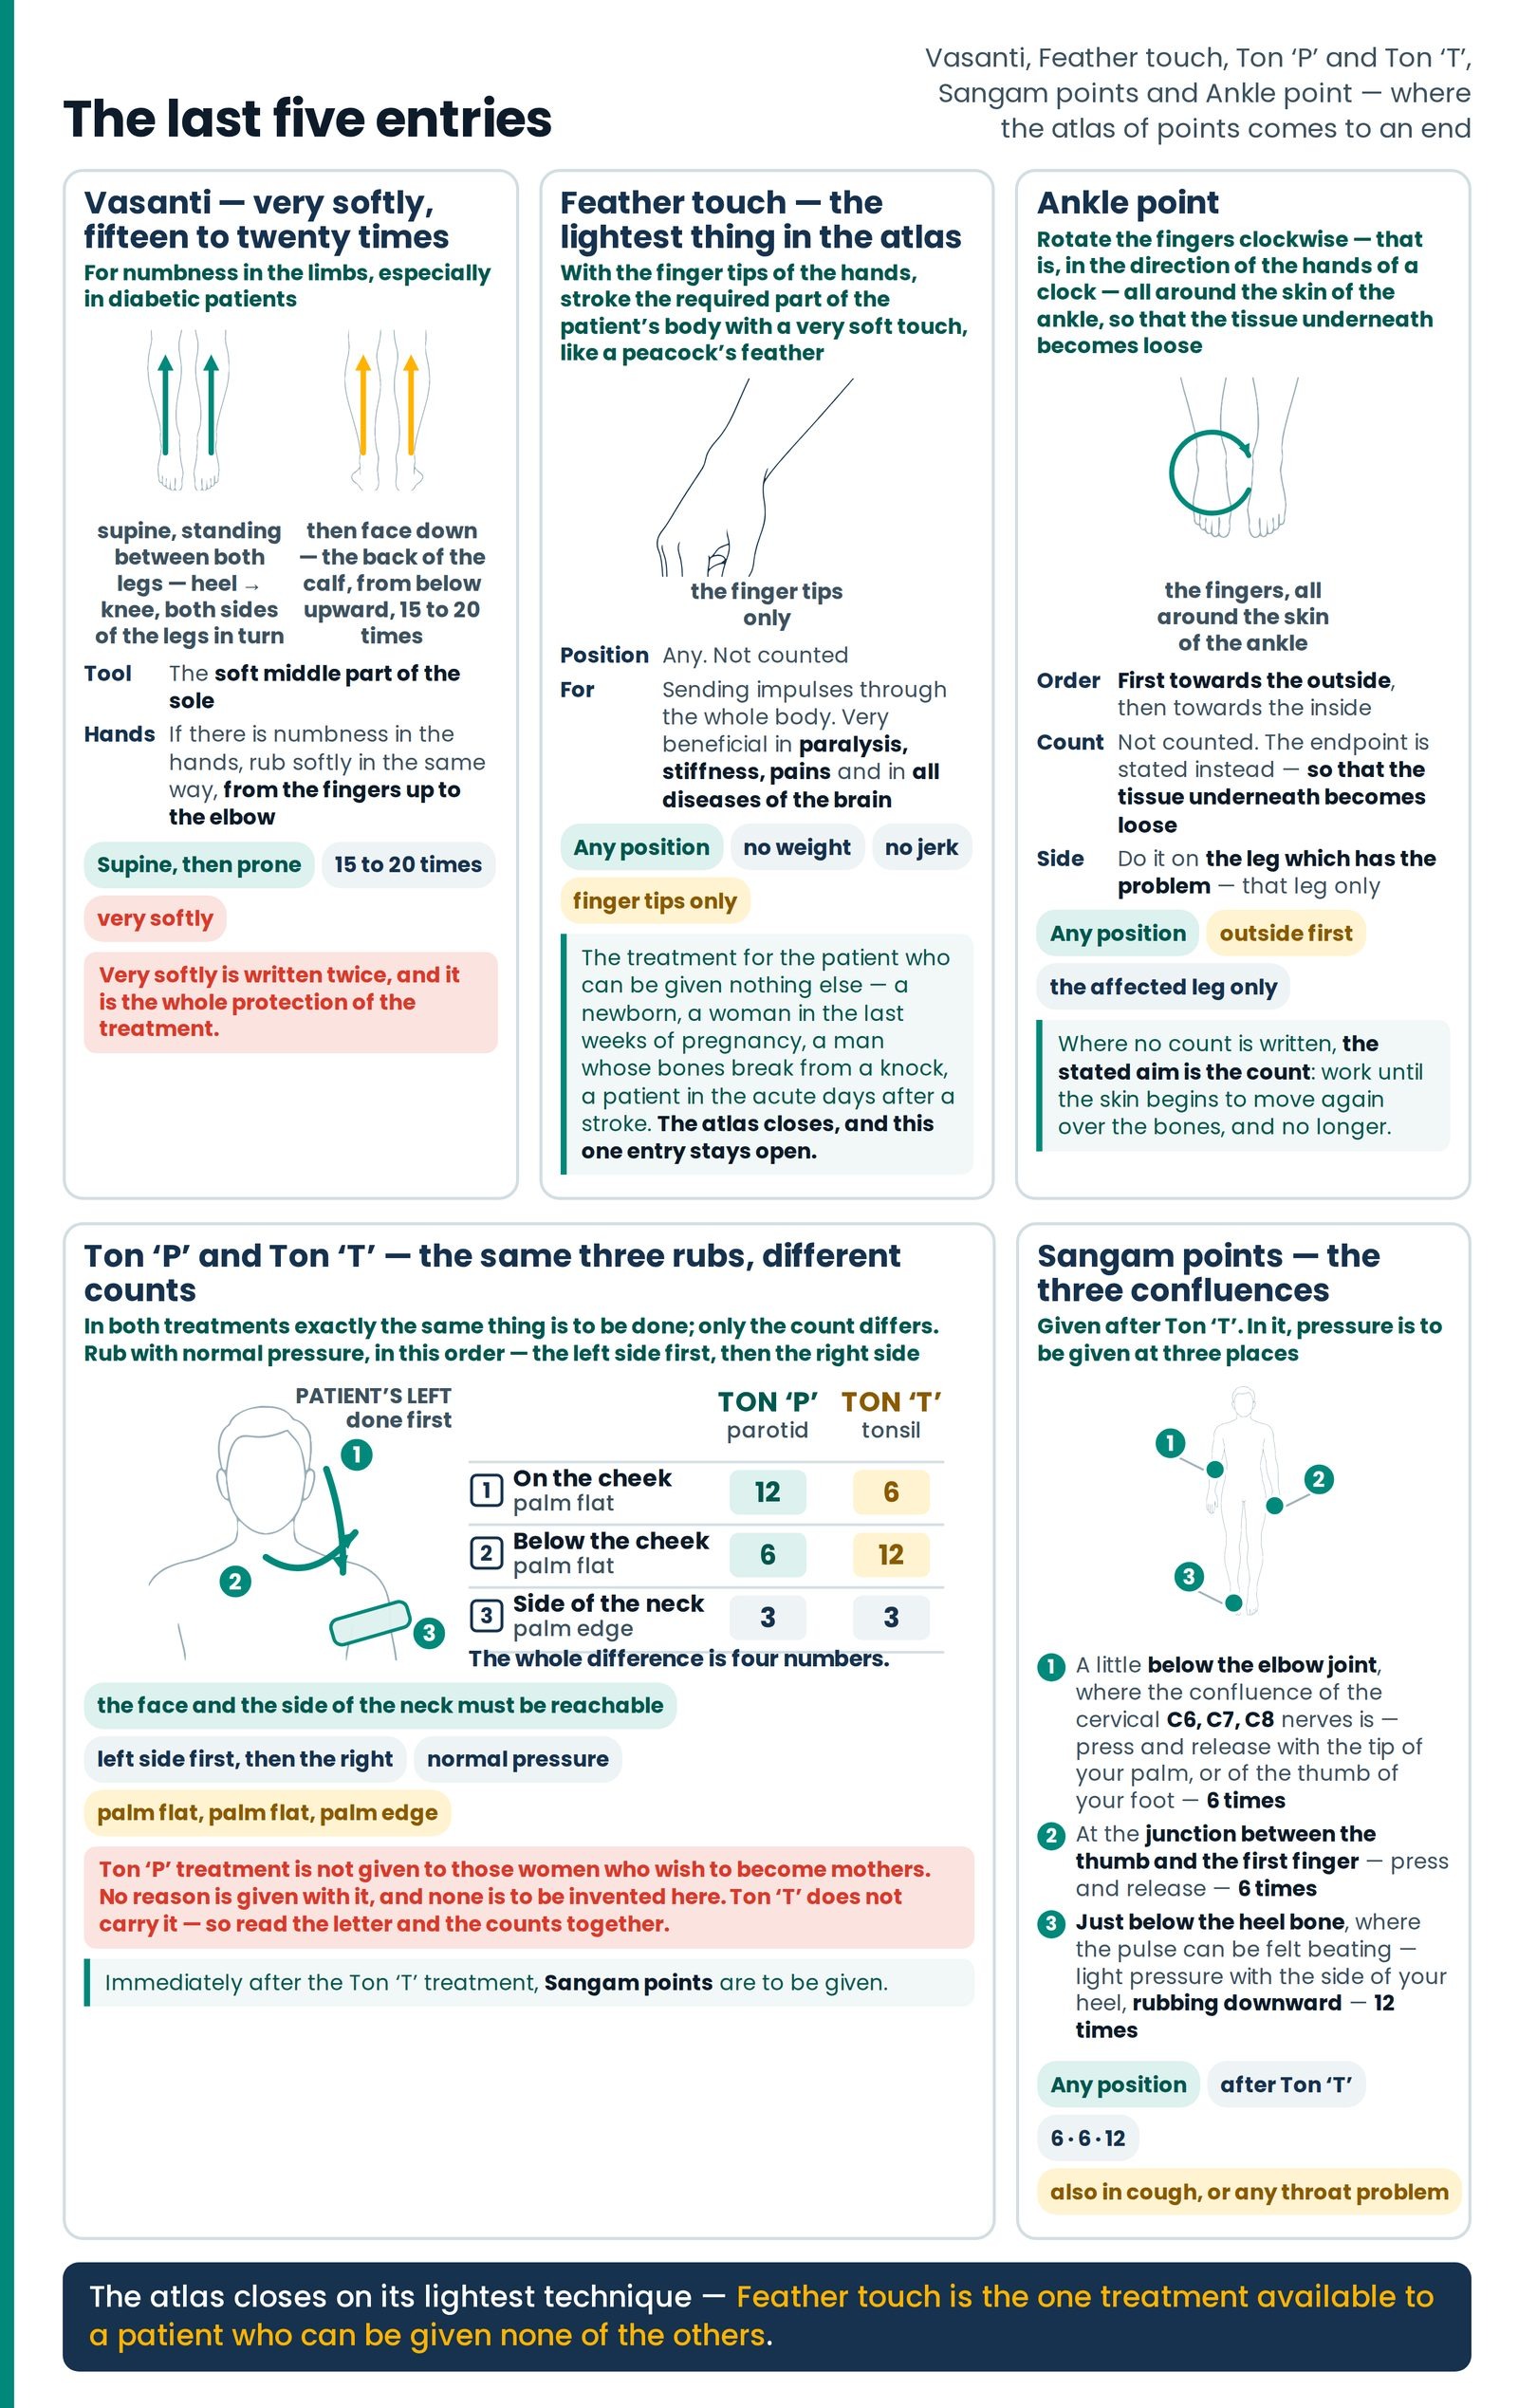
Lay the patient straight and stand between both their legs. Then, with the soft middle part of your sole, rub very softly from the heel up to the knee, on both sides of the legs in turn.
After that, lay them face down and, in the same way, rub the back part of the calf from below upward, 15 to 20 times.
This is especially beneficial for removing numbness in the limbs in diabetic patients.
If there is numbness in the hands, then rub softly in the same way with the sole, from the fingers up to the elbow.
| Patient's position | Laid straight first, the therapist standing between both the patient's legs; then laid face down Supine Prone |
|---|---|
| Where the foot is placed | The soft middle part of the sole — heel up to the knee, on both sides of the legs in turn; then, face down, the back part of the calf, from below upward. For numbness in the hands, from the fingers up to the elbow |
| Pressure | Very softly — written twice, and it is the whole protection of the treatment ▲ Take care |
| Duration and repetitions | 15 to 20 times on the back of the calf. The first phase is not counted |
| What it is for | Removing numbness in the limbs, especially in diabetic patients |
Two positions, three territories. Face up, between the legs: both sides of each leg in turn, heel to knee. Face down: the back of the calf, from below upward, 15 to 20 times. And a fourth territory for a different complaint — the hand, if that is where the numbness is, worked from the fingers up to the elbow with the same sole and the same softness. (Figure 24.7)
The direction is always towards the body — heel to knee, fingers to elbow. And "very softly" is not a style; it is the safeguard. The patients this treatment names are the patients least able to tell you that you are pressing too hard.