Watch


ABDOMEN SETTING — four movements, and nothing touches the abdomen
The knees are the handle, and every count is three
For those whose stomach is very bad, this is one more excellent treatment for setting the abdomen.
Read that sentence and then read the method, and notice what is missing: no hand goes near the belly at all. Every one of the four movements is done by holding the knees. The abdomen is set by moving the hips and the lower back through directions they have stopped going in. (Figure 24.4)
| Summary card | Laid straight throughout; the hands on the knees for every movement. Butterfly ×3 · knees joined, heels at the buttocks, three to the right and three to the left · one leg straight, the other knee inward to the ground, three on both sides · face one way, both knees the other way towards the ground, three on both sides. For those whose stomach is very bad Supine Both sides × 3 |
|---|
Every count in this treatment is three, and every movement but the first is done to both sides. Movement 4 is the one students shorten, and it is the largest: the face turns one way and both knees turn the other. Turning only the knees is a different, smaller movement. The counter-turn of the head is what makes it the treatment.
And the movements are passive. The therapist holds the knees and moves them; the patient supplies nothing. A patient who "helps" has tightened the very muscles the movement is meant to lengthen. Tell her, once: let your legs be heavy and let me do the work.
OPPOSITE POINT — the mirror across the body
Diagonal, not mirror — the address that stays open
According to the affected limb, pressing the opposite hand and foot, rotating clockwise and in the reverse direction, and so on. — The opposite of the right hand — that is, the reverse side — is the left leg; and the opposite of the left leg is the right hand: treatment is to be given there.
| What it is | A rule for choosing the place, not a technique of its own |
|---|---|
| The pairing | The opposite of the right hand is the left leg. The opposite of the left leg is the right hand. And so, by the same rule: left hand ↔ right leg Left Right |
| What is done there | Pressing, and rotating clockwise and in the reverse direction, and so on — according to the affected limb, that is, whatever the affected limb would have received |
| Patient's position | Any; the opposite limb must be reachable |
"Opposite" here means diagonal, and the entry spells it out so that it cannot be mistaken for the mirror limb. Not right hand to left hand. Right hand to left leg. The diagonal partner, across and down.
And this is the rule to reach for when the affected limb cannot be touched — broken, plastered, freshly operated on, hot and swollen, or simply too painful to bear a hand. There is still somewhere to work that reaches the same nervous system, and the entry tells you where. That is the version of this rule most worth learning: when the place that hurts is closed to you, the atlas gives you an address that is open.
Say it to the patient plainly, because it sounds like a trick until it is explained: the two sides of your body are wired together and cross over on the way to your brain; when I cannot reach the arm, I work the leg that shares its circuit.
SUPERFAST — for the leg that slipped
Down the inside, pillows, back up the outside — on the other leg
When the leg suddenly slips, the muscles of one side go over to the other side, because of which sharp pain comes in the groin or the waist. This is useful for giving relief in that. Whichever side the pain is on, do it on the other.
With the soft middle part of both your soles, from the thigh down to the ankle, taking close overlapping steps, press and draw the inner muscles of the leg downward and come down. Then, turning the knee over, place two or three pillows below for support.
From the outside of the thigh, going by the side of the calf, come back up to the heel in the same way. Doing three or four such rounds gives considerable relief.
| Which side | Whichever side the pain is on, do it on the other — the Opposite point rule applied to a fresh strain Left Right |
|---|---|
| Patient's position | Lying. Then the knee is turned over and two or three pillows are placed below it for support, before the return journey Supine Side-lying |
| Where the feet are placed | The soft middle part of both soles, taking close overlapping steps |
| The two halves | Down: from the thigh down to the ankle, pressing and drawing the inner muscles of the leg downward. Up: from the outside of the thigh, going by the side of the calf, back up to the heel, in the same way |
| Duration and repetitions | Three or four such rounds gives considerable relief × 3 |
| What it is for | Sharp pain in the groin or the waist after the leg suddenly slips and the muscles of one side go over to the other side |
The instruction you will be tempted to skip is the pillows. Turning the knee over, place two or three pillows below for support sits between the two halves of the journey, and it is what makes the second half possible: the outer side of the thigh and calf are not reachable with a sole until the limb has been rolled and carried. Angle the leg instead of turning it and you will be walking down the front of a thigh calling it the outside — the same shortcut Knee, Leg, Foot blocks in writing at BOF.
Note the shape of the round. Down the inside from thigh to ankle; turn; back up the outside, and the return ends at the heel — not at the thigh. One round is down-and-back. Three or four rounds is the treatment. And the counts belong to rounds, not to steps: the steps are close and overlapping, as many as the limb is long.
The two points that are given only after much thought
Four pillows, a three-finger gap, and only a mild jerk
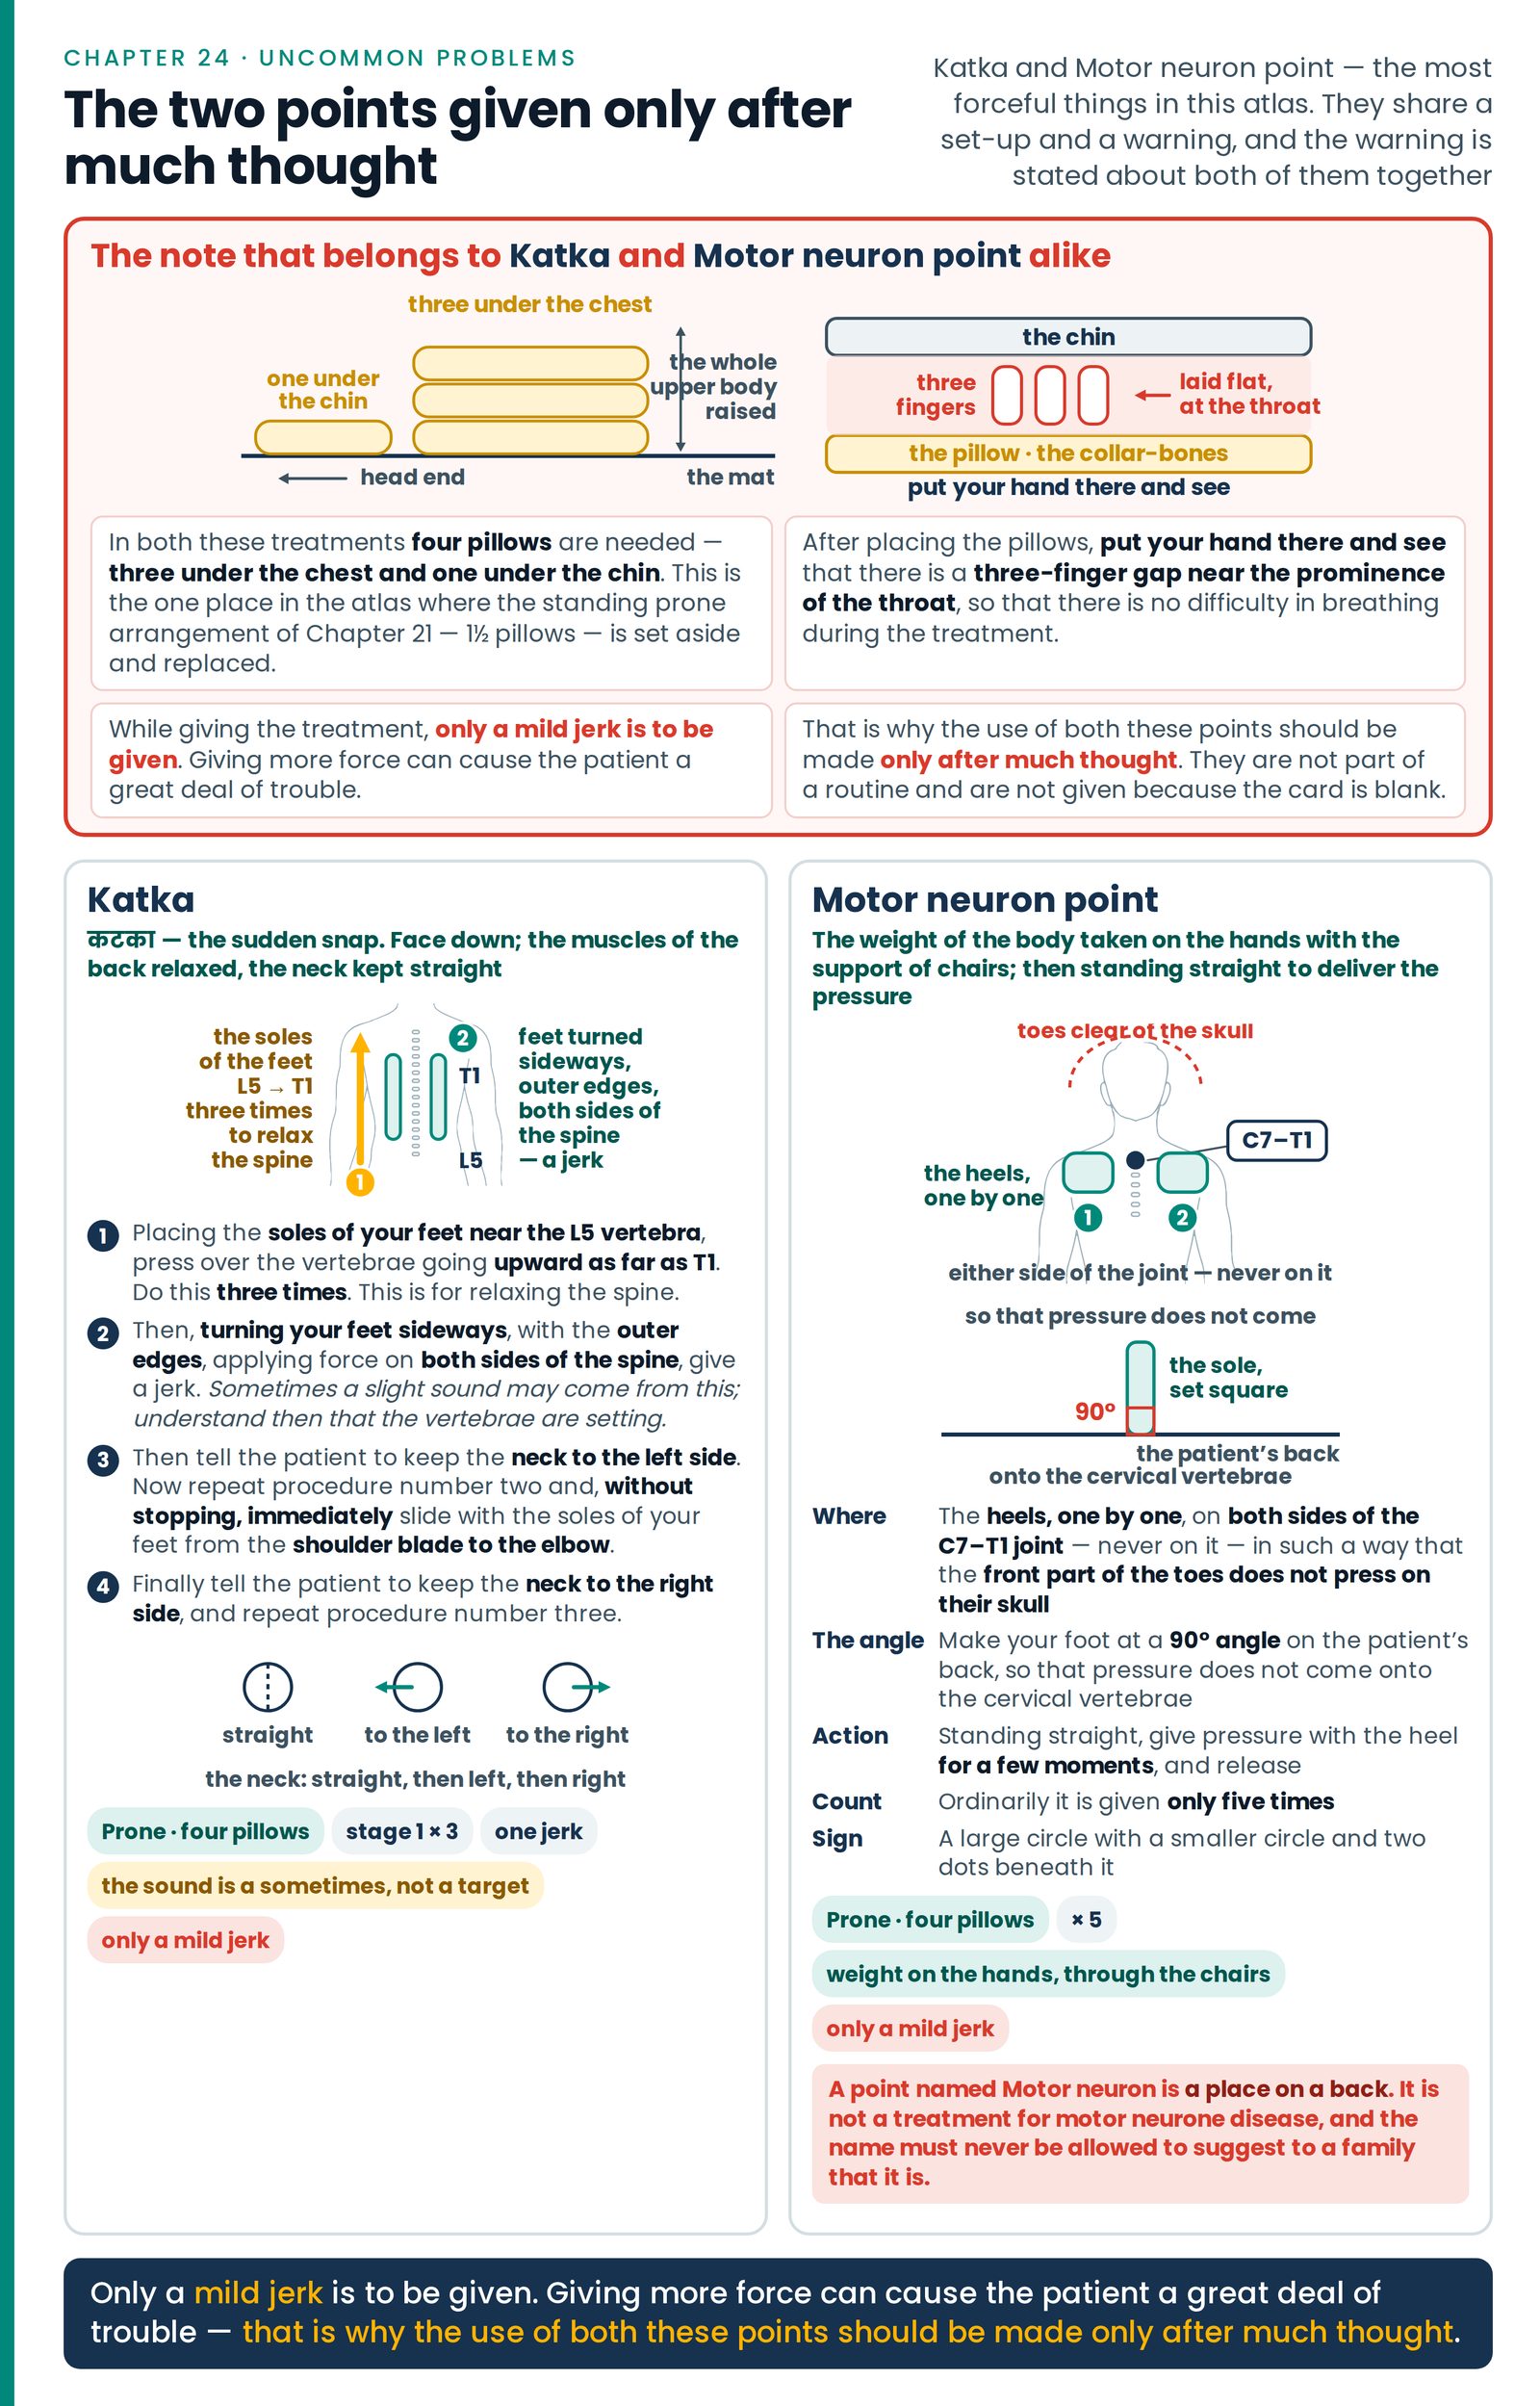
Katka and Motor neuron point are the most forceful things in this atlas. They share a set-up, they share a warning, and the material states that warning about both of them together rather than separately. Read the shared note before either method, every time, and read it again before you use them on a patient you have not used them on before.
Three things in that note are instructions and not advice. (Figure 24.5)
Four pillows, not one and a half. This is the one place in the atlas where the standing prone arrangement of Face Down is set aside and replaced. Three under the chest raise the whole upper body; one under the chin carries the head so the neck is not left hanging.
The three-finger gap is a check you perform with your hand, not an estimate you make with your eye. Put your hand there and see — two fingers or three, laid flat at the front of the throat between the chin and the collar-bones, and there must be room for them. A patient face down on a stack of pillows can have her chin pushed down onto her own windpipe and will be too polite, too old, or too short of breath to say so. Check it after the pillows are placed and before a foot goes anywhere near her.
"Only after much thought" is written by the material about its own technique. Take it at its word. These two are not part of a routine and are not given because the card is blank.
KATKA
| Summary card | Prone, four pillows, three-finger gap, back relaxed. Neck straight, then left, then right. Soles from L5 upward to T1, three times · feet turned sideways, outer edges, force on both sides of the spine, a jerk · neck left: the jerk again, then without stopping slide shoulder blade → elbow · neck right: the same again. For relaxing the spine Prone Left Right × 3 |
|---|
Stage 1 is the preparation and it has the only count in the treatment. Soles near L5, pressing over the vertebrae, travelling upward as far as T1 — the full length of the back — three times, and the entry states its own purpose: this is for relaxing the spine. Nothing is jerked until that has been done three times.
Stage 2 changes the tool. The feet are turned sideways and it is the outer edges — the narrow little-toe borders — that deliver force, on both sides of the spine, not on the beads. Then the jerk. One. And the entry tells you what the noise means if it comes: sometimes a slight sound may come from this; understand then that the vertebrae are setting. It may equally not come, and the entry does not make the sound a requirement. Do not chase it. A therapist working for a click is a therapist adding force.
Stages 3 and 4 are the same thing with the head turned, plus a new action. Neck to the left: the jerk again, and then — without stopping, immediately — the soles slide from the shoulder blade to the elbow. Neck to the right: repeat procedure number three, which is the whole of stage 3, jerk and slide together. The words without stopping, immediately join the jerk and the slide into one movement. Give them as two and you have given something else.
MOTOR NEURON POINT
Taking the weight of the body on the hands with the support of chairs, place your heels one by one on both sides of the C7–T1 joint, in such a way that the front part of the toes does not press on their skull. Then, standing straight, give pressure with the heel for a few moments, and release. Ordinarily it is given only five times.
Take note — while giving the pressure, make your foot at a 90° angle on the patient's back, so that pressure does not come onto the cervical vertebrae.
| Patient's position | Prone, four pillows — three under the chest and one under the chin — with the three-finger gap at the throat checked by hand Prone ▲ Take care |
|---|---|
| The therapist | The weight of the body taken on the hands with the support of chairs; then standing straight to deliver the pressure |
| Where the heels are placed | The heels, one by one, on both sides of the C7–T1 joint — not on the joint — in such a way that the front part of the toes does not press on their skull |
| The angle | The foot at a 90° angle on the patient's back, so that pressure does not come onto the cervical vertebrae |
| Duration and repetitions | Pressure with the heel for a few moments, then release. Ordinarily it is given only five times |
| The limit on force | Only a mild jerk is to be given. Giving more force can cause the patient a great deal of trouble. The point is to be used only after much thought |
| Sign | A large circle with a smaller circle and two dots beneath it |
Four safeguards are written into eight lines, which tells you what the material thinks of this point.
"One by one" — the heels are placed separately, one and then the other, never both dropped together. "On both sides of the C7–T1 joint" — either side of the bead, never on it. "The front part of the toes does not press on their skull" — with the heel at the base of the neck the toes point up over the head, and they must be clear of it. "The foot at a 90° angle on the patient's back" — the sole set square across the body, so the load runs into the muscle beside the spine and not down into the neck bones. And the count is a small, specific number: ordinarily only five times.