The patient stays face down and the atlas drops four inches. Everything in Face Down was given above the waist or on the sacral plate; everything here is given at the waist and below it. That changes almost nothing about your hands and a great deal about your caution, because the low back is the one region where the thing you must not miss and the thing you see forty times a week look identical from the doorway.
This is also where the therapy stops using the word point loosely. Half of what follows is not a spot at all but a journey — a foot that starts at one bead and finishes at the flank, a walk down a raised thigh, a diagonal from L5 to the far shoulder. Where the foot begins, where it ends and which way it travels between them is the instruction.
Watch


The heading this group carries
Some treatments for the low back — not the whole answer to one
The name of the group
कमर की समस्याओं को ठीक करने के कुछ उपचार
Some treatments to correct problems of the low back.
Not the treatments. Some. The group does not claim to be the whole answer to a low back, nor that the low back is where a low back's trouble began. It offers a set of procedures for the region, to sit inside a plan built the ordinary way — from the navel findings, the direction, the digestion and the history.
Everything given face down here is given under the arrangement taught at the head of Face Down: 1½ pillows under the chest, compulsory — half the lower pillow sticking out, chest on the upper, chin on the lower, head straight and never turned. It is not restated at each point and it is not optional anywhere.
Several points here are not prone: L4 Fracture is given face up, and JJ⁺¹, JJ⁺², Bending forward and Standing point may be given seated on a chair or laid straight. Read the position line before the method line, every time.
| Where the therapist stands | Named in |
|---|---|
| Astride the L5–S1 joint, weight on the palms through the chairs | L5–S1 ghisai, stage 3 Prone |
| Comfortably near the waist, full weight on the hands through the chairs | Fracture point — the 'T' Prone |
| Beside the patient, the usual way, weight on the palms | Blood Supply to Sides, (6) L3,4,5, Sciatica point, Pelvic, Bindu Prone |
| The reverse way — facing the patient's heels | Blood Supply to Legs Prone |
| In front of the patient | Standing point Seated Supine |
| At the foot, hands only | Sciatica setting, Bending forward Supine Seated |
The chairs are the load control, not the furniture. In every foot-given treatment here the instruction is written into the method — taking the full support of the chairs and putting the body weight on your palms — so what reaches the patient is exactly as much of the therapist as his arms let down, and can be taken back in an instant.
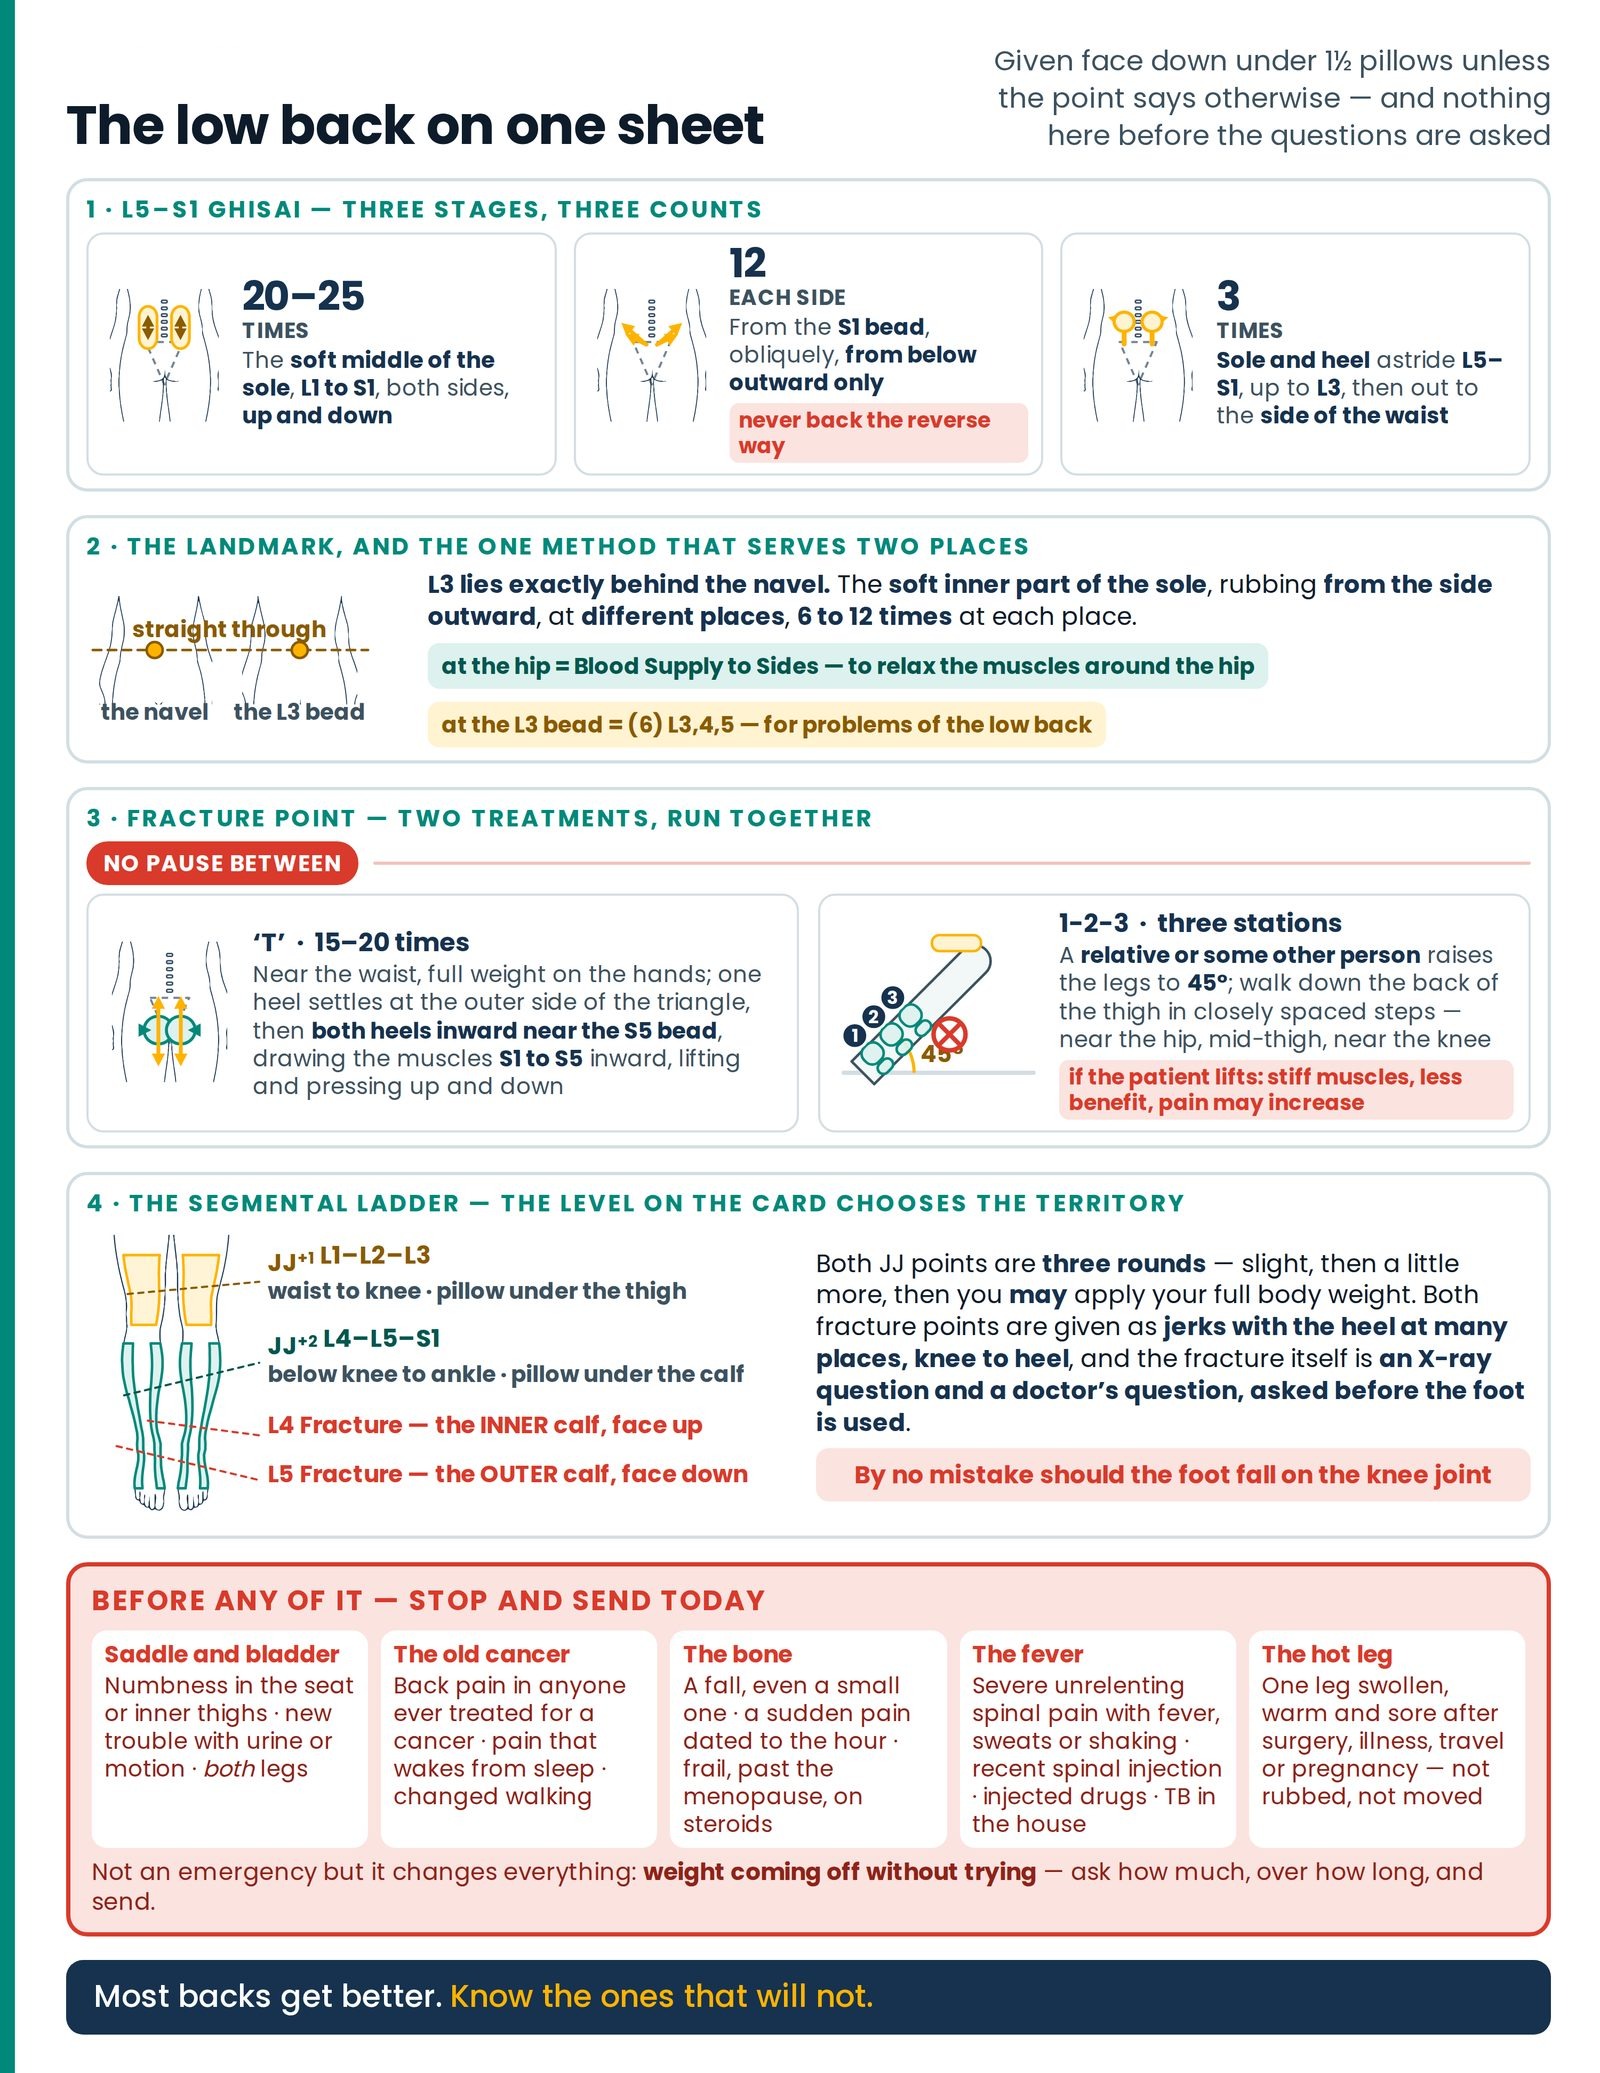
L5–S1 GHISAI — three stages, three different counts
Three different actions in a fixed order: 20–25, then 12 a side, then 3
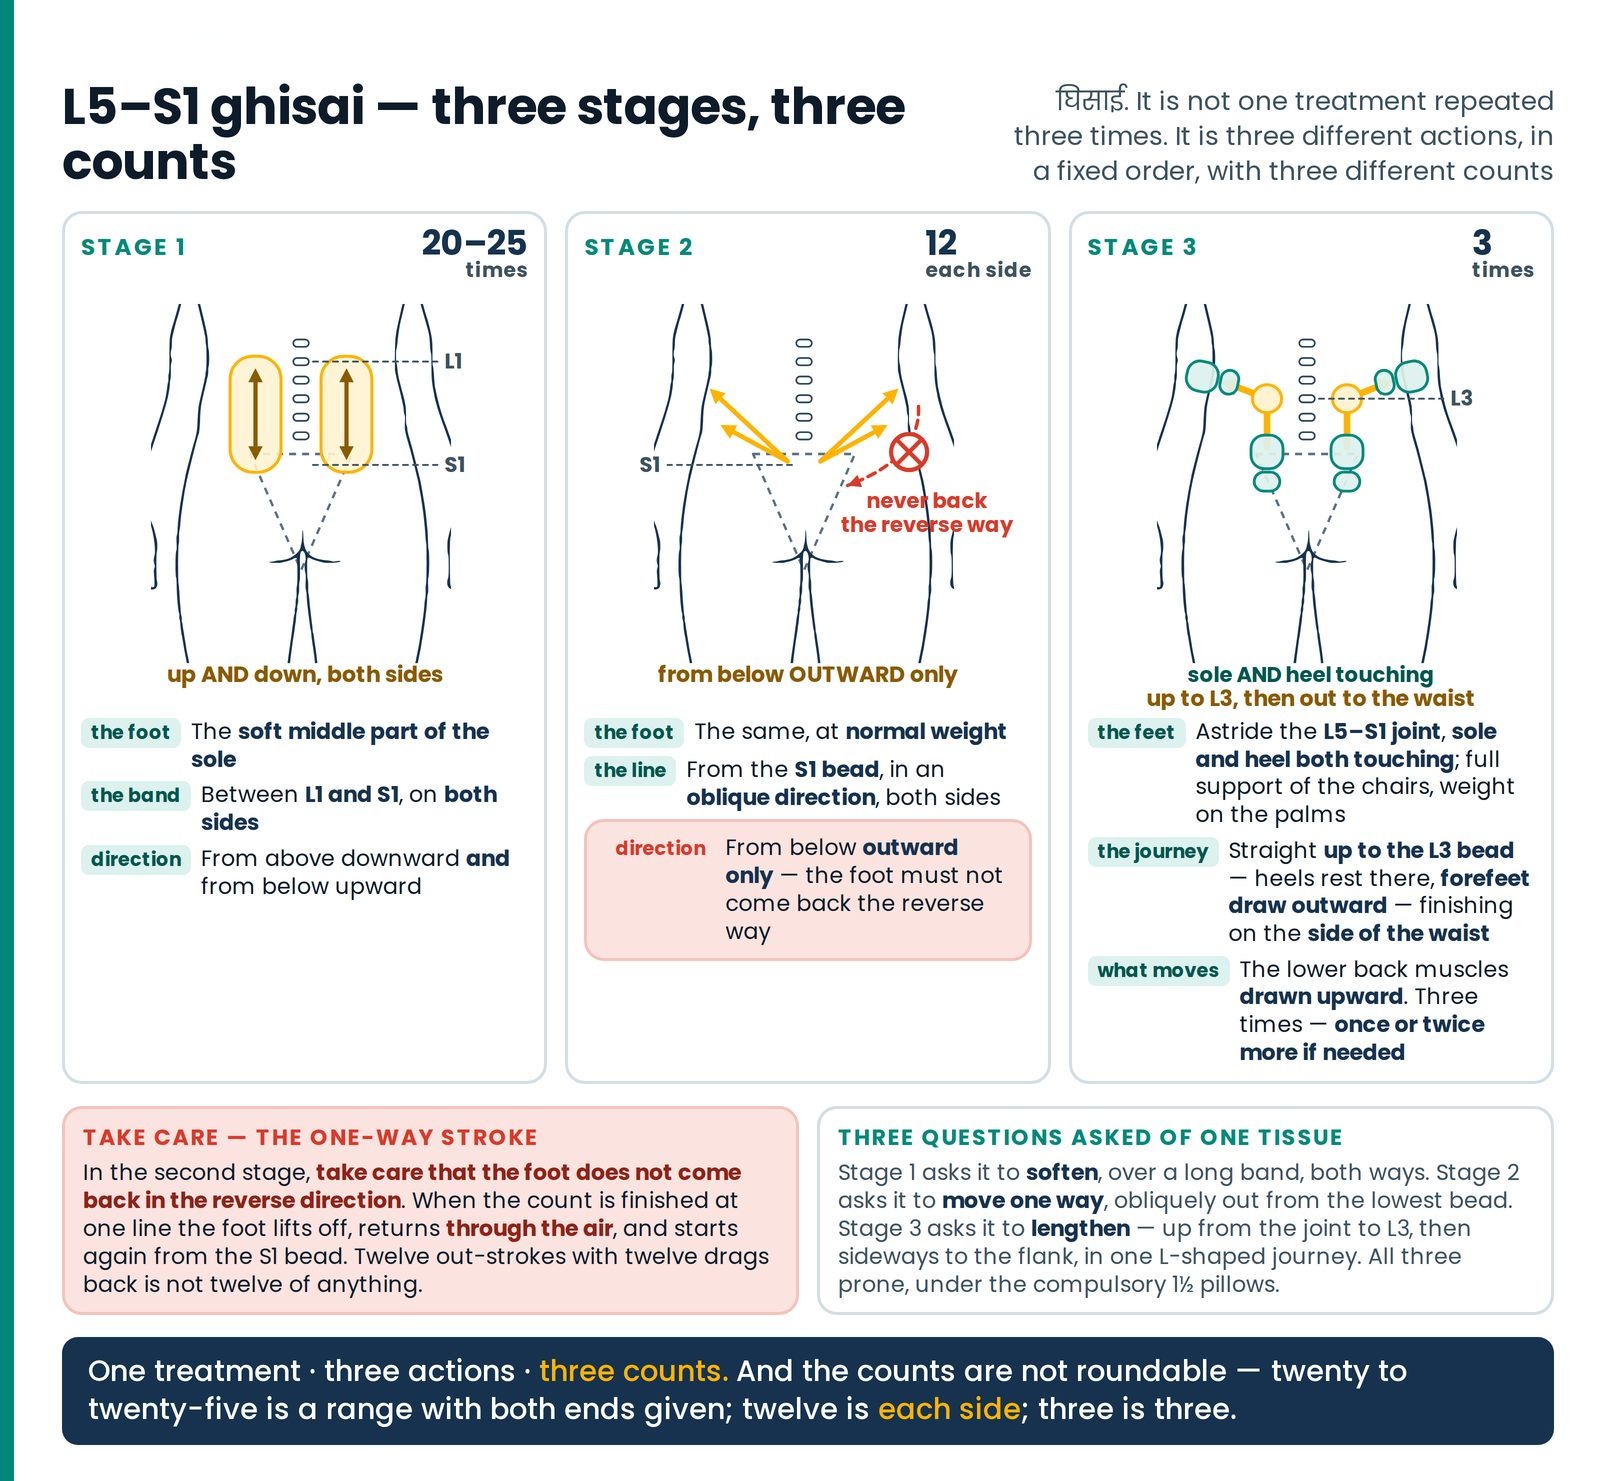
It is not one treatment repeated three times. It is three different actions, in a fixed order, with three different counts. A student who learns it as "rub the low back" has learned none of it. (Figure 22.1)
| Stage | The action, in short | Count |
|---|---|---|
| 1 | Soft middle of the sole, the band L1 to S1, both sides, up and down | 20–25 times |
| 2 | From the S1 bead, obliquely, from below outward only — the foot never coming back the reverse way — at normal weight | 12 times each side ▲ Take care |
| 3 | Weight on the palms through the chairs, astride L5–S1, sole and heel both touching, sliding up to the L3 bead, heels resting there while the forefeet draw outward, finishing with forefoot and heel on the side of the waist — the lower back muscles drawn upward | 3 times; once or twice more if needed |
All three stages are given prone, under the compulsory 1½ pillows, for problems of the low back. Prone
Three questions asked of one tissue. Stage 1 asks it to soften, over a long band, both ways. Stage 2 asks it to move one way, obliquely out from the lowest bead. Stage 3 asks it to lengthen — up from the joint to L3, then sideways to the flank — in one L-shaped journey ending with the whole foot, forefoot and heel together, on the side of the waist. And the counts are not roundable. Twenty to twenty-five is a range with both ends given; twelve is each side; three is three, with a written permission to go to four or five if needed — a judgement you should be able to state aloud, not a habit.
(6) L3,4,5 — the plainest landmark in the wiki
The L3 bead lies exactly behind the navel — and the method is borrowed whole
This entry borrows a method whole from another point and changes only the place.
What (6) L3,4,5 is
The figure and the method of this treatment are those of Blood Supply to Sides. Only the place of the treatment changes.
In this, start from above the L3 bead on the back — exactly behind the navel — and draw the back muscles toward the side, which gives the patient considerable relief.
So the borrowed method is taught here, in full, because this is where it is first needed. Its own entry, with its own indication, follows at the place the atlas gives it.
The method both points use is one sentence, and it is the whole of Blood Supply to Sides. Taking the full support of the chairs and putting the body weight on your palms, with the soft inner part of your sole, rub at the side of the hip, from the side outward, at different places, 6 to 12 times. Prone
Four things in that sentence are the treatment:
The tool — the soft inner part of the sole. Not the middle, not the heel, not the outer border.
The direction — from the side outward, away from the midline toward the flank.
The stations — at different places, several levels down the region, not one.
The count — 6 to 12 times at each place, a range with both ends given.
Now change only the place and you have (6) L3,4,5. Instead of the side of the hip you begin from above the L3 bead, and the sweep draws the back muscles toward the side. The bracketed (6) is the number of sweeps at each place.
| Patient's position | Prone, 1½ pillows under the chest; therapist taking the full support of the chairs, body weight on the palms Prone |
|---|---|
| Where the feet are placed | The soft inner part of the sole, starting from above the L3 bead — exactly behind the navel — at different places |
| Direction | From the side outward, drawing the back muscles toward the side |
| Duration and repetitions | (6) — six sweeps at each place; the parent method's own written range is 6 to 12 times at each place |
| What it is for | Problems of the low back — it gives the patient considerable relief |
Finding L3 without counting
The L3 bead lies exactly behind the navel.
You do not count beads up from the sacrum or down from the big one at the base of the neck. You look at where the navel is on the front of the body and you go straight through.
On a prone patient the navel is not visible, so take it before you turn them over. Then confirm by feel: the bead under your finger should be in the middle of the lumbar row, two below it and two above before the ribs begin. And note what this landmark is worth beyond one point. It fixes the middle of the low back for every lumbar level named in this article, and it is one of the few surface landmarks that does not degrade on a heavy patient — a navel is a navel.
What lies beneath. The sweep crosses the long upright muscle columns beside the spine, the deep square muscle running from the last rib to the pelvic crest, and the broad fibrous sheet that wraps them — the commonest place a patient with a "waist problem" puts a flat palm. The claim is that blood is being supplied; the demonstrable action is that a broad, slow, repeated lateral sweep lengthens that sheet and lowers how sore it is to press. That is real, and needs no larger claim to be worth giving.
FRACTURE POINT ('T' + 1-2-3) — two treatments, no pause between
Heels at S5, then the raised thigh — and somebody else does the lifting
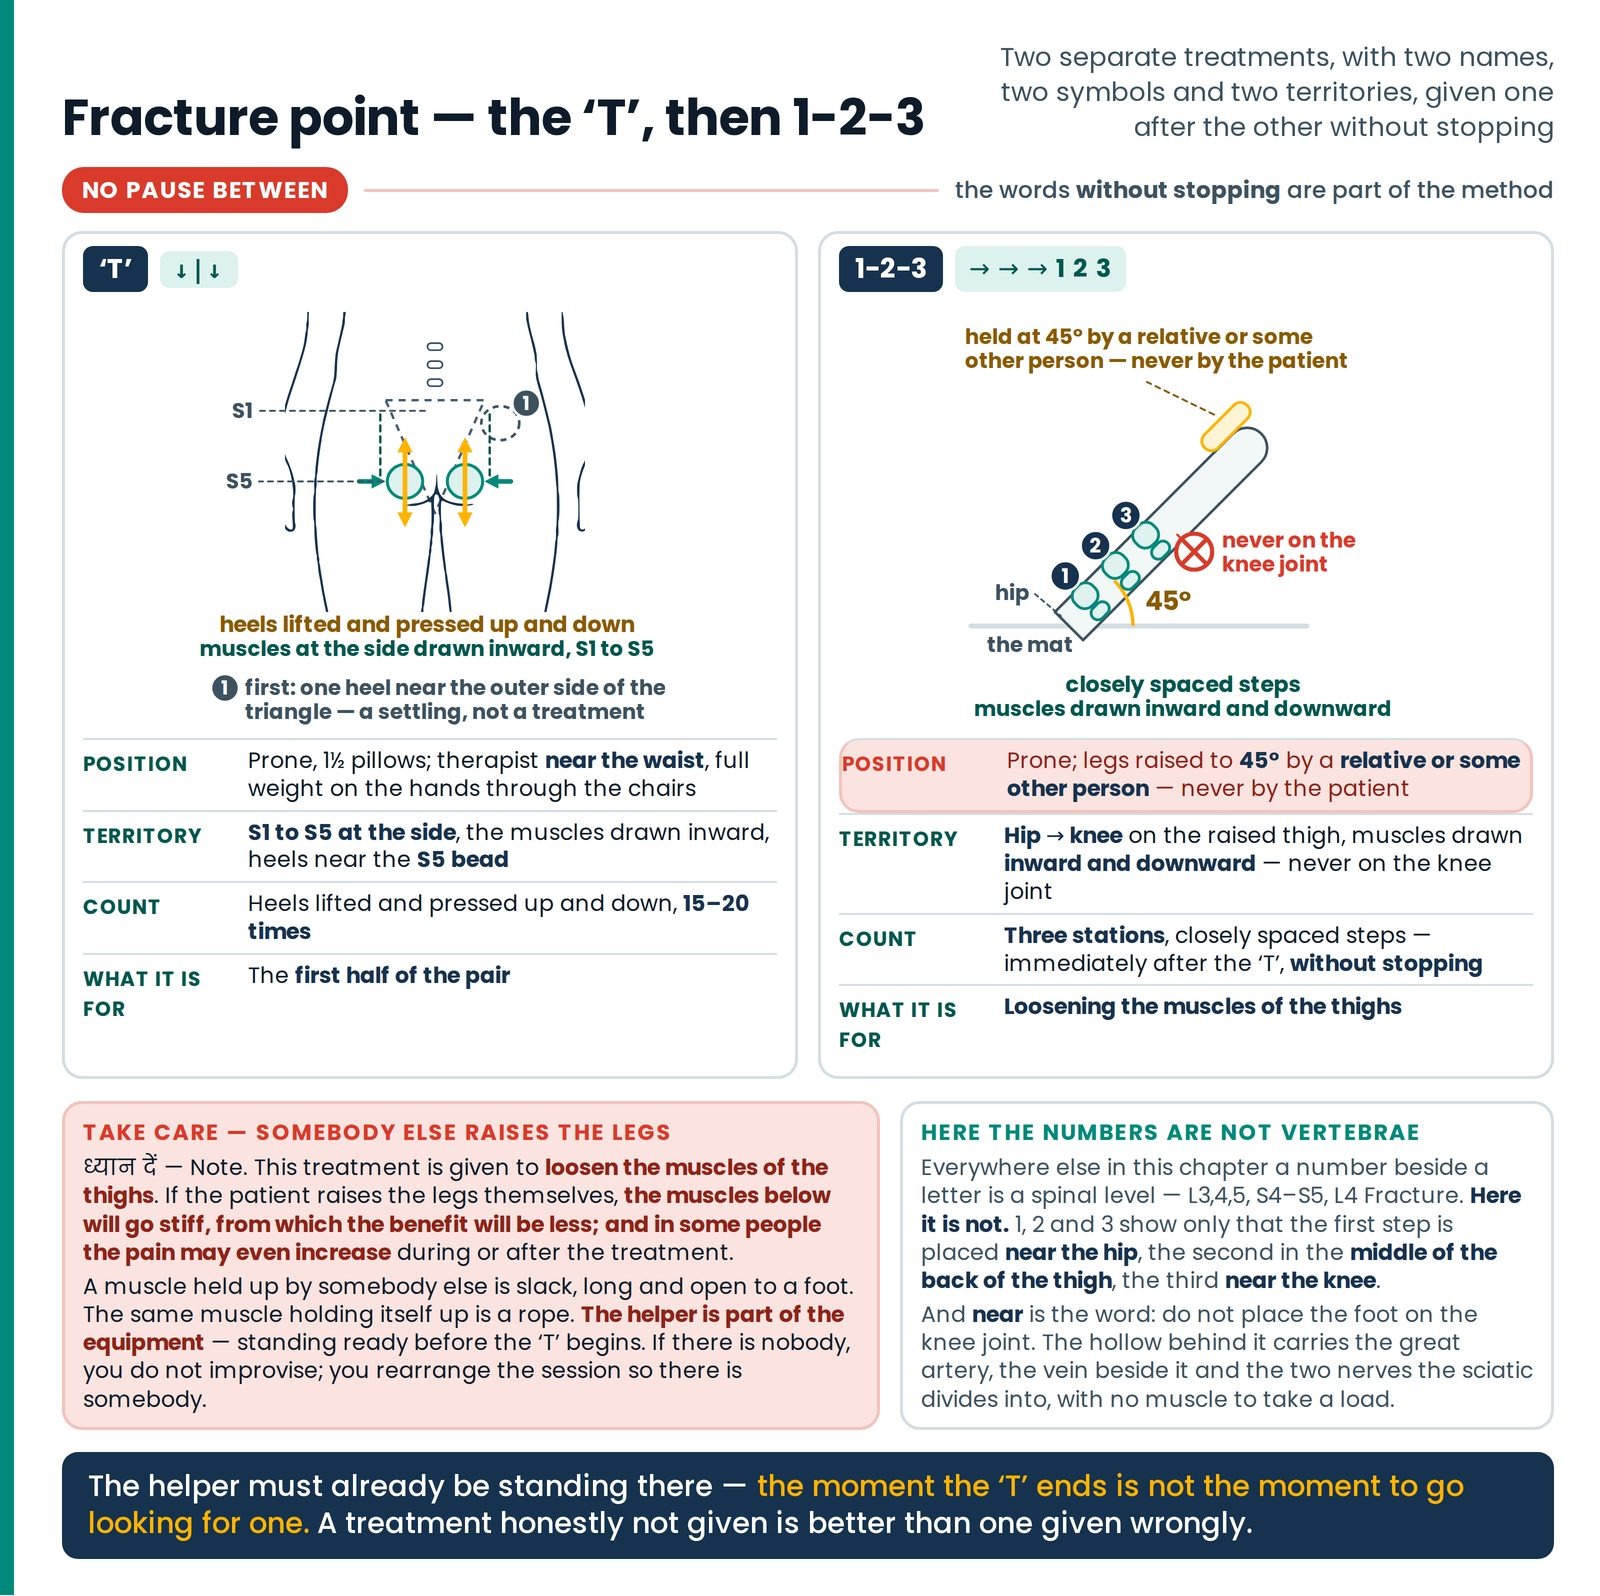
This includes two separate treatments, which are to be given one after the other without stopping. They have two names, two symbols and two territories, and on the card they may appear as one instruction. The words without stopping are part of the method — which means the helper the second half needs must already be standing there, because the moment the 'T' ends is not the moment to go looking for one. (Figure 22.2)
The symbol of the first treatment is ↓|↓. This is called 'T'.
The settling heel comes first and is not a treatment — one heel down near the outer side of the pelvic triangle, so the foot has found bone before weight arrives. The action is a pump, not a press and not a jerk: where Triangle for piles is one upward jerk at each of three stations and (2) S4, S5 one inward-and-downward jerk then a press-and-release, 'T' is fifteen to twenty repetitions of a rising and falling heel at one station.
The next treatment's symbol is → → → 1 2 3. This is called 1-2-3.
Everywhere else in this article a number beside a letter is a spinal level — L3,4,5, S4–S5, L4 Fracture. Here it is not. Read the glyph: three arrows in a row, travelling.
| 'T' | 1-2-3 | ||
|---|---|---|---|
| Symbol | ↓\ | ↓ | → → → 1 2 3 |
| Position | Prone, 1½ pillows; therapist near the waist, weight on the hands through the chairs Prone | Prone; legs raised to 45° by a relative or some other person ▲ Take care | |
| Territory | S1 to S5 at the side, the muscles drawn inward, heels near the S5 bead | Hip → knee on the raised thigh, muscles drawn inward and downward — never on the knee joint | |
| Count | Heels lifted and pressed up and down, 15–20 times | Three stations, closely spaced steps — immediately after the 'T', without stopping | |
| What it is for | The first half of the pair | Loosening the muscles of the thighs |
And the name must be handled plainly, because it is the point's name. The entry is called Fracture point, and its own stated purpose is loosening the muscles of the thighs — which is the claim it carries in its own words, and a defensible one. A vertebra that is broken is an X-ray question and a doctor's question, and that question gets asked before a foot goes near the back. The teaching section later in this article says when, how and in what words.
BLOOD SUPPLY TO SIDES — its own entry
The same sole, the same sweep, at the hip — to relax the muscles around it
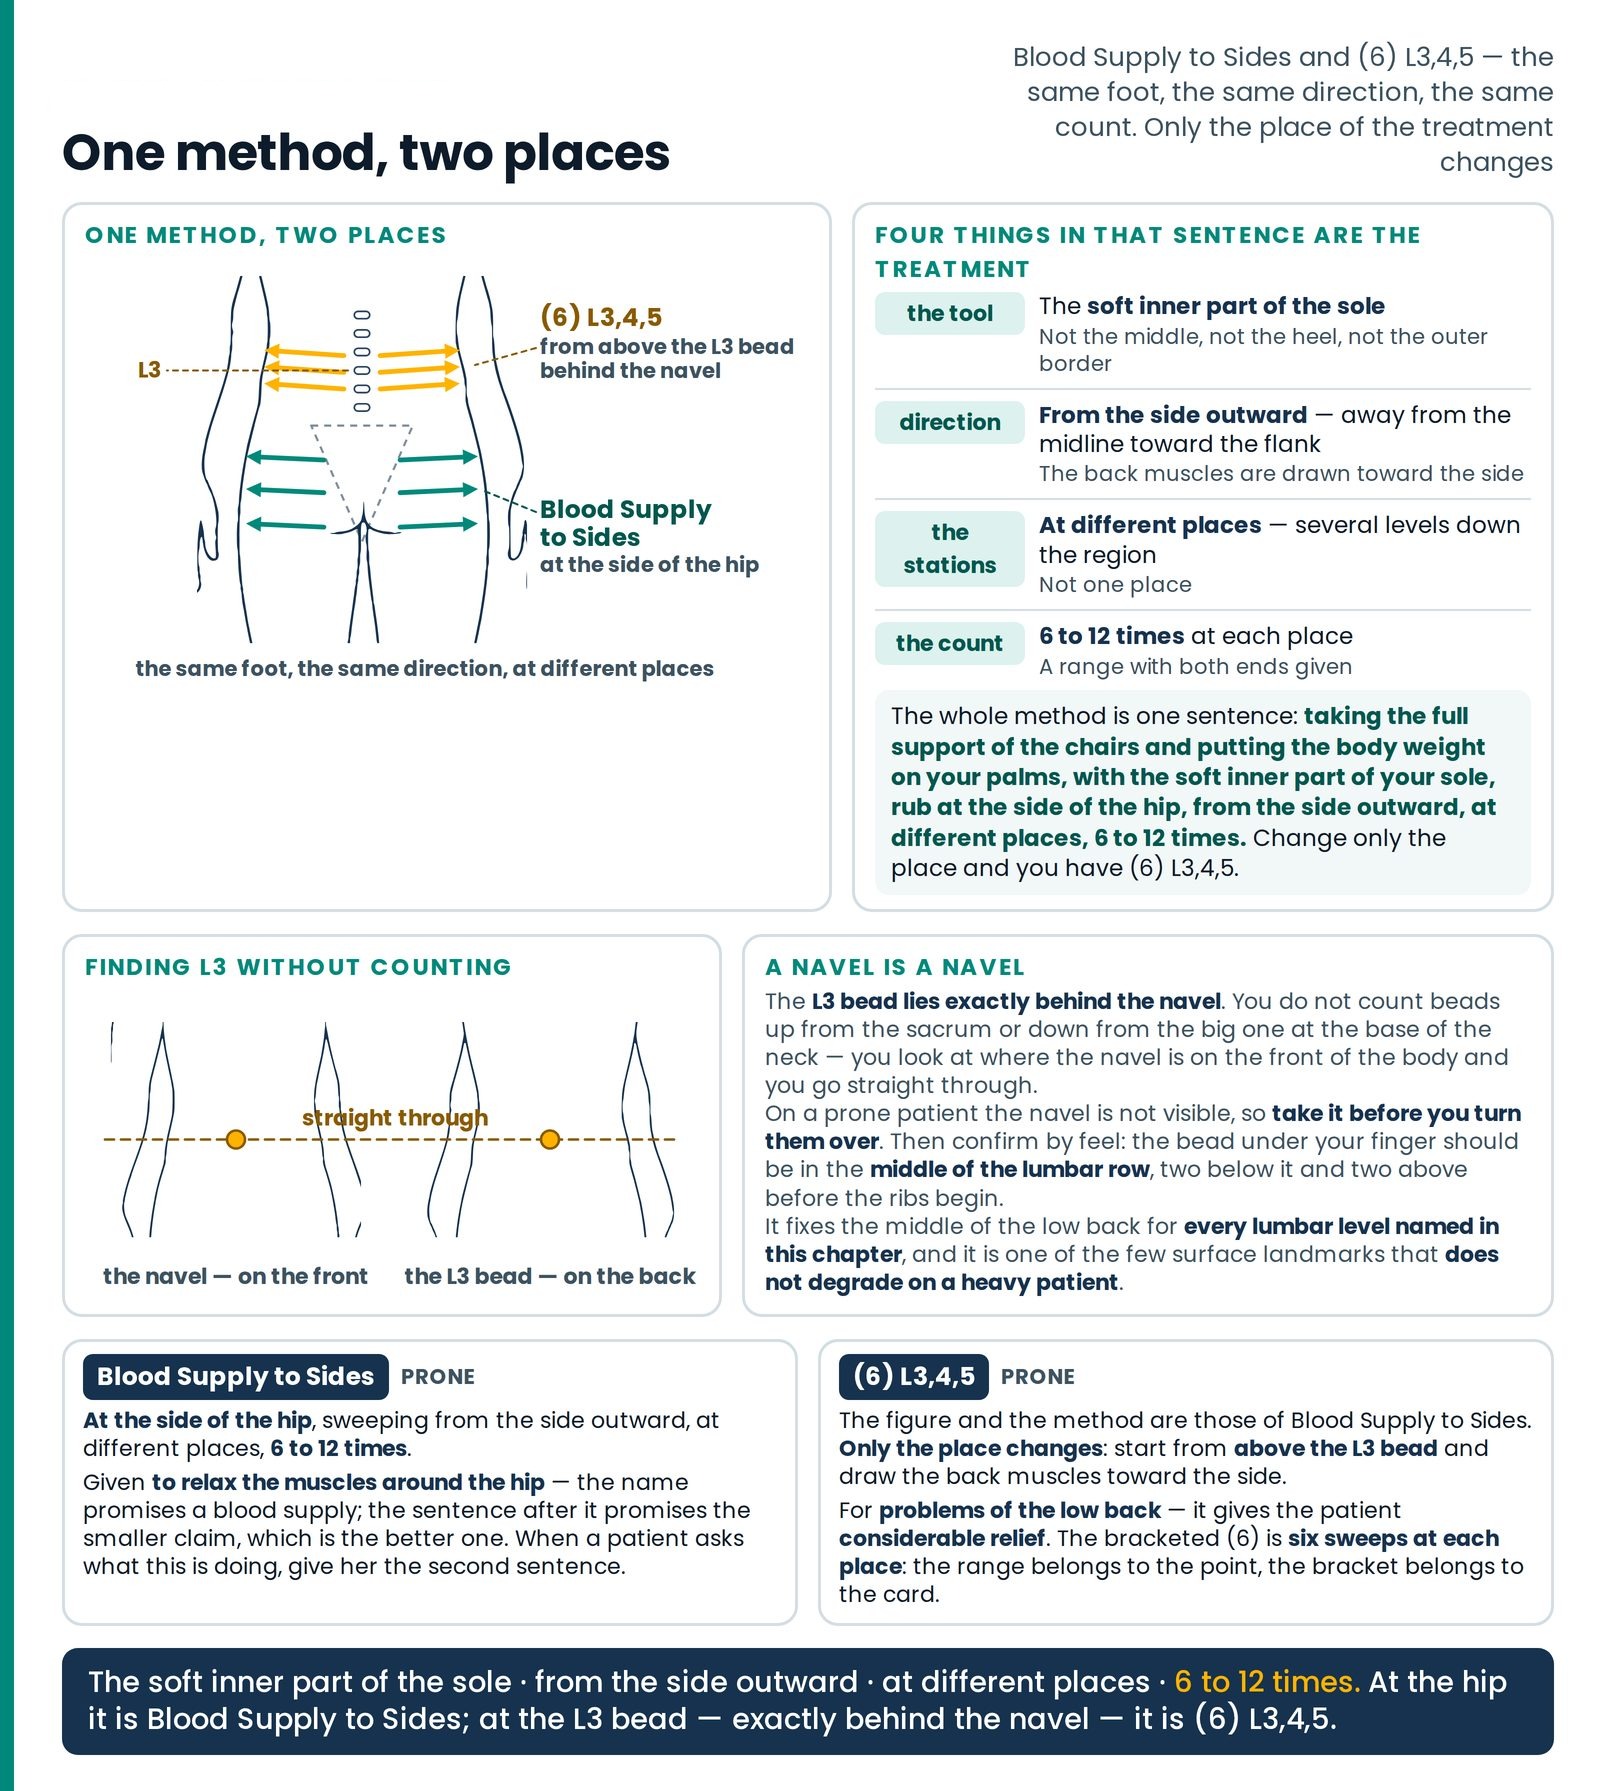
The method was taught in full above, because (6) L3,4,5 cannot be given without it. Here is the point in its own right, with the indication that belongs to it. (Figure 22.3)
Taking the full support of the chairs and putting the body weight on your palms, with the soft inner part of your sole, rub at the side of the hip, from the side outward, at different places, 6 to 12 times. It is given to relax the muscles around the hip.
| Patient's position | Prone, 1½ pillows; therapist taking the full support of the chairs, body weight on the palms Prone |
|---|---|
| Where the feet are placed | The soft inner part of the sole, at the side of the hip, sweeping from the side outward, at different places |
| Duration and repetitions | 6 to 12 times at each place |
| What it is for | Relaxing the muscles around the hip |
Note the modesty of the stated purpose and keep it. The name promises a blood supply; the sentence after it promises relaxed muscles around the hip, which is the smaller claim and the better one. When a patient asks what this is doing, give her the second sentence.
JJ⁺¹ and JJ⁺² — the segmental pair
L1-2-3 the thigh, L4-5-S1 the calf, and three rounds that ramp
JJ⁺¹ FOR L1 – L2 – L3
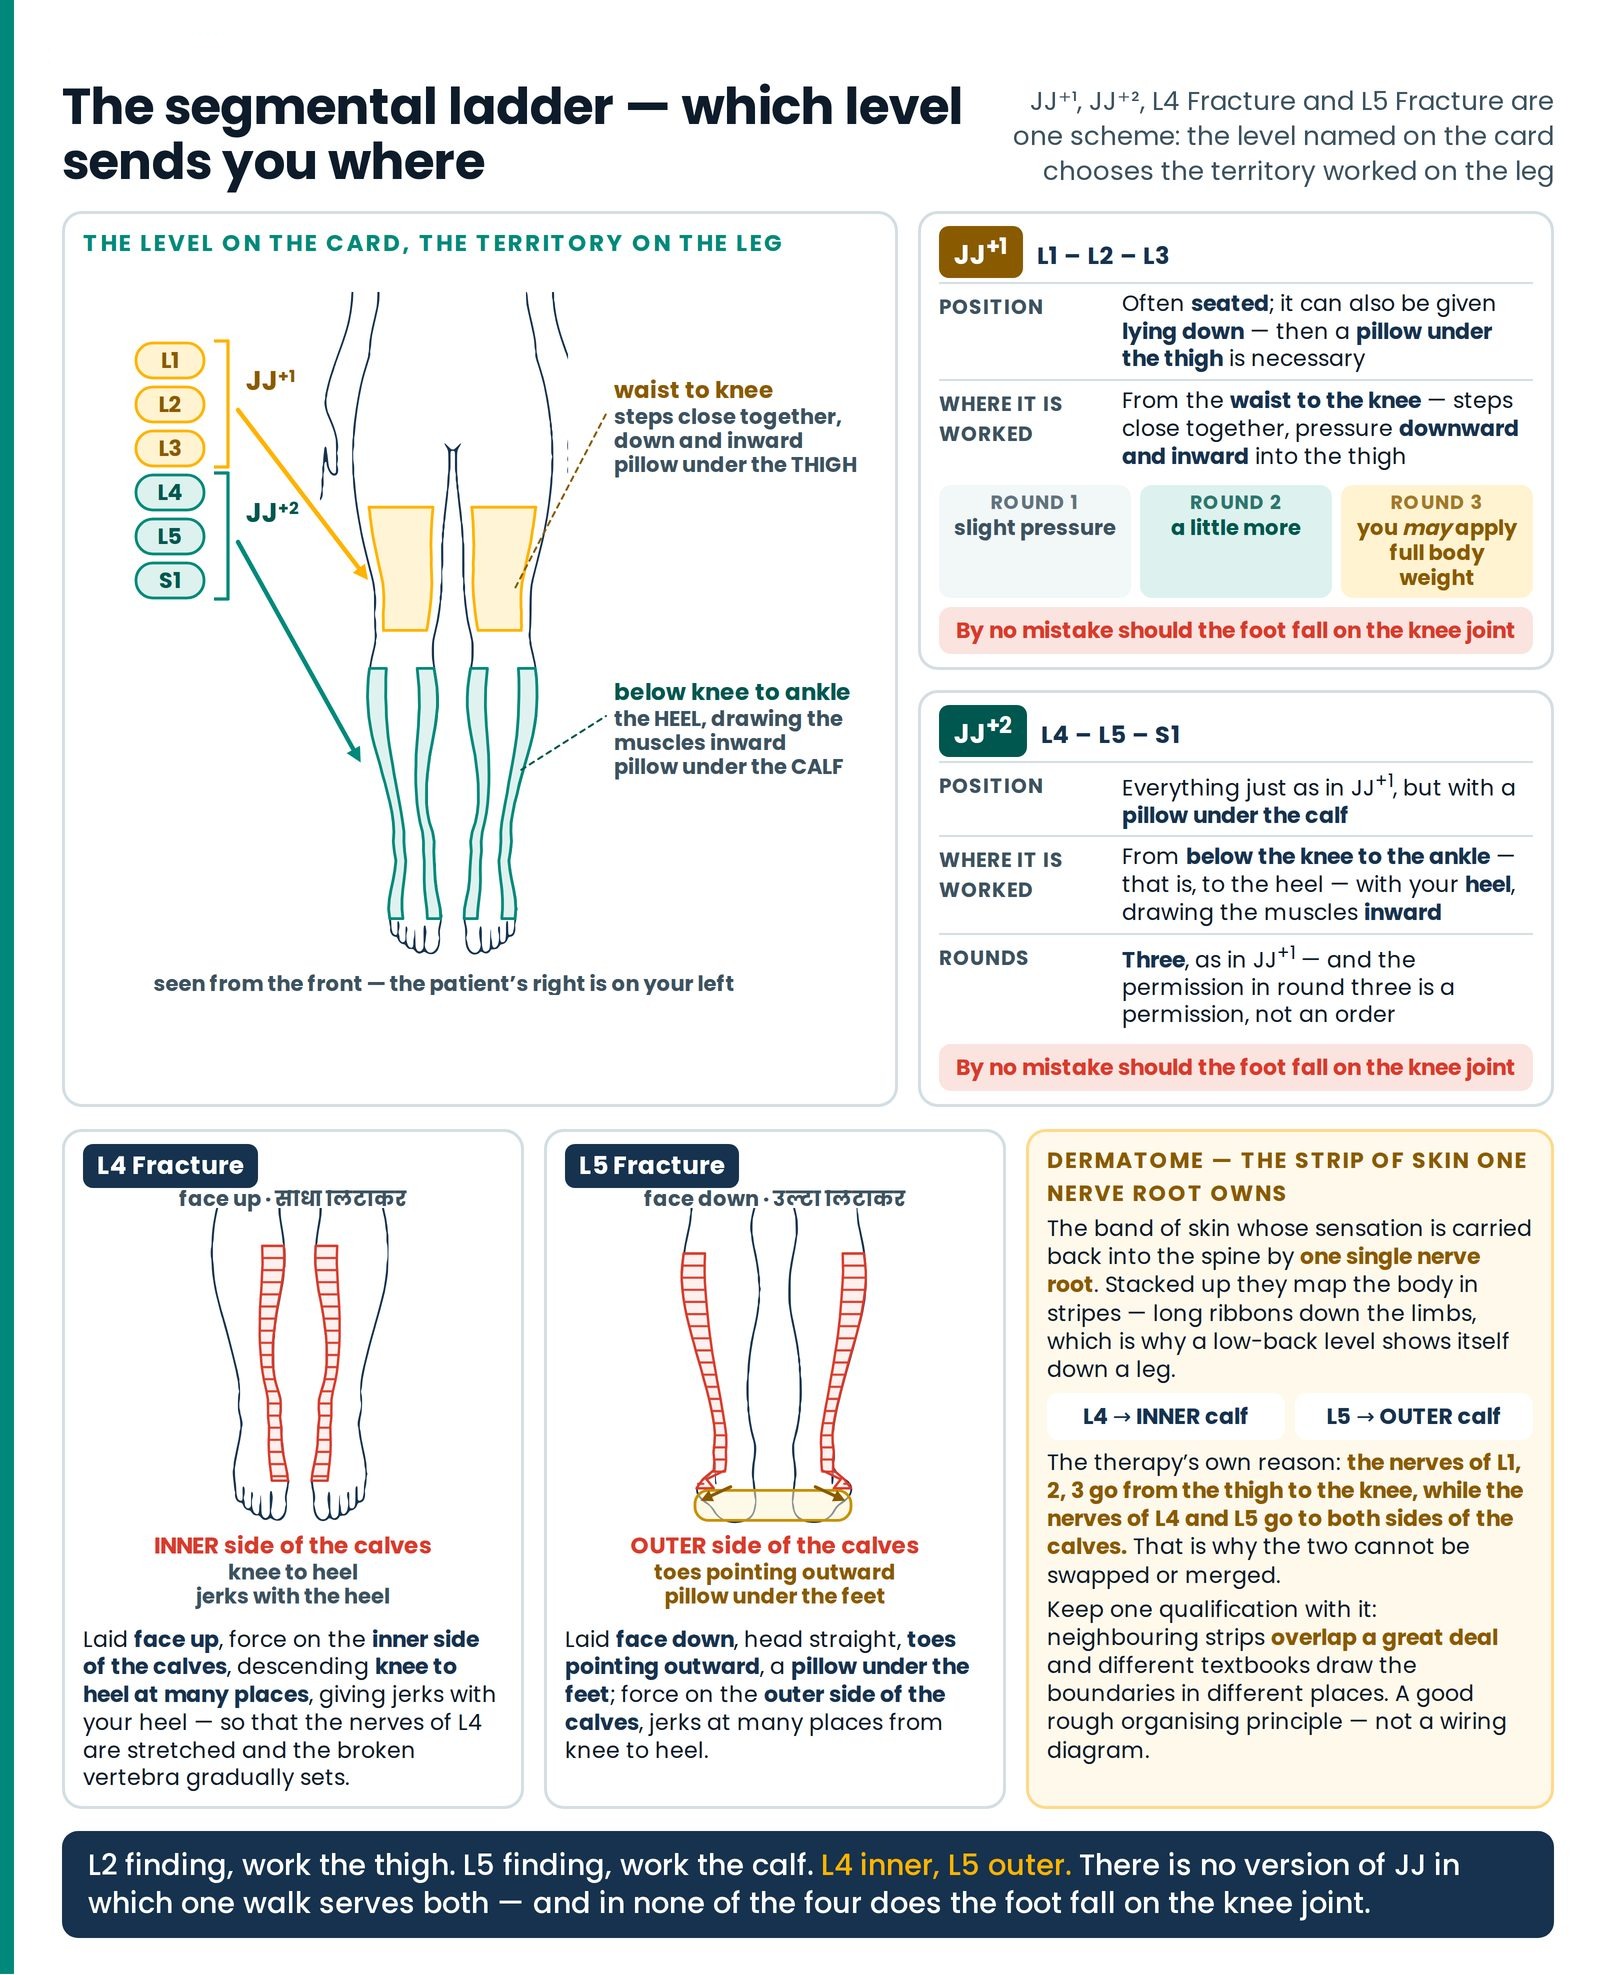
This is often given seated. But it can also be given lying down. If given lying down, a pillow under the thigh is necessary. If given seated, perhaps no pillow will be needed. Its symbol is JJ⁺¹. (Figure 22.4)
Taking the body weight on the chairs, and placing the steps close together, giving pressure downward and inward into the thigh, walk from the waist to the knee. But by no mistake should the foot fall on the knee joint. Do three rounds. In the first round, taking your body weight on the hands, give slight pressure on their thighs. In the second round, increase the pressure a little. The third time, you may apply your full body weight on them. Seated Supine × 3
JJ⁺² FOR L4 – L5 – S1
Its symbol is JJ⁺². Everything is to be done just as in JJ⁺¹ above, but in this, placing a pillow under the calf, and with your heel drawing the muscles inward, walk from below the knee to the ankle — that is, to the heel. Do three rounds.
| JJ⁺¹ | JJ⁺² | |
|---|---|---|
| Segments | L1 – L2 – L3 | L4 – L5 – S1 |
| Patient's position | Often seated; but it can also be given lying down Seated Supine | Everything just as in JJ⁺¹ Seated Supine |
| The therapist | Body weight taken on the chairs | |
| Where it is worked | From the waist to the knee | From below the knee to the ankle — that is, to the heel |
| Pillow | Under the thigh, if given lying down (seated, perhaps none) | Under the calf |
| Tool and direction | Steps close together, pressure downward and inward into the thigh | The heel, drawing the muscles inward |
| Rounds | Three — slight, then a little more, then you may apply your full body weight × 3 | Three, as in JJ⁺¹ |
| The rule | By no mistake should the foot fall on the knee joint ▲ Take care |
The therapy's own reason for the pair, and the ramp inside it
JJ⁺¹ and JJ⁺² — both of these are based on dermatome charts. The nerves of L1, 2, 3 go from the thigh to the knee, while the nerves of L4 and L5 go to both sides of the calves.
That is the whole logic, and it is why the two cannot be swapped or merged: the territory is chosen by the level named on the card. L2 finding, work the thigh. L5 finding, work the calf. There is no version of JJ in which one walk serves both.
And most treatments give a count; this one gives a ramp. Round one slight, round two a little more, round three you may apply your full body weight. Three things follow. The tissue is given time to accept the load. You get two warnings before the heaviest round — anything that will hurt, wince or go rigid does so when almost nothing is on the foot, so the grading is a screening tool wearing the clothes of a dose. And the permission in round three is a permission, not an order: on a frail patient, an elder, a child, or a leg that objected in round two, you may not.
L4 FRACTURE and L5 FRACTURE
A mirrored pair: face up on the inner calf, face down on the outer
A mirrored pair in which everything is reversed — the position of the patient, the side of the calf, the level named. Learn them together or you will one day give one while reading the other.
L4 Fracture — सीधा लिटाकर, laid face up. This is to be given to those whose L4 vertebra has fractured — that is, broken. Laying the patient face up, giving force on the inner side of the calves, descend from the knee to the heel at many places, giving jerks with your heel, so that the nerves of the L4 vertebra are stretched and the broken vertebra gradually sets. Supine Both sides
L5 Fracture — उल्टा लिटाकर, laid face down. This is to be given to those whose L5 vertebra has fractured. Lay the patient prone, so that the head is straight and the toes point outward. Give a pillow under the feet. Then, with your heel, giving force on the outer side of the calves, give jerks at many places from knee to heel, so that the nerves of the L5 vertebra are stretched and the broken vertebra gradually sets. Prone Both sides
| L4 Fracture | L5 Fracture | |
|---|---|---|
| Patient's position | Laid face up — सीधा लिटाकर Supine | Laid face down — उल्टा लिटाकर, head straight, toes pointing outward, a pillow under the feet Prone |
| Where the feet go | Force on the inner side of the calves | Force on the outer side of the calves |
| Count | Jerks with the heel at many places, descending knee to heel | Jerks with the heel at many places, knee to heel |
| What it is for | A fractured L4 — the nerves of L4 stretched so that the broken vertebra gradually sets | A fractured L5 — the nerves of L5 stretched so that the broken vertebra gradually sets |
The therapy's own reason, stated at the point
ध्यान दें — Note. Both these points too are based on dermatome charts. The nerves of L4 go to the inner side of the calves, and the nerves of L5 go to the outer side of the calves. So by giving treatment at these places, such patients will surely get relief!
That is the same reasoning as the JJ pair — the level chooses the territory. L4 inner, L5 outer is the sentence to learn, and it is the sentence that keeps the two points apart.
Three details in L5 Fracture are skipped by almost everybody. The head straight, on top of the compulsory chest pillows. The toes pointing outward, which rolls the thighs outward and turns the outer border of the calf upward, so the side the instruction names is the side actually presented to your heel. And the pillow under the feet, which takes the ankles out of their fully pointed position and lets the calf lie soft. Position the patient wrongly and you are working the back of the calf instead of its outer side — a different point aimed at a different level.
The boundary, plainly. A broken bone in the spine mends by growing new bone across the break, and what it needs for that is stillness. A suspected fracture is a question for a picture and a doctor before any of this is considered — which is why it stands among the findings that end a session, later in this article.
BLOOD SUPPLY TO LEGS — the stance that faces the wrong way
The one treatment given facing the heels, 30 to a thigh, crossed feet
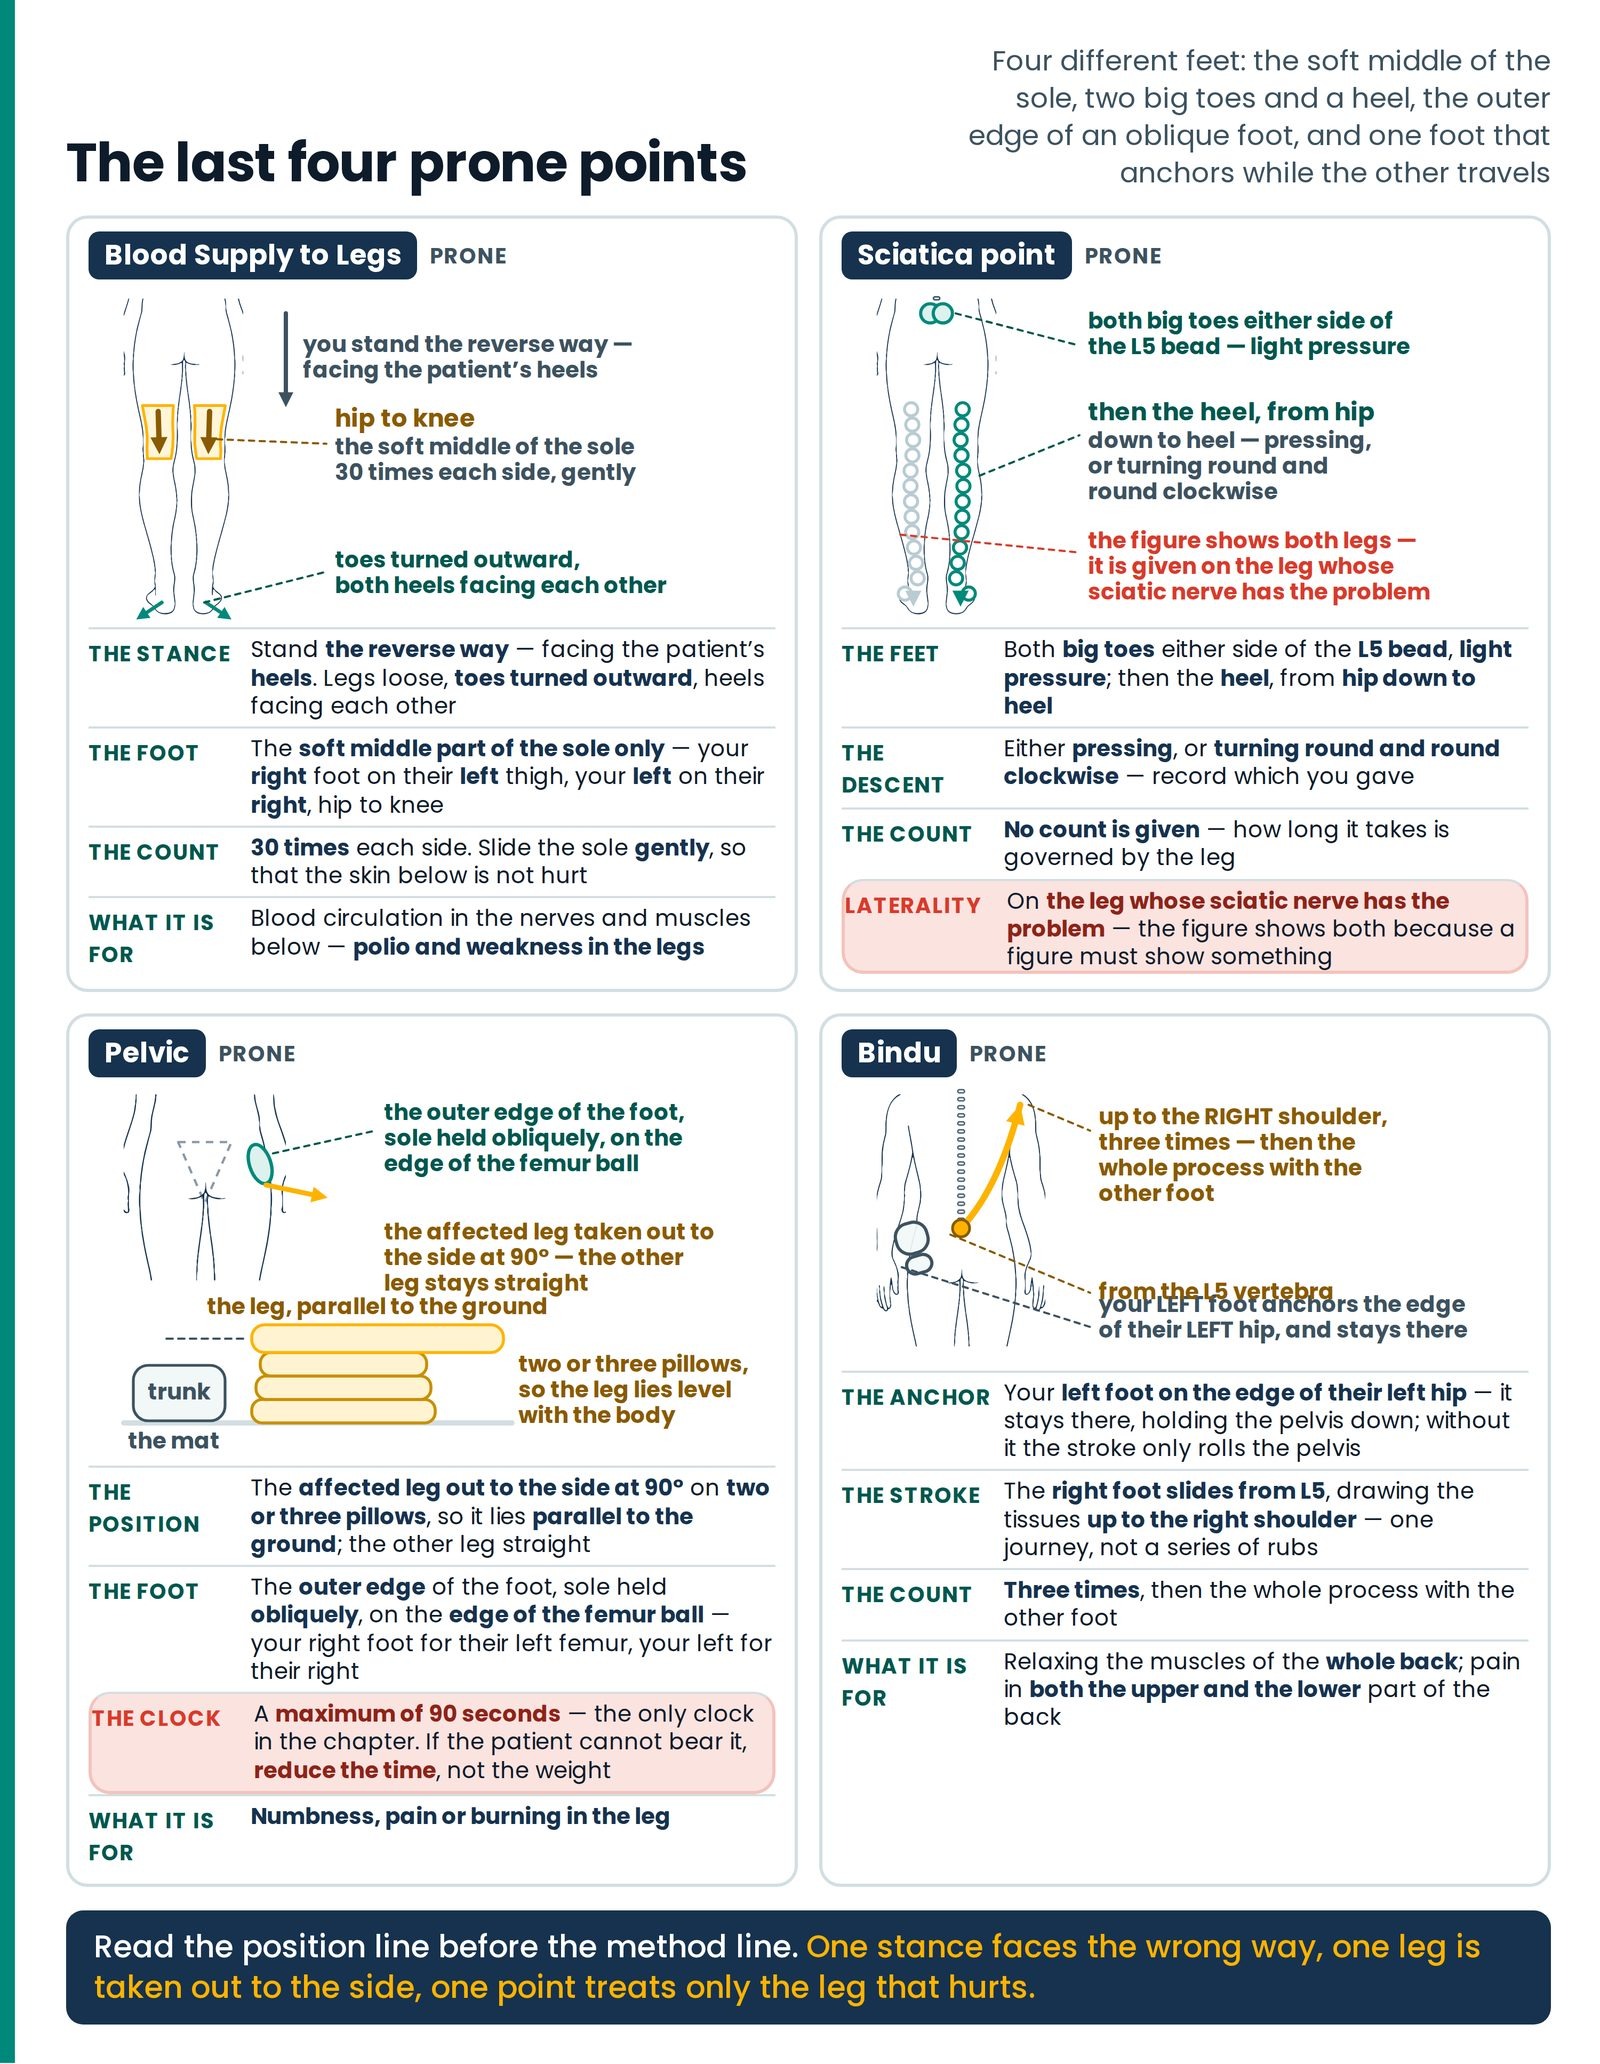
Note that in this treatment there is one main change in the therapist's standing position. Taking the support of the chairs, stand the reverse way compared with the other treatments — that is, facing toward the patient's heels. The treatment is given with the soft middle part of the sole only. Prone Left Right (Figure 22.5)
Tell them to keep their legs loose, the toes turned outward, and both heels facing each other. Now, on the back of their left thigh, with your right foot, rub from hip to knee 30 times. Then with your left foot, rub their right thigh in the same way, 30 times. Each time, slide the sole gently, so that the skin below is not hurt, but the blood circulation in the nerves and muscles below is increased.
This is an excellent treatment for polio and for weakness in the legs.
When writing it on the card, its symbol is → → → an inverted triangle marked 30, with two downward arrows beneath it.
| Patient's position | Prone, 1½ pillows; legs loose, toes turned outward, both heels facing each other. Therapist taking the support of the chairs, standing the reverse way — facing the patient's heels Prone |
|---|---|
| Where the feet go | The soft middle part of the sole only, back of the thigh, hip to knee — your right foot on their left thigh, your left foot on their right Left Right |
| Duration and repetitions | 30 times each side. Slide the sole gently, so that the skin below is not hurt |
| What it is for | Increasing blood circulation in the nerves and muscles below; an excellent treatment for polio and for weakness in the legs |
The reverse stance has a reason you feel at once: the sweep runs hip to knee, away from you, and a foot pushing away has a long clean travel where a foot pulling toward the body runs out of range in a hand's breadth. The crossing is written too — the crossed foot is the one that arrives square on the muscle and can travel the whole thigh.
The patient's position is half the treatment. Legs loose, toes turned outward, heels facing each other rolls both thighs outward at the hip and slackens the back-of-thigh muscles, so the sole rides soft bellies rather than a drawn bowstring. And gently is load-bearing: thirty repetitions with a therapist's whole weight available is a great deal, and the instruction names its own limit — so that the skin below is not hurt. The check is the skin. Pink is treated; scuffed, hot or marked is dragged.
What lies beneath, and the honest boundary. The sweep covers the three muscles at the back of the thigh, from the sitting bone to below the knee, with the great sciatic nerve running down the middle between them. For a weak leg, no amount of rubbing substitutes for using the muscle — what rebuilds a weak muscle is loading it and practising the task. What a slow thirty-stroke sweep gives is a leg less stiff, less sore and more willing to be moved, and a patient more willing to move it. Say it at that size and it is entirely true, and worth giving every day.
The sciatic points
Two big toes at L5 and a heel to the heel — then the foot, toe by toe
SCIATICA POINT
This is useful for those who get a sharp, pricking pain running from the waist toward the leg, which sometimes goes away and sometimes stays for hours. This is called sciatic pain, or sciatica. Some people have the problem in one leg only, while others get burning or pain in both legs. In the figure it is shown for both legs, but it is done on the leg whose sciatic nerve has the problem. Prone Left Right
Taking the support of the chairs, place both your big toes on either side of the L5 bead and give a light pressure. Then, with your heel, on the leg that has the pain, go from the hip down to the heel — either pressing, or turning round and round clockwise.
| Patient's position | Prone, 1½ pillows; therapist taking the support of the chairs Prone |
|---|---|
| Where the feet go | Both big toes either side of the L5 bead, light pressure; then the heel, on the leg that has the pain, from hip down to heel |
| Duration and repetitions | No count is given. The descent is made either by pressing or by turning round and round clockwise |
| Laterality | The figure shows both legs; it is done on the leg whose sciatic nerve has the problem ▲ Take care |
| What it is for | Sciatic pain, or sciatica — sharp, pricking, running from waist toward leg, sometimes going, sometimes staying for hours. Some have it in one leg only; others get burning or pain in both legs |
Three instructions here are easily lost. The tool at the top is two big toes and the pressure is light — a narrow, precise, low-force contact used nowhere else in this article, while the rest of the treatment is a heel and the body's weight. The descent is on one leg, the leg that hurts — the figure shows two because a figure must show something, and the instruction overrides the figure in plain words. And two ways down are given, neither preferred — pressing, a series of holds descending hip to heel; or the clockwise turn, the heel circling as it descends. Choose by what the leg tolerates and record which you gave.
Note also what the entry does not give: a count. That is unusual in a book of counts and should be read as written rather than filled in from habit — the descent is made, and how long it takes is governed by the leg.
SCIATICA SETTING
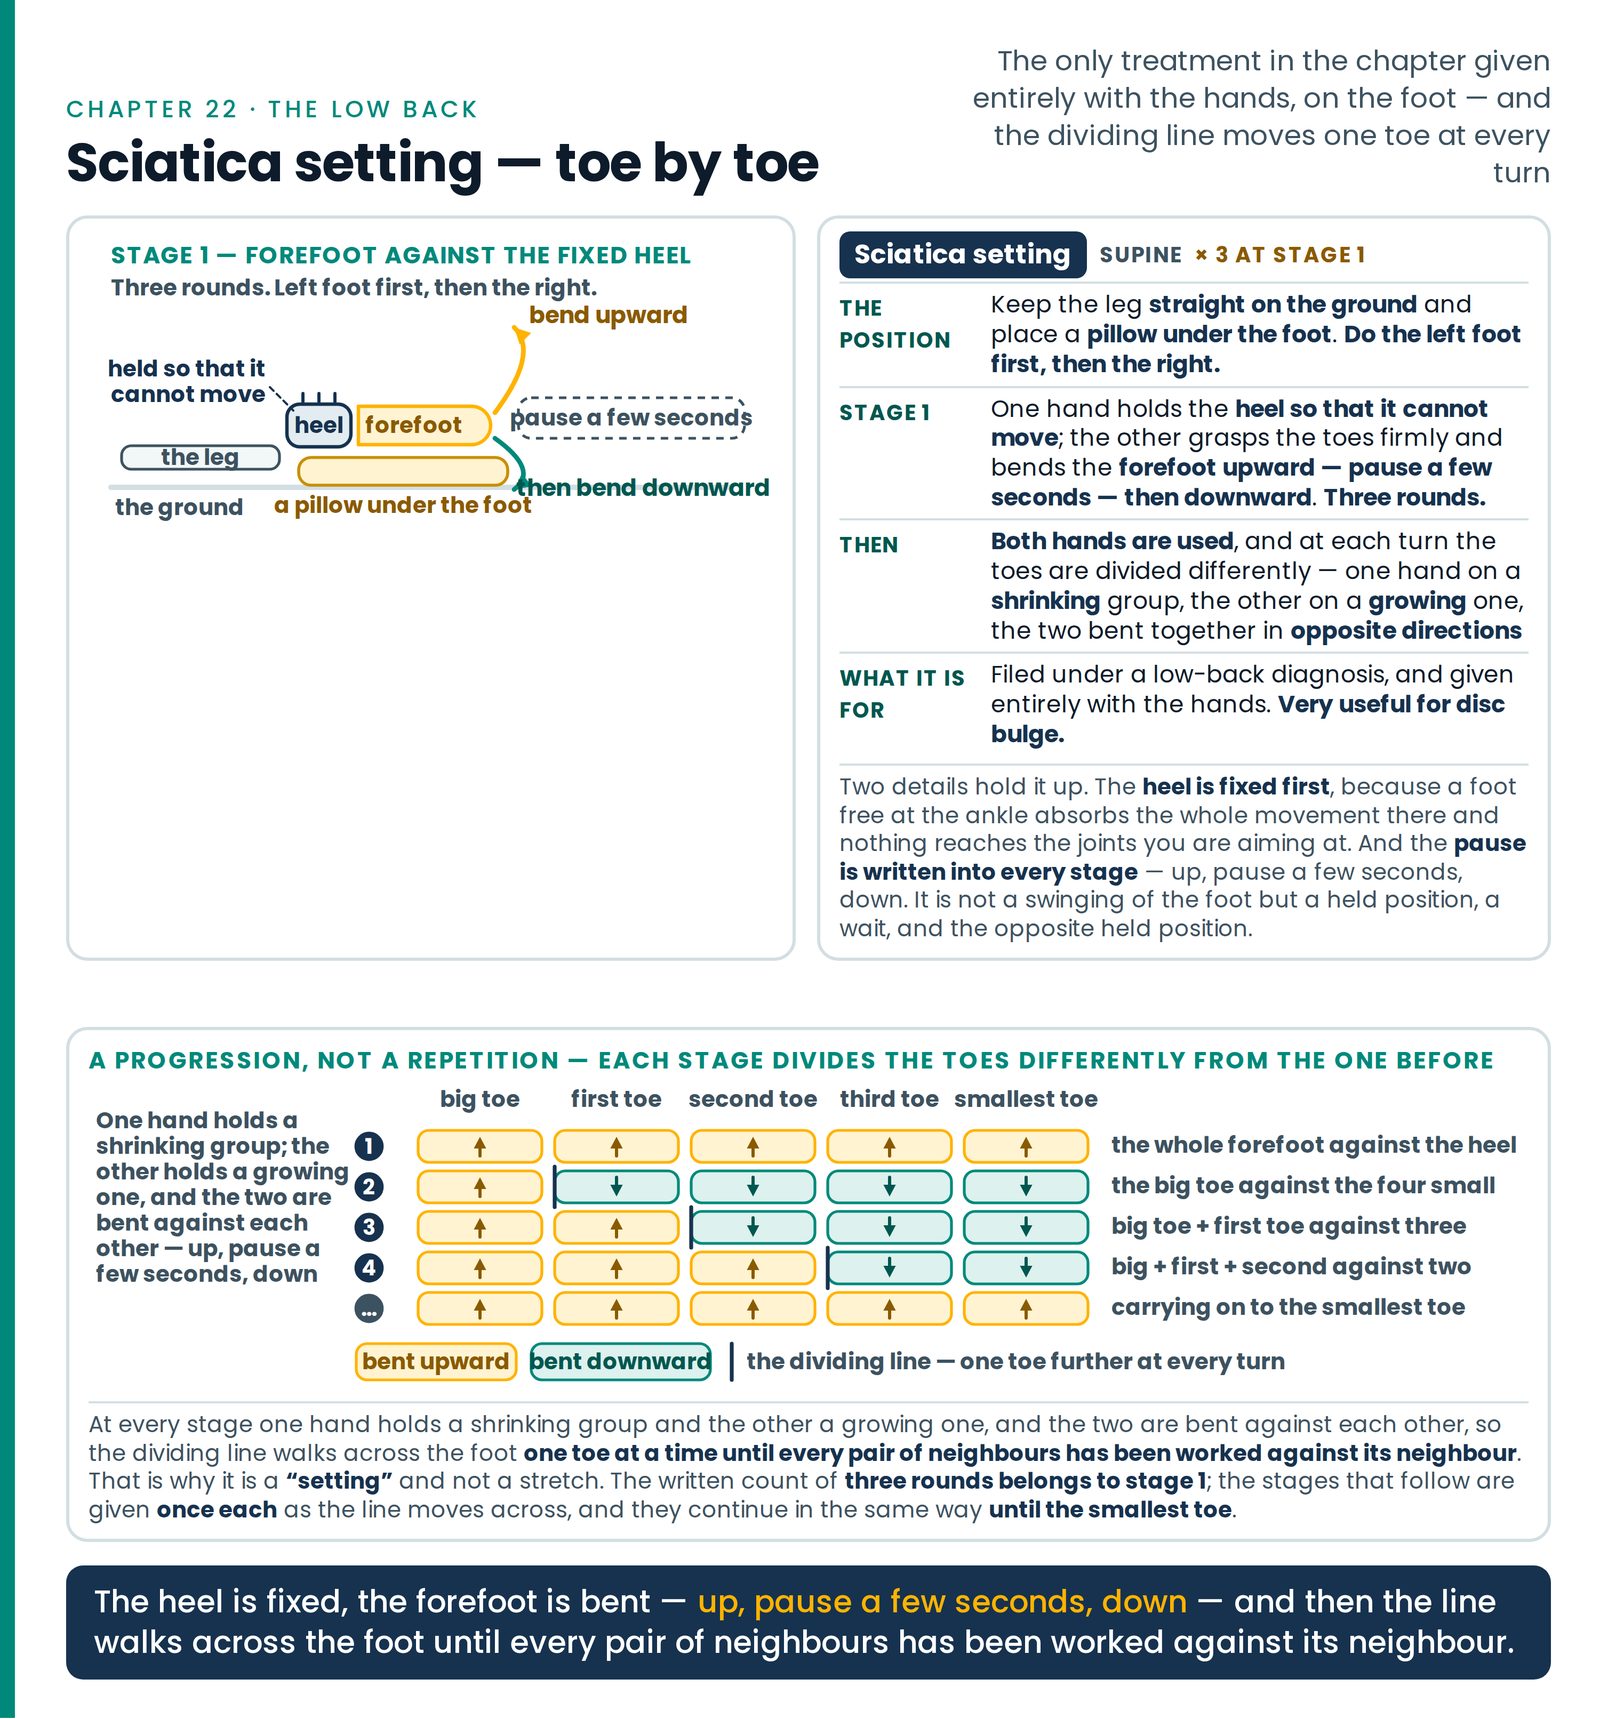
The only treatment in the article given entirely with the hands, on the foot — and filed under a low-back diagnosis. It is a progression, not a repetition: each stage divides the toes differently from the one before. (Figure 22.6)
Keep the leg straight on the ground and place a pillow under the foot. Do the left foot first, then the right. Supine Left Right × 3
With one hand, hold their heel so that it cannot move. Then, with the other hand grasping the toes firmly, bend the forefoot upward, pause for a few seconds, then bend it downward. Do three rounds. After this, both hands are used — and at each turn the toes are divided differently, one hand holding a shrinking group and the other the big toe with, next time, one more toe added to it, the two hands bent together in opposite directions, upward and downward — pause — bend.
| Stage | One hand holds | The other holds | The movement |
|---|---|---|---|
| 1 | The heel, held so it cannot move | The whole forefoot, the toes grasped firmly | Bend up — pause a few seconds — bend down. Three rounds |
| 2 | The four small toes | The big toe | That big toe bent up and down — pause — bend |
| 3 | Three toes | Big toe + first toe, together | Both hands together in opposite directions, up and down — pause — bend |
| 4 | The remaining toes | Big toe + first + second, all three held together | Both hands together in opposite directions, upward and downward — pause — bend |
| … | Continuing in this same way | Carry on until the smallest toe |
This is very useful for disc bulge.
At every stage one hand holds a shrinking group and the other a growing one, and the two are bent against each other, so the dividing line walks across the foot one toe at a time until every pair of neighbours has been worked against its neighbour. That is why it is a "setting" and not a stretch. And the written count of three rounds belongs to stage 1; the stages that follow are given once each as the line moves across.
Two details hold it up. The heel is fixed first, because a foot free at the ankle absorbs the whole movement there and nothing reaches the joints you are aiming at. And the pause is written into every stage — up, pause a few seconds, down. It is not a swinging of the foot but a held position, a wait, and the opposite held position.
What lies beneath. Bending toes and forefoot upward draws tight the strong fibrous band under the sole and the small muscles between the long bones of the foot; bending one toe up while its neighbour goes down shears the spaces between those bones, where the small nerves to the toes run. Toe and ankle bending upward is also the manoeuvre used everywhere to add tension along the nerve line running continuously from the sole to the low back — so working a foot in a patient with leg symptoms is not the arbitrary act it looks. What it plainly is: a low-force, well-tolerated mobilisation of the foot, easy to stop at any moment.
The back that gets better, and the back that leaves the room today
Most backs mend; a handful must be sent, and the difference is not the pain
Every article since From Findings to a Plan has promised this section, and here it is, at the place in the wiki where it is most needed — because the low back is where the commonest complaint in a clinic and the most dangerous one arrive wearing the same clothes.
Start with the encouraging half, because it is true and should be said often. Most low backs get better. Most back pain is not caused by anything anybody can name; pictures of ordinary painless backs are full of alarming findings; and an ordinary acute back settles substantially within weeks whatever is done to it. That last fact deserves unusual honesty: it means any treatment given to an ordinary acute back will look excellent, and a therapist who does not know that will overestimate his own hands for thirty years.
Now the other half. A small number of backs are not ordinary, and the whole of the difference lies in a handful of findings that have nothing to do with how bad the pain is. (Figure 22.8)
The findings that end a session on the spot
These are not reasons to treat more gently. They are reasons to stop, today, and send.
Ask for them by name, in the flat voice you use to ask about sleep. Each has a name, and a therapist should be able to say the name.
1 — The saddle and the bladder. *Cauda equina.* Numbness in the seat, the inner thighs or around the back passage — the area that would touch a saddle. Urine that will not come, or comes without being asked. Loss of control of the bowel. Weakness in both legs, or shooting pain down both legs at once. Any of these, in a patient with back pain, is the bundle of nerves at the bottom of the spine being crushed: the same-day emergency of the low back. Hospital, today — not tomorrow, not after one session to see. What is lost by waiting is not recovered afterwards. This is why the Sciatica point instruction to treat only the affected leg matters twice over: pain down both legs means the saddle and bladder questions come before anything else.
2 — The old cancer, and the night. *Spread to the bone.* Back pain in a person who has had cancer of any kind, at any time. Pain that wakes them from sleep rather than being there when they wake. Pain that goes round the body in a band. Any new numbness, weakness or change in the way they walk. Bone is where several common cancers travel, and the spine is the commonest bone they travel to. A new back pain with that history is a picture, not a treatment — and with a new neurological sign it is urgent in hours. Ask every patient once whether they have ever been treated for a cancer, at intake, on paper.
3 — The bone that may already be broken. *Fracture.* A fall, even a small one. A sudden severe pain that arrived in one moment and can be dated to the hour. A woman past the menopause, a frail elder, anybody on long-term steroids, anybody who has broken a bone before from a trivial knock. These are backs in which bone gives way under a force a young spine would not notice. A suspected fracture is an X-ray question and a doctor's question, asked before the foot is used, not after. Everything in this article that names a fracture is given to somebody whose fracture is already known about and being looked after.
4 — The fever. *Infection in the spine.* Severe back pain that does not let up at all, with fever, sweats or shaking. Recent injection into the back. Anybody who injects drugs. Tuberculosis anywhere in the body or in the household. Infection can settle in a disc or the space around the cord, and it is not a slow problem. Fever plus a spine that hurts all the time is a hospital finding.
5 — The leg that is hot, swollen and tender. *A clot.* Not a back finding, but it belongs here because every treatment in the second half of this article loads a calf or a thigh. One leg swollen, warm and sore, in somebody who has just had surgery, a long illness, a long journey or a pregnancy, is a clot until somebody says otherwise. That limb is not rubbed, not walked on, not mobilised — it is sent.
And one that is not an emergency but changes everything: weight coming off without trying. Never call it the treatment working. Ask how much, over how long, and whether the clothes are looser — and send.
| The finding | What it may be | What you do |
|---|---|---|
| Saddle numbness · new trouble passing or holding urine or motion · weakness or shooting pain in both legs | The nerve bundle at the base of the spine being crushed — cauda equina | Hospital today. Do not treat. Do not "try one session" |
| Back pain with any past cancer · pain that wakes from sleep · band-like pain · new weakness or changed walking | Spread of cancer to the spine | Same day. No pressure, no traction, no loading. Send with a note |
| Fall or sudden dated onset · past menopause · frail · long-term steroids · previous easy fracture | A broken vertebra | Picture first. No jerks, no body weight on the spine, until it is known |
| Severe unrelenting spinal pain with fever · recent spinal injection · injected drugs · tuberculosis in the house | Infection in the spine | Hospital. No spinal work at all |
| One leg hot, swollen, tender after surgery, illness, travel or pregnancy | A clot in the deep veins | Do not rub or move that limb. Send urgently |
| Weight falling off without trying | Anything that needs finding | Investigate before you treat. Never call it progress |
Two treatments that serve the low back and the knee together
Cupped palms down the calf, then a heel at each toe joint — seated or bent
The shared setup
Both of the treatments below are useful in both low-back pain and knee pain. They are given one after the other.
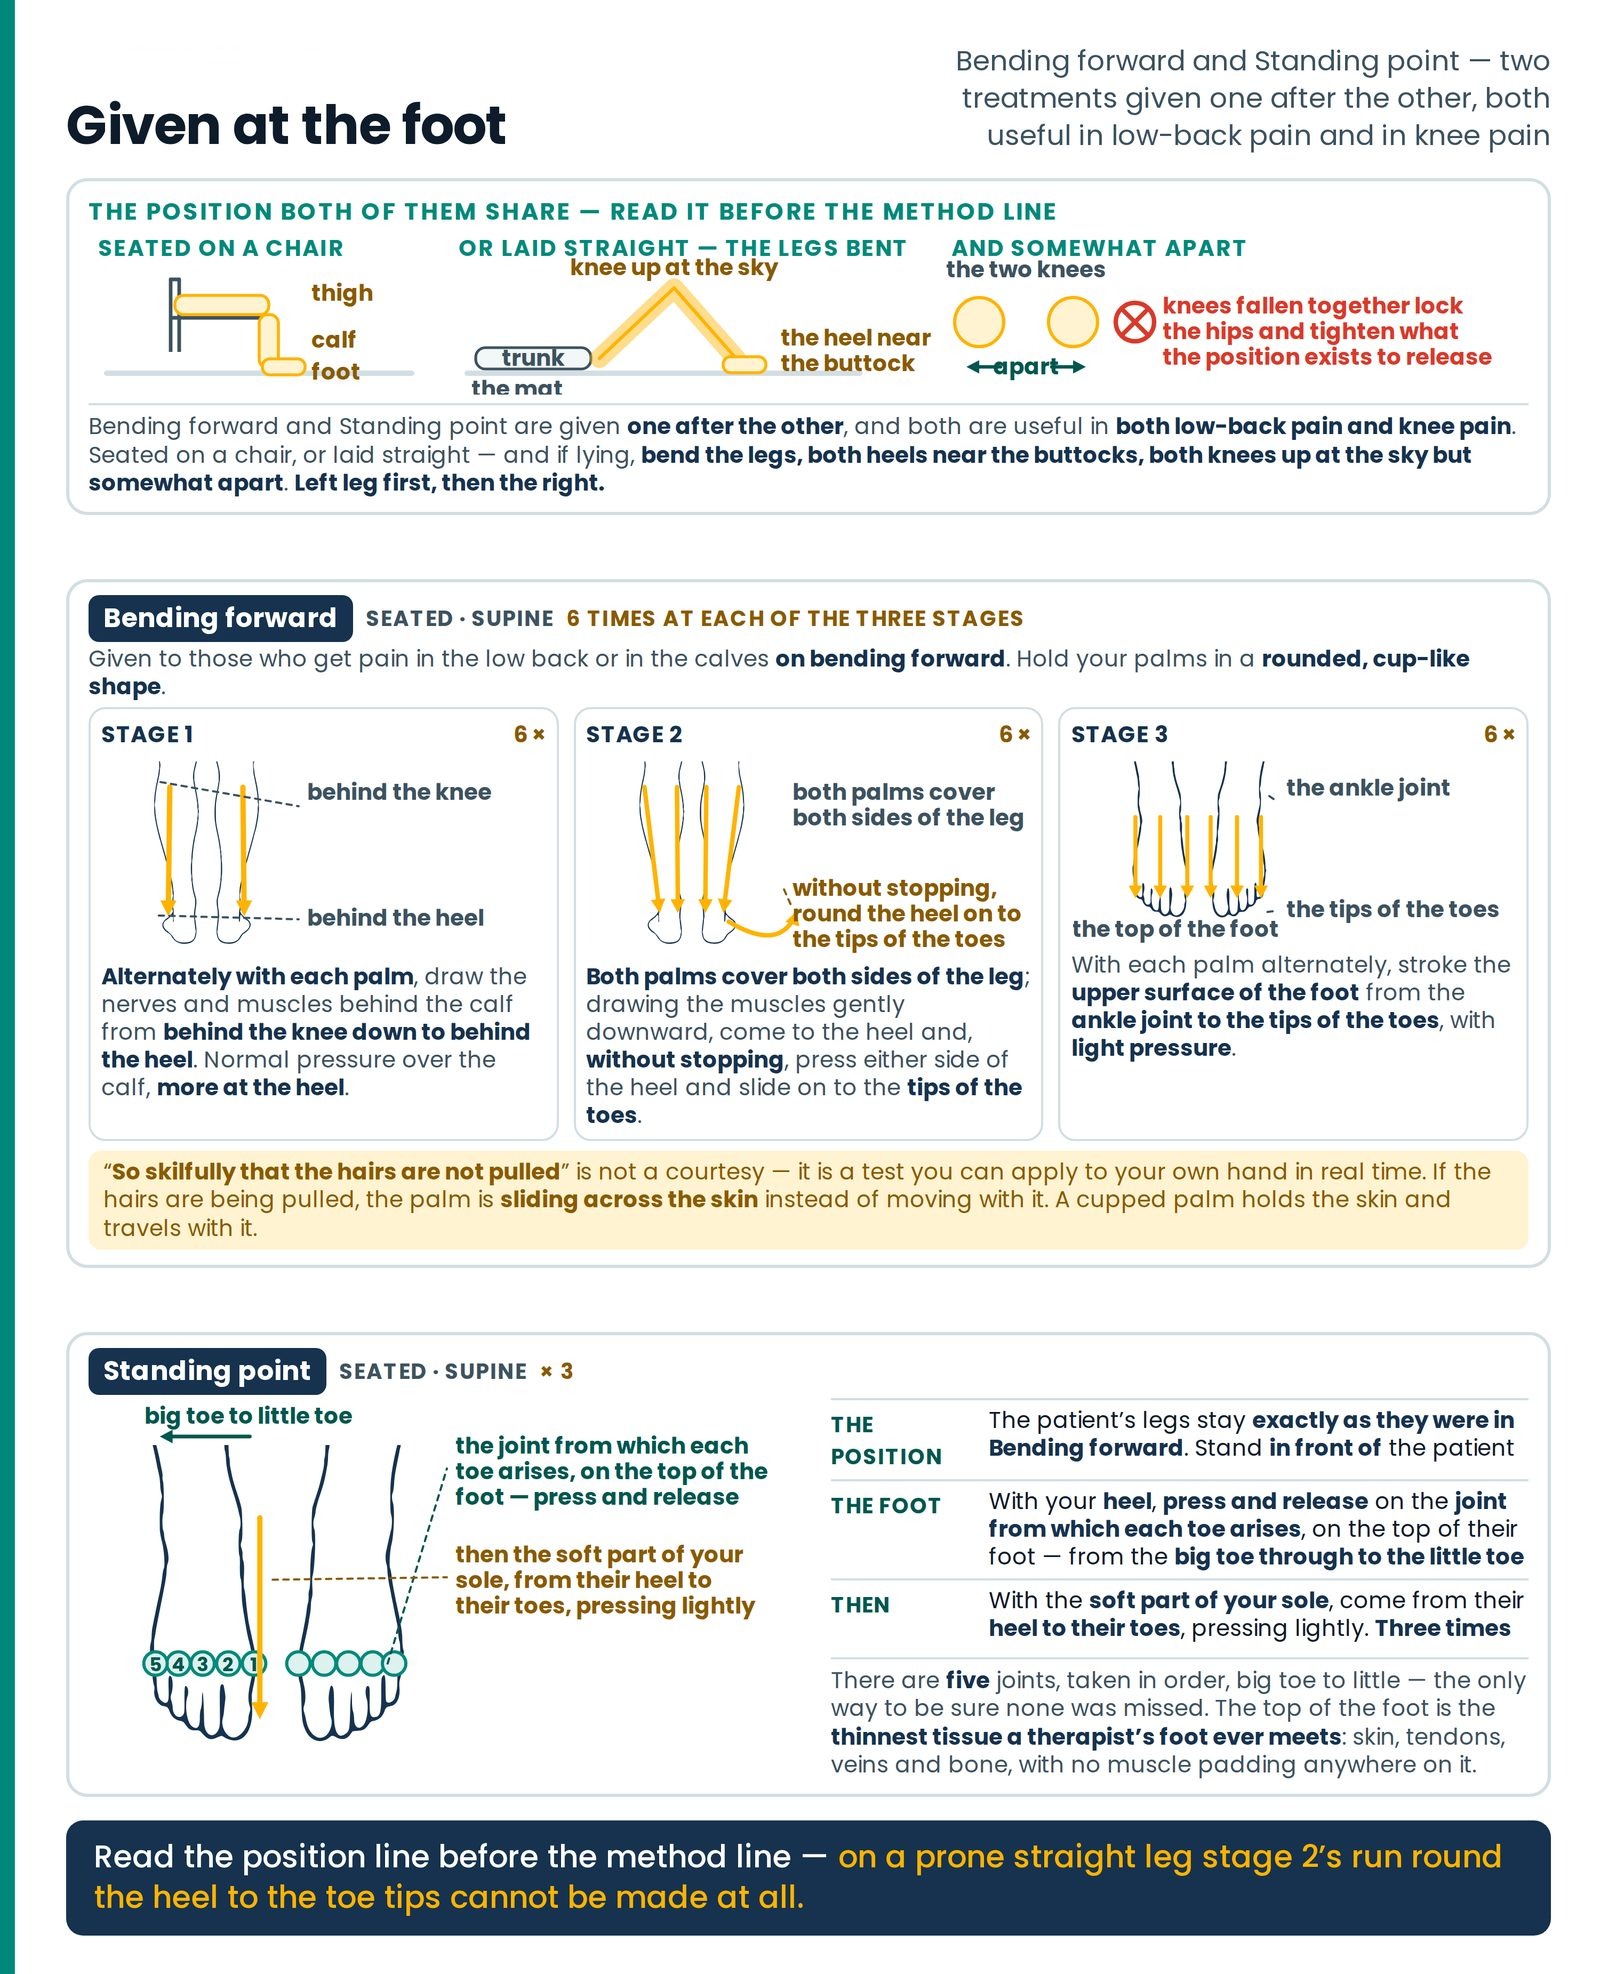
They can be given with the patient seated on a chair, or laid straight. If given lying down, tell the patient to bend the legs and place both heels near their buttocks, with both knees pointing up at the sky but somewhat apart from each other.
That position does quiet work before a hand arrives. Hip and knee bent with the feet planted flattens the hollow of the low back, opens the gaps the nerves leave by, and releases the deep muscle running from the low back to the thigh, which has been under tension in every prone treatment so far — and it leaves the back of the calf slack, which is the tissue the first treatment is about to handle. Knees "somewhat apart" is written and is not a comfort note: knees fallen together lock the hips and tighten exactly what the position exists to release.
BENDING FORWARD
Give this to those who get pain in the low back or in the calves on bending forward. (Figure 22.7)
It is to be done in three stages. Hold your palms in a rounded, cup-like shape. Do the left leg first, then the right. Seated Supine Left Right
- 1. Alternately with each palm, draw the nerves and muscles behind the calf from behind the knee down to behind the heel, so skilfully that the hairs are not pulled. Keep the pressure normal over the calf but give more pressure at the heel. Do this 6 times.
- 2. Cover both sides of the leg with the palms and, drawing the muscles and nerves gently downward, come to the heel and, without stopping, pressing on the skin on both sides of the heel, slide on to the tips of the toes. Do this 6 times.
- 3. With each palm alternately, stroke the upper surface of the foot from the ankle joint to the tips of the toes with light pressure. Do this 6 times.
| Patient's position | Seated on a chair, or laid straight; if lying, legs bent, both heels near the buttocks, knees up at the sky but somewhat apart. Left leg first, then right Seated Supine |
|---|---|
| Where the hands go | Cupped palms. (1) Alternate palms, behind the knee → behind the heel. (2) Both palms covering both sides of the leg → the heel → without stopping, over the skin either side of the heel to the tips of the toes. (3) Alternate palms on the top of the foot, ankle → toe tips |
| Duration and repetitions | 6 times at each of the three stages |
| Pressure | 1: normal over the calf, more at the heel, drawn so skilfully that the hairs are not pulled. 3: light |
| What it is for | Pain in the low back or the calves on bending forward |
"So skilfully that the hairs are not pulled"
One of the most useful sentences in the atlas, and easy to read past as a courtesy. It is not a courtesy. It is a test you can apply to your own hand, in real time, without asking the patient anything.
If the hairs are being pulled, the palm is sliding across the skin instead of moving with it. A palm that moves with the skin takes the tissue underneath along and lengthens it; a palm that slides over it has abraded the surface and left everything beneath where it was. The cupped shape is what makes it possible — a flat palm grips at its edges and drags, while a rounded palm makes contact through its soft heel and finger pads, holds the skin and travels with it. The hairs will tell you the truth before the patient does.
STANDING POINT
The patient's legs stay exactly as they were in Bending forward. This treatment too can be given seated on a chair, or laid straight; if lying, tell the patient to bend the knees and place both heels near their buttocks. Seated Supine × 3
Stand in front of the patient and, with your heel, press and release on the joint from which each toe arises, on the top of their foot. Do this from the big toe through to the little toe. After this, with the soft part of your sole, come from their heel to their toes, pressing lightly. Do this three times.
| Patient's position | Exactly as in Bending forward; therapist standing in front of the patient Seated Supine |
|---|---|
| Where the feet go | The heel on the joint from which each toe arises, on the top of the foot, big toe through to little toe; then the soft part of the sole, heel to toes |
| Duration and repetitions | Press and release at each toe joint in turn; then the light sole stroke, three times × 3 |
| What it is for | Given one after the other with Bending forward; both are useful in both low-back pain and knee pain |
"The joint from which each toe arises" is the knuckle line across the top of the foot, where each long bone meets its toe. There are five, taken in order, big toe to little — the only way to be sure none was missed. And the action is written as press and release, deliberately. The top of the foot is the thinnest tissue a therapist's foot ever meets: skin, the tendons that lift the toes, the visible veins, and bone. There is no muscle padding anywhere on it. Then the treatment finishes with the softest tool in the article — the soft sole, heel to toes, lightly, three times.
PELVIC — the longest hold in the article
The leg out at 90° on pillows, and the only clock in the chapter: 90 seconds
This too is excellent for numbness, pain or burning in the leg. Prone Left Right ▲ Take care
In this treatment, besides laying the patient face down with 1½ pillows under the chest, the leg that is turned outward needs two or three pillows underneath it, so that the leg lies parallel to the ground. The affected leg is taken out to the side at 90° and rested on the pillows. The patient's other leg stays straight.
The therapist, holding the sole obliquely, stands with the outer edge of the foot on the edge of the femur ball, for a maximum of 90 seconds. If the patient cannot bear it, reduce the time. To stand on their left femur, use your right foot; to stand on their right femur, use your left foot.
| Patient's position | Prone, 1½ pillows under the chest; affected leg out to the side at 90° on two or three pillows so the leg lies parallel to the ground; other leg straight Prone |
|---|---|
| Where the feet go | The outer edge of the foot, sole held obliquely, on the edge of the femur ball — your right foot for their left femur, your left for their right Left Right |
| Duration and repetitions | A maximum of 90 seconds. If the patient cannot bear it, reduce the time ▲ Take care |
| What it is for | Numbness, pain or burning in the leg |
The pillows are the treatment, not the bedding. Two or three, so that the leg lies parallel to the ground means level with the body, not sagging toward the floor and not propped above it. A leg abducted to ninety degrees and left to hang is hanging by its own hip, and everything you were going to press is already pulled tight. Build the stack, place the leg, then sight along the floor from the patient's feet and check the thigh is horizontal — before you stand. And the tool is written: not the sole flat, not the heel, but the outer border of the foot with the sole turned obliquely, a firm narrow contact that can be placed on the edge of the ball of the thigh bone and stay there.
What lies beneath. With the hip taken out to the side and supported level, the bony knob at the top of the thigh bone rolls up toward the surface, and the foot meets the fanned tendon of the great buttock muscle, the insertions of the two smaller buttock muscles beneath, the short muscles that rotate the hip, and a fluid-filled cushion between all of them and bone. The sciatic nerve leaves the pelvis just inside that window — one of the very few places where the largest nerve in the body comes within reach of a foot, and the plausible reason a treatment aimed at numbness and burning in the leg is given here rather than lower down.
BINDU POINT — the long diagonal
One foot anchors the hip while the other draws L5 to the far shoulder
This relaxes the muscles of the whole back. It is useful for those who have pain in both the upper and the lower part of the back. Prone × 3 Both sides
Lay the patient face down. Taking full support from the chairs, place your left foot on the edge of the patient's left hip. Then with your right foot, sliding from the L5 vertebra of their back, draw the underlying tissues up to the right shoulder. Do this three times. Then do this whole process with the other foot as well.
| Patient's position | Prone, 1½ pillows; therapist taking full support from the chairs Prone |
|---|---|
| Where the feet go | Left foot on the edge of the patient's left hip; right foot sliding from the L5 vertebra, drawing the tissues up to the right shoulder. Then the whole process with the other foot Left Right |
| Duration and repetitions | Three times each way × 3 |
| What it is for | Relaxing the muscles of the whole back; pain in both the upper and the lower part of the back |
The anchoring foot is half the technique, not a stance. The left foot rests on the edge of the left hip and stays there, holding the pelvis down; without it the diagonal stroke lengthens nothing — it simply rolls the pelvis toward the shoulder you are pulling at. And the stroke is one journey, not a series of rubs: L5 up and across to the opposite shoulder, three times, then the mirror image with the feet exchanged.
What lies beneath. That diagonal is very nearly the fibre direction of the broad fibrous sheet across the low back and of the great flat muscle of the back that rises from it and from the pelvic crest to reach the upper arm. It is one of the few long lines in the body where a stretch at one end is genuinely felt at the other. A slow loaded slide along it is a long stretch of a real continuous structure — the honest version of "relaxes the muscles of the whole back", and it is enough.
Questions students ask
- 1. I am twenty-two and new. Stage 2 says twelve times on both sides. Is that twelve altogether or twelve each? Twelve each side, so twenty-four strokes in the stage. When a count is followed by each, the number belongs to a side. Compare stage 1, where twenty to twenty-five times covers the action on both sides together, and stage 3, where three times means three complete journeys.
2. I am a housewife learning this for my mother-in-law. There is nobody else at home to lift her legs. Can I hold them with one hand and work with my foot? No — and the honest answer is that you should not give 1-2-3 that day. You cannot hold two legs at forty-five degrees with one hand and carry your own weight on the chairs at the same time, and a patient who takes over the holding is exactly the situation the caution is written about. Give the 'T', record on the card that 1-2-3 was not given and why, and arrange for somebody next time. A treatment honestly not given is better than one given wrongly.
3. I am a physiotherapist. What is actually being claimed by "the nerves of L4 are stretched and the broken vertebra gradually sets"? Two separate things worth separating out loud. The territorial claim — L4 broadly to the inner calf, L5 to the outer — is the standard segmental teaching and is why the two points differ. The mechanical claim, that stretching a segment's nerves repositions a fractured bone, is a different order of statement, and there is no route by which a nerve pulls a vertebra. What can honestly be said of the technique is that it is careful soft-tissue work on a calf. A fracture is diagnosed on a picture and managed by a doctor, and that referral comes first.
4. Why is (6) L3,4,5 written with a bracket when Blood Supply to Sides is written as a range, six to twelve? Because the range belongs to the point and the bracket belongs to the card. The point tells you the sensible band and leaves the choice to you; (6) L3,4,5 is a prescription that has already made that choice for this patient today. Same action — one is a recipe, the other an order. See also → The Shorthand, "The Shorthand".
5. The Sciatica point figure shows both legs and my patient has pain in both legs. Do I treat both? Stop before answering that. Pain down both legs is one of the findings that ends a session until you have asked about the saddle area and about passing urine and motion. If those answers are clear, treat — but treat the leg with the problem, and if both genuinely have it, work them as two separate decisions, one at a time, and write both down. The figure shows two legs because a drawing must show something. The sentence beneath it is the instruction.
6. I practise in a village with no reports and no scanner. How am I to know whether a vertebra is fractured? You are not. You are to recognise when the question needs asking and get the patient to somebody who can answer it — a clinical skill, not a confession of poverty, and it needs no equipment: a fall, a sudden pain that can be dated to the hour, an elderly or frail patient, long-term steroids, a previous easy break. Know your nearest X-ray machine and how long the bus takes. See also → When the Hand Must Stop, "When the Hand Must Stop".
- 7. My patient says the ninety seconds of Pelvic is fine and asks me to go longer because it feels good afterwards. Ninety is written as a maximum, and a maximum is not moved by enjoyment. Say so plainly — "this one has a ceiling and I keep it" — and if the effect is what she wants, give it again tomorrow rather than longer today. See also → Weeks, Not Sessions, "Weeks, Not Sessions".
- 8. I keep pulling the hairs in Bending forward. What am I doing wrong? Your palm is flat and sliding. Cup it. Make contact through the soft heel of the hand and the finger pads, and move so the skin travels with you rather than under you — a shorter stroke that takes the skin along beats a long one that scuffs over it. If you can feel the hairs, so can she.
9. A woman came with low back pain and told me at the end that she is eleven weeks pregnant. What should I have done? Asked at the beginning. Pregnancy changes the position a patient can be placed in before it changes anything else — and this whole group is given face down. Ask every woman of childbearing age at intake, on paper, so she can answer in writing rather than out loud in a public hall. See also → Treating Women, "Treating Women".
Questions patients ask
- 1. "Why do you press my back when the pain is in my foot?" Because the nerve that reports pain in your foot begins in your back. Think of a long wire: something pinches it near the top, but the message arrives labelled foot, because that is where that wire has always come from. So I work at both ends — where the pain is felt, and where it is likely coming from.
2. "You are going to stand on my hip with your foot for a minute and a half? That sounds like a lot." It is the longest single hold I will ever give you, and it has a fixed ceiling that I keep. My whole weight is on these two chairs, so I can make it as light as it needs to be, and I will tell you when I start counting. Say "stop" at any point and I stop straight away — you do not have to give me a reason and I will not ask for one.
3. "My son can lift my legs. Why must it be him? I can lift them myself, I am not weak." It is nothing to do with strength and I am sure you could. It is that a leg holding itself up has all its muscles pulled tight, and this treatment exists to loosen exactly those muscles. If you hold your own legs I would be working on a rope instead of a cushion — you would get less benefit, and some people find the pain is worse afterwards. Let him do the lifting and you do the resting.
4. "Since two days I cannot start my urine properly. It must be the treatment loosening everything, no?" I am glad you told me. That is not something I treat around, so I am going to stop today's session here. It may well turn out to be nothing much, but the only way to know is for a doctor to look at it today — not tomorrow. I will write down everything we have done and everything you have just told me, so you can hand it over. And this is not me sending you away: come straight back once they have seen you.
5. "Everyone says once the back goes, it never comes right. Is that true?" No, and it is one of the least helpful things people say to each other. Most backs get better — that is the ordinary course, not the exception. What decides how it goes is usually not the scan; it is whether you keep moving, whether the digestion is put right, and whether you stop the two or three things in your day that provoke it. I will show you what I find with my hands each week and you can judge from that.
6. "My mother had cancer in the breast eight years back and she is fine now. Is that relevant to her back pain?" Yes — and thank you for saying it, because many people don't, thinking it is old news. Anyone treated for a cancer who develops a new back pain should have it looked at before we begin, particularly if it wakes her at night. In most such cases it turns out to be an ordinary back. We check because the one time it isn't, checking early is what matters.
Words used here
| Hindi | English | Neurotherapy code / usage | |
|---|---|---|---|
| कमर | The waist — the band from the lowest rib to the top of the buttock | The region this group is named for; convert it into a place with "one finger, then the whole palm" | |
| कमर की समस्याएँ | Problems of the low back | The group heading — some treatments to correct problems of the low back | |
| घिसाई | Rubbing — a sliding application | L5–S1 ghisai — three stages: 20–25 · 12 each side · 3 Prone | |
| मणका | Bead — a vertebra | L3 lies exactly behind the navel; S1 begins stage 2; L5 begins Sciatica point and Bindu | |
| — | Fracture point ('T' + 1-2-3) | Two treatments without stopping. 'T' ↓\ | ↓ — heels at S5, 15–20. 1-2-3 — somebody else raises the legs to 45°; 1 hip, 2 mid-thigh, 3 near the knee; never on the knee joint ▲ Take care |
| — | Blood supply to sides · (6) L3,4,5 | Soft inner sole, from the side outward, 6–12 at each place. At the hip it is the first; at L3 it is the second | |
| — | JJ⁺¹ · JJ⁺² | L1-2-3, waist → knee, pillow under the thigh · L4-5-S1, below knee → ankle, pillow under the calf. Three rounds: slight, more, full weight. Both based on dermatome charts | |
| सीधा लिटाकर / उल्टा लिटाकर | Laid face up / laid face down | L4 Fracture — face up, inner calf Supine · L5 Fracture — face down, outer calf, toes out, pillow under the feet Prone | |
| — | Blood supply to legs | The one treatment given facing the patient's heels; soft middle of the sole, hip → knee, 30 each, right foot to left thigh. Polio; weakness in the legs | |
| गृध्रसी | Sciatica — "the vulture's gait" | Sciatica point — both big toes either side of L5, light; then the heel, hip → heel, on the painful leg only | |
| — | Sciatica setting | Heel fixed; forefoot bent up — pause — down, 3 rounds; then toe by toe, counter-bent, to the smallest toe. Disc bulge | |
| — | Bending forward · Standing point | Given one after the other; seated, or knees bent with heels near the buttocks. Cupped palms, 3 stages of 6, hairs not pulled · heel press-and-release at each toe joint, then sole heel → toes, 3 times | |
| पेल्विक | Pelvic | Affected leg out at 90° on 2–3 pillows, level with the ground; outer edge of the oblique foot on the edge of the femur ball; maximum 90 seconds ▲ Take care | |
| बिन्दु | Bindu — a point, a drop | Left foot anchors the left hip; right foot slides L5 → right shoulder, 3 times; then the mirror. Relaxes the whole back | |
| — | The findings that end a session | Saddle numbness · new bladder or bowel trouble · both legs · past cancer · night pain · fall or frailty · fever · one hot swollen leg · unintended weight loss |