Palms up with the palms; palms down, arms raised, with the feet
The shoulder blade is a flat triangle of bone that does not sit in a socket. It floats on the back of the rib cage, held there by muscle alone, and the muscles that hold it run on into the arm. So a pain in the blade is rarely a pain in the blade; it is a pain in a sheet of tissue that starts at the spine and ends at the fingers.
That is why both of these treatments begin beside the spine and finish at the hand — and why they are told apart by which part of the blade hurts, and by what the arm is doing while you work. (Figure 24.1)
Key teaching
The two entries, and what separates them
Lower shoulder blade pain is given, as the arrows show, to put right pains in the lower part of the scapula, that is, the shoulder blade — and that is exactly why it has been named lower shoulder blade.
Upper shoulder blade pain is given to put right pains in the upper part of the scapula — and that is exactly why it has been named upper shoulder blade.
Lower is given with the palms, the elbows bent and the palms facing the sky, the arms down. Upper is given with the feet, the elbows bent and the palms facing the ground, the arms raised.
And after these two treatments, giving BAFA will be of great benefit in cervical problems.
LOWER SHOULDER BLADE PAIN — given with the palms
The six steps are a relay: one hand starts, the other joins it, then both travel together. A table cannot show a relay, so this one is set out in order.
Summary card
Prone, 1½ pillows under the chest, elbows bent, palms facing the sky. Palms only. The whole sequence three times, then the same on the right side too. For pains in the lower part of the shoulder blade Prone × 3 Both sides
Read step 2 slowly, because the two hands are doing two different jobs. The left palm is an anchor, set down flat beside the spine and not yet moving. The right palm is the traveller, taking hold of the arm, pressing, and — the phrase that matters — drawing the muscles beneath as it goes, not sliding over the skin. It travels as far as the elbow and stops there.
Step 3 releases the anchor without releasing the pressure.Keeping the pressure of the right palm — the travelling hand stays loaded where it is — the left palm is now dragged from the shoulder joint down to the elbow, so that both hands finish at the same place. Only then, in step 4, do both palms move off together, crossing the wrist and running out to the tips of the fingers.
Step 5 is the count and there is only one.Repeat the whole of the above three times. Not three strokes of each stage — three complete runs, spine to fingertips, before you change anything. And step 6 is written as a separate numbered instruction, exactly as Back of knees closes in Knee, Leg, Foot: now do the same on the right side too. The entry is written out on one side and then sends you across.
UPPER SHOULDER BLADE PAIN — given with the feet
As in the figure, bend the elbows and keep the palms facing the ground. With both your feet, sliding along both arms, travel from the shoulder joint to the elbow; then, drawing the muscles inward and taking small close steps, walk on from the elbow to the palm.
After these two treatments, giving BAFA will be of great benefit in cervical problems.
Patient's position
Laid face down, 1½ pillows under the chest, the arms raised as in the figure, the elbows bent and the palms facing the ground Prone Both sides
Where the feet are placed
Both feet, sliding along both arms — both arms worked at once — from the shoulder joint to the elbow; then, drawing the muscles inward and taking small close steps, from the elbow to the palm
Duration and repetitions
No count is given. The path is the instruction: a slide for the upper half, small close steps for the lower
What it is for
Pains in the upper part of the shoulder blade
What follows it
After these two treatments, giving BAFA will be of great benefit in cervical problems
Two different actions in one journey, and students run them together. From shoulder joint to elbow the feet slide — one continuous travelling contact. From elbow to palm they step, closely, and the pressure changes direction: the muscles are drawn inward at each step. Slide above the elbow, step below it.
"With both your feet, sliding along both arms" means both arms at once — one of your soles on each of the patient's arms, the pair of you working as a bridge. That is what the raised, elbow-bent, palms-down position is for: it puts both arms up where two soles can reach them together.
And the closing sentence belongs to both treatments, not only this one.After these two treatments, giving BAFA will be of great benefit in cervical problems. It is a sequencing instruction: lower blade, upper blade, then BAFA — and the condition under which it is written is cervical problems, not shoulder-blade pain in general.
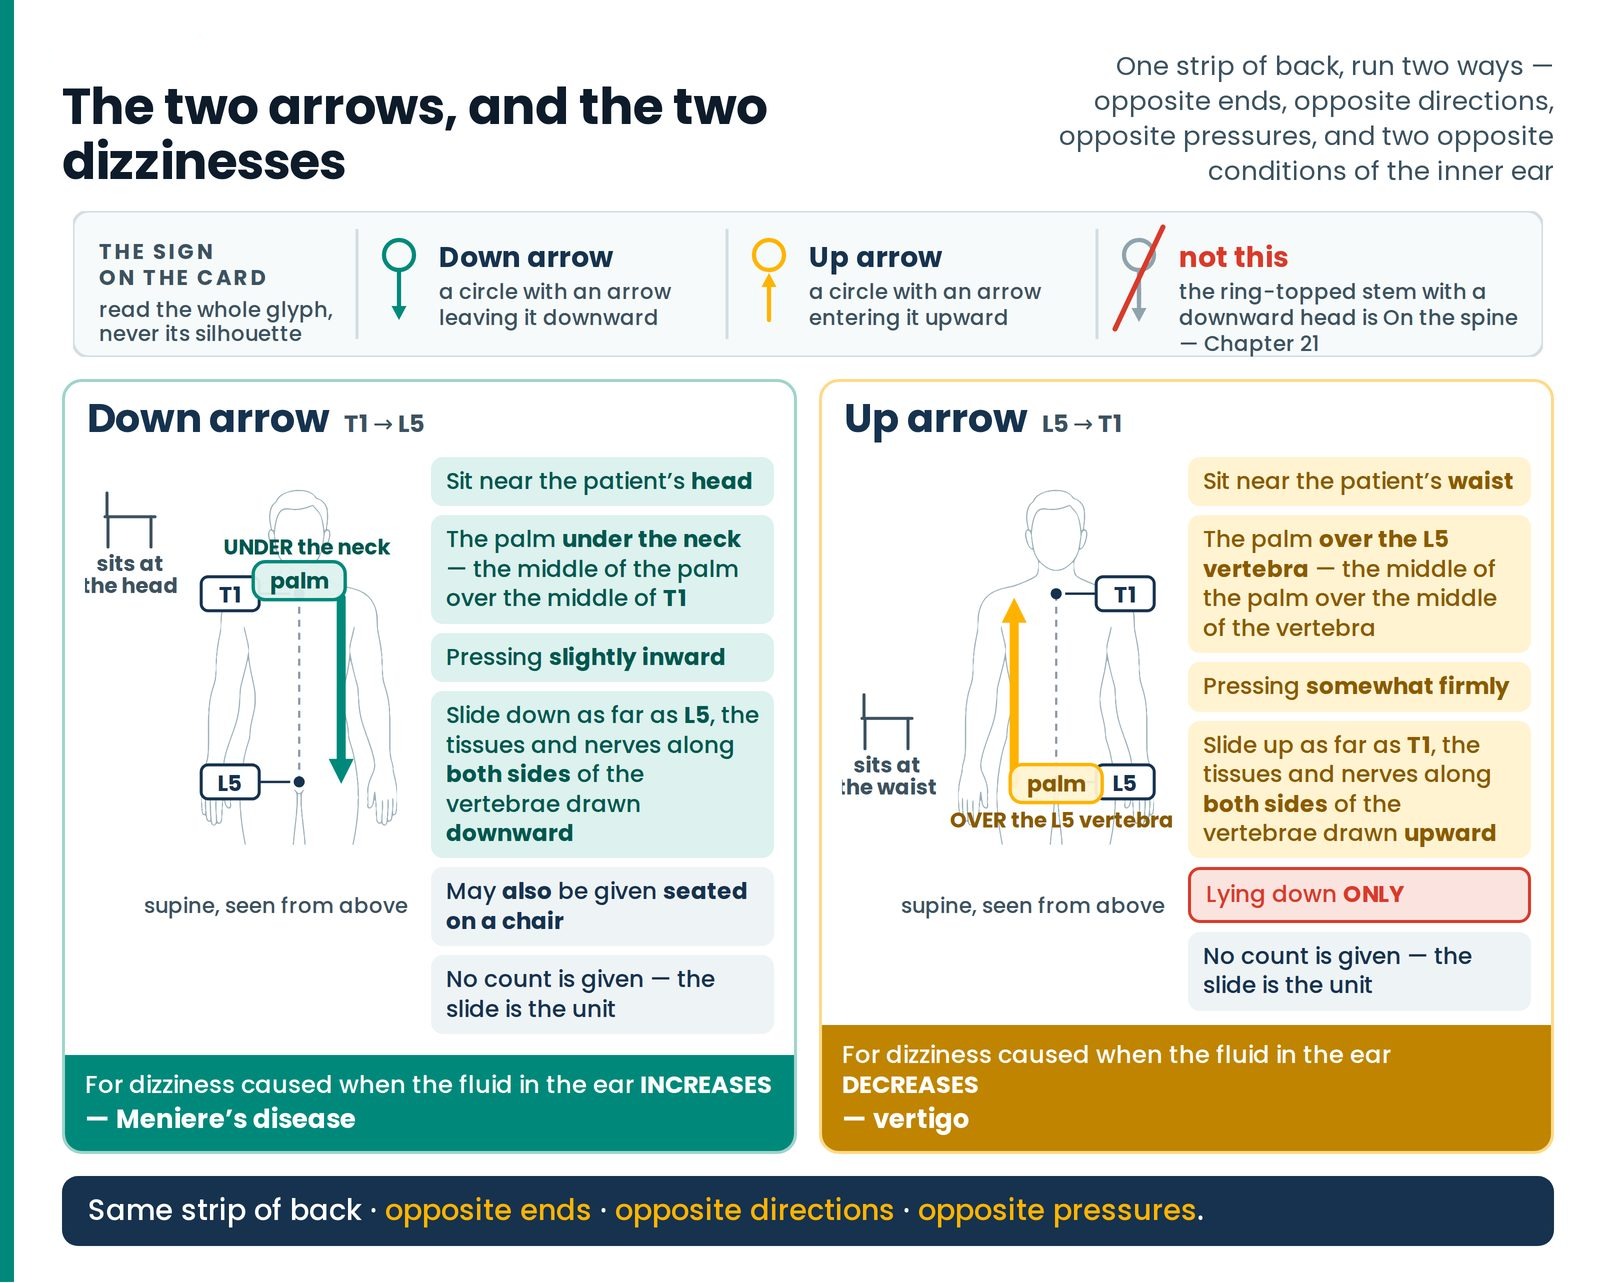
The two arrows, and the two dizzinesses. One strip of back run two ways — the palm under the neck at T1 sliding down to L5, and the palm over L5 sliding up to T1 — with the two glyphs, the bare ring-and-stem that is not On the spine, and the two opposite conditions of the inner ear.
Read next
The Front of the Body II The Front of the Body — II — where BAFA, which follows both of these in cervical problems, is taught in full
How a Formula Is Built How a Formula Is Built — lower blade, upper blade, then BAFA — a sequencing instruction, not a list
The Low Back The Low Back — the red-flag findings that end a session, arriving here between the shoulder blades
DOWN ARROW and UP ARROW — one stroke, run two ways
Opposite ends, opposite directions, and two opposite ears
Here is a pair that looks like one treatment written twice and is nothing of the sort. Everything about them differs except the strip of tissue they travel over — where the therapist sits, which end the palm starts at, which way it runs, how hard it presses, which positions are allowed, and which of two quite different dizzinesses it is for. (Figure 24.2)
Face Down taught the arrow family of the prone back — Back arrow, H arrow, On the spine, Beside the spine, Round arrow, 3 arrows — and when it came to the bare ring-and-stem glyph it stopped and said: a different point, and not in this article. This is that point, and its partner.
Key teaching
Down arrow
Sit near the patient's head.
As in the figure, place your palm under their neck so that the middle of the palm lies over the middle of their T1 vertebra. Then, pressing slightly inward, slide down as far as the L5 vertebra, in such a way that the tissues, nerves and so on along both sides of the vertebrae are drawn downward.
This treatment may also be given with the patient seated on a chair.
Its sign is a small circle with an arrow leaving it downward.
If the fluid in the ear increases, that too causes dizziness, which is called Meniere's disease; this is useful for putting that right.
Key teaching
Up arrow
This treatment must be given with the patient lying down. Sit near the patient's waist.
As in the figure, place your palm over their L5 vertebra so that the middle of the palm lies over the middle of the vertebra. Then, pressing somewhat firmly, slide up along the spine from L5 as far as T1, in such a way that the tissues, nerves and so on along both sides of the vertebrae are drawn upward.
Its sign is a small circle with an arrow entering it upward.
If the fluid in the ear decreases, that causes dizziness, which is called vertigo; this treatment is useful for putting that right.
Down arrow
Up arrow
The therapist sits
Near the patient's head
Near the patient's waist
Where the palm is placed
Under the neck, the middle of the palm over the middle of T1
Over the L5 vertebra, the middle of the palm over the middle of the vertebra
Direction of the slide
T1 → L5
L5 → T1
Pressure
Slightly inward
Somewhat firmly
What is carried, and where
The tissues, nerves and so on along both sides of the vertebrae, downward
The tissues, nerves and so on along both sides of the vertebrae, upward
Patient's position
Lying — and it may also be given with the patient seated on a chair Supine Seated
Lying down only Supine
Duration and repetitions
No count is given; the slide is the unit
What it is for
Dizziness caused when the fluid in the ear increases — Meniere's disease
Dizziness caused when the fluid in the ear decreases — vertigo
Sign
○ with an arrow leaving it downward
○ with an arrow entering it upward
Four of those rows are the treatment, and three of them are easy to lose. The therapist moves between the two — head for one, waist for the other — because a palm cannot deliver a long even stroke running away from a body it is sitting behind. The pressure differs: slightly inward going down, somewhat firmly going up. And Down arrow alone may be given on a chair; Up arrow carries the word must — this treatment must be given with the patient lying down — which is not a preference and not a note about comfort.
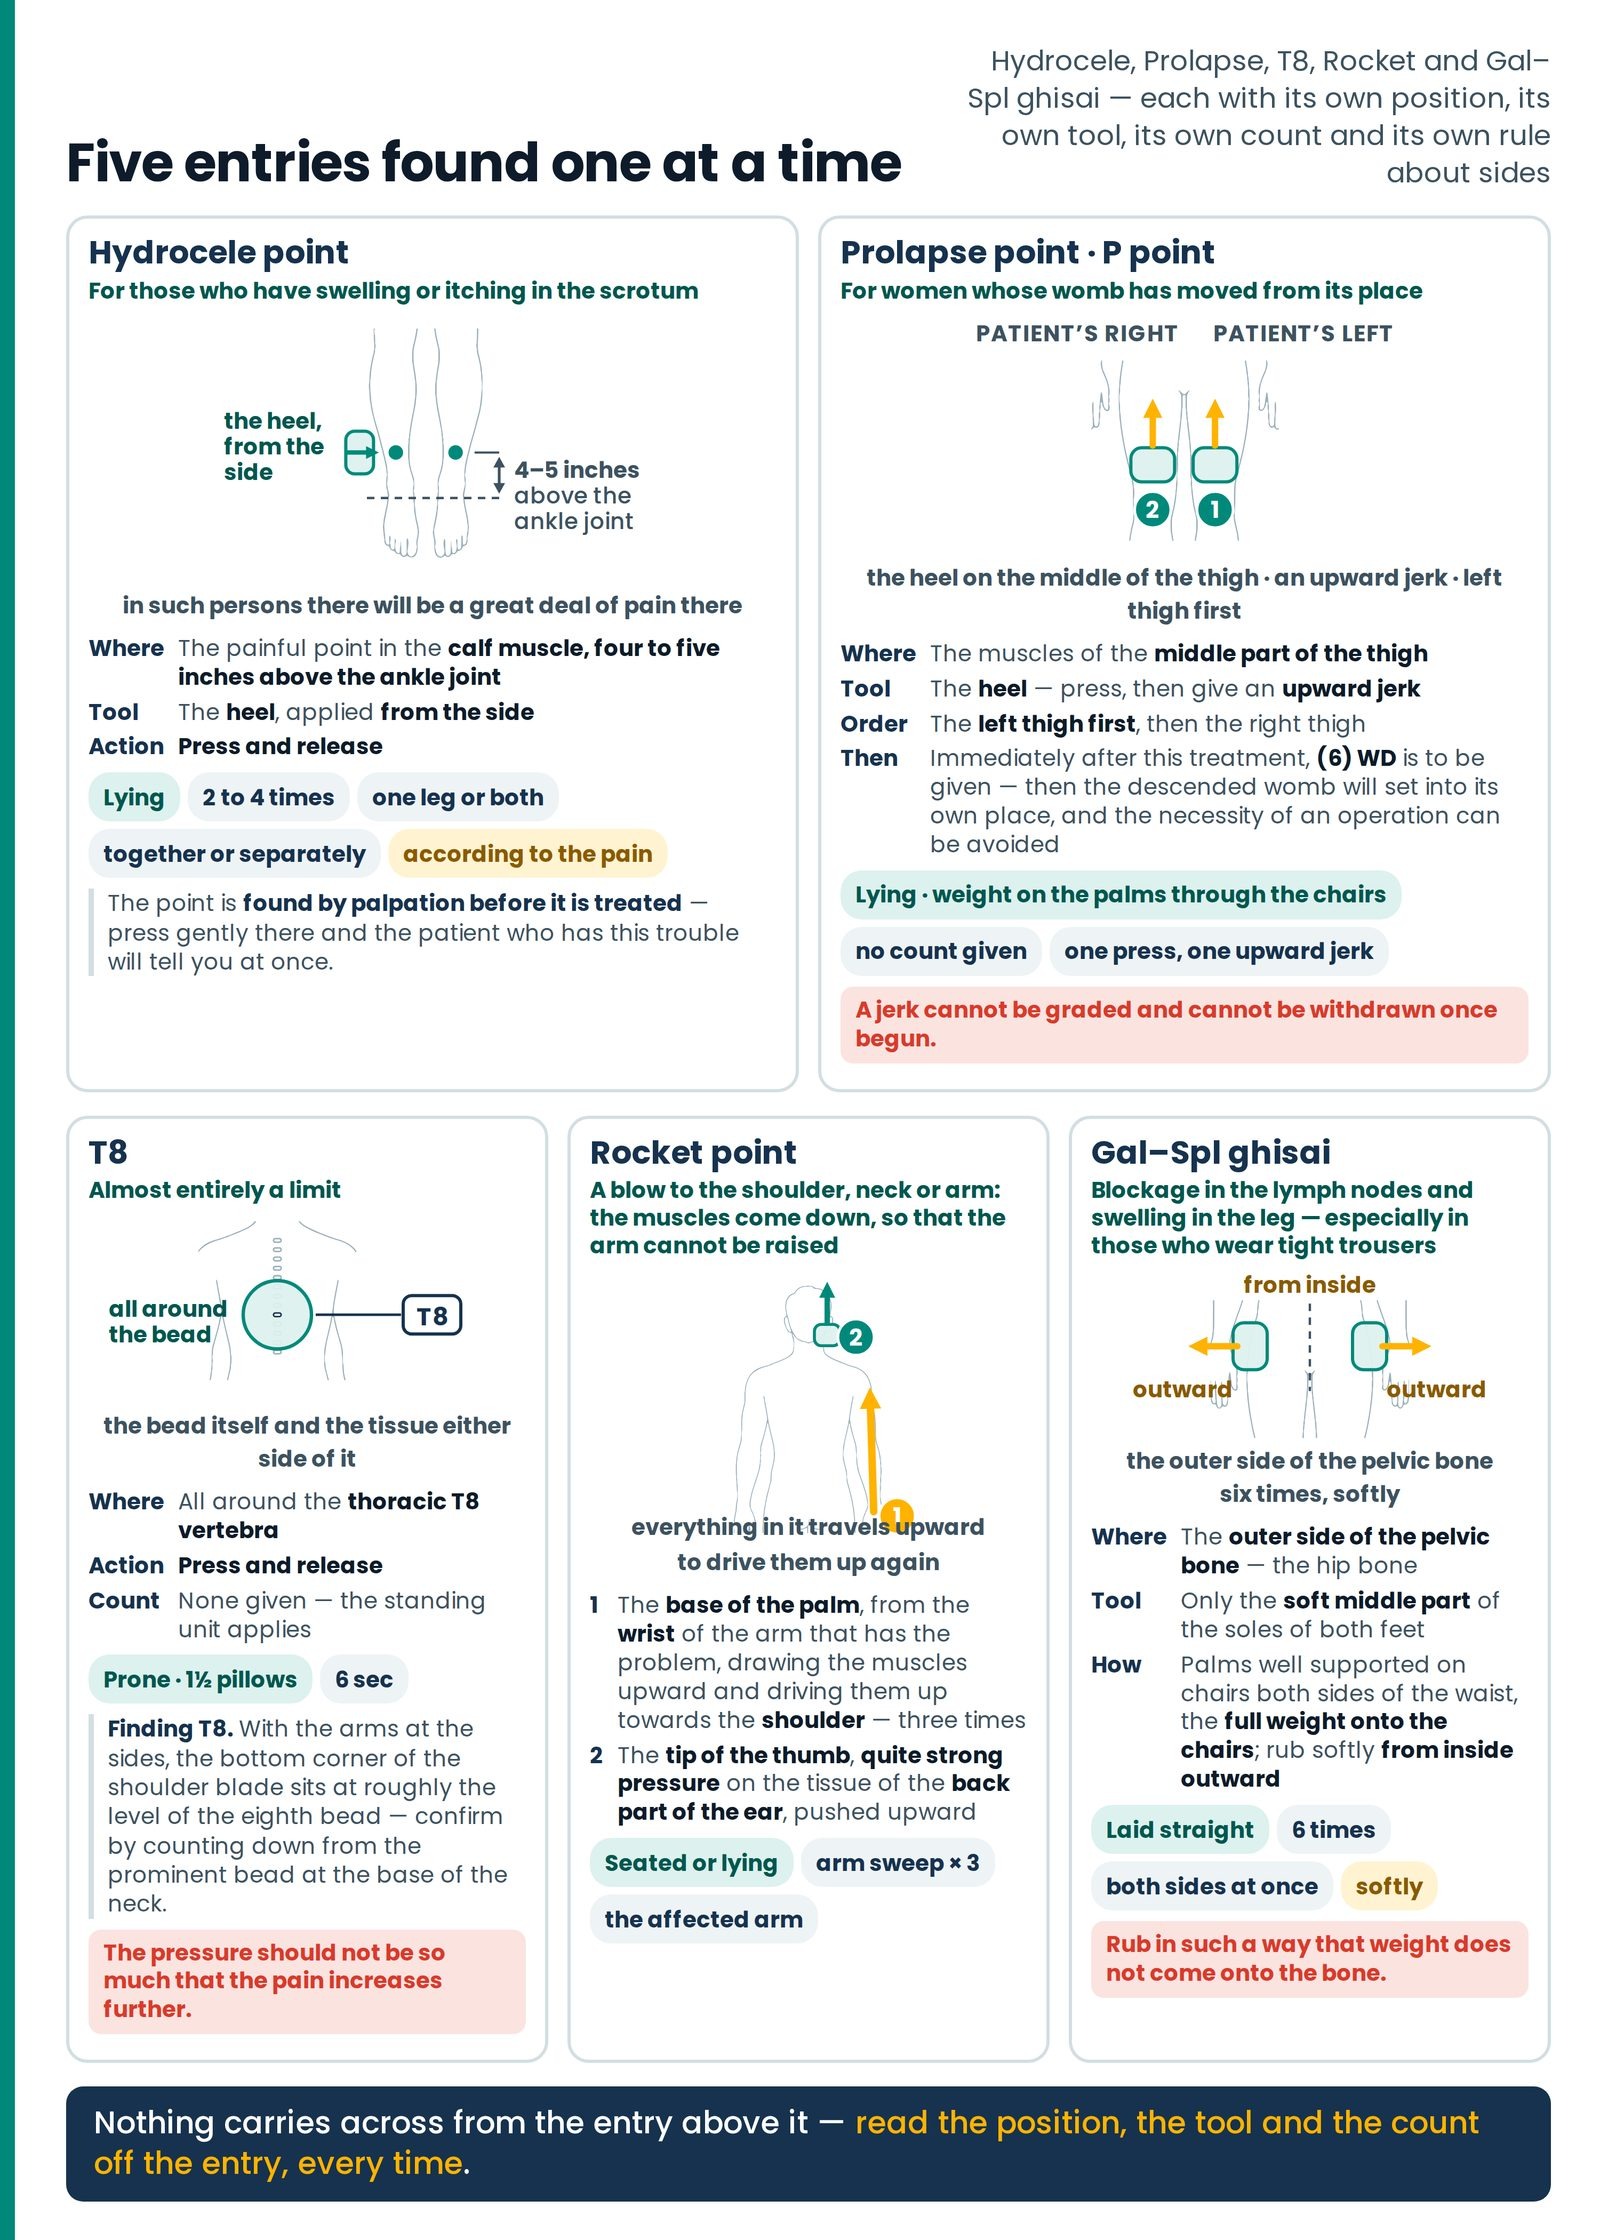
Five entries found one at a time. Hydrocele, Prolapse, T8, Rocket and Gal–Spl ghisai on one sheet — each with the place marked on the body, its own tool, its own count and its own rule about sides, and the condition each carries on force.
HYDROCELE POINT — a scrotal complaint found in the calf
The heel from the side, four to five inches above the ankle
This treatment is for those who have swelling or itching in the scrotum.
In such persons there will be a great deal of pain in the calf muscle, four to five inches above the ankle joint. Press and release at that point with your heel, from the side.Do this two to four times, and they will get much relief from the pain.
According to the pain, it may be done on one leg or on both, together or separately.
Patient's position
Lying, the leg reachable from the side Supine
Where the foot is placed
The therapist's heel, applied from the side, on the painful point in the calf muscle, four to five inches above the ankle joint
Duration and repetitions
Press and release, two to four times. According to the pain — on one leg or on both, together or separately Left Right Both sides
What it is for
Those who have swelling or itching in the scrotum; and the patient gets much relief from the pain in the calf
Sign
A small figure with a mark on each calf
The tenderness is a finding, not a coincidence. The entry does not say press the calf and see; it says that in such persons there will be a great deal of pain at that place. So the point is found by palpation before it is treated — four to five inches above the ankle joint, roughly a hand's breadth up from the bony knob on the inside of the ankle, where the big soft calf muscle narrows into the tendon. Press gently there and the patient who has this trouble will tell you at once. (Figure 24.3)
Three details carry the treatment. The tool is the heel, and it comes in from the side — not down from above onto the back of the calf, which is a different contact on a different tissue. The action is press and release, the short loaded press that lifts off. And the count is two to four times — a very small number, which tells you how sharp the point is under a heel.
And "according to the pain" decides the sides. One leg or both; together or separately. The finding chooses, not the habit.
Read next
The Educated Hand The Educated Hand — the point is found by palpation before it is treated
The History That Cannot Mislead You The History That Cannot Mislead You — asking about the embarrassing thing in the same voice as everything else
When the Hand Must Stop When the Hand Must Stop — a scrotal swelling is a diagnosis to be made, not a symptom to be treated
PROLAPSE POINT — also written P point
Left thigh first, an upward jerk — and (6) WD immediately after
This is useful for those women whose womb has moved from its place.
Press the muscles of the middle part of the thigh with the heel and give an upward jerk.
Do the left thigh first, then the right thigh.
Bear in mind that immediately after this treatment, (6) WD is to be given — then the descended womb will set into its own place, and the necessity of an operation can be avoided.
Patient's position
Lying; both thighs reachable, the therapist's weight carried on the palms through the chairs Supine
Where the foot is placed
The heel on the muscles of the middle part of the thigh — pressing, and then giving an upward jerk
Order of the sides
The left thigh first, then the right thigh Left Right
Duration and repetitions
No count is given. The action is one press and one upward jerk
What must follow it
Immediately after this treatment, (6) WD is to be given 6 sec
What it is for
Women whose womb has moved from its place — with the (6) WD following, the descended womb will set into its own place, and the necessity of an operation can be avoided
Sign
A figure with two arrows converging downward onto the thighs
This is a two-part instruction and the second half is not optional.Bear in mind that immediately after this treatment, (6) WD is to be given.P point alone is half a treatment. WD — the womb displacement point — is taught in full in the supine atlas, with its bracketed count of six; it is not restated here. Immediately means in the same breath, not later in the session.
The jerk is upward and the order is fixed.Left thigh first, then the right thigh — written out, like Pradeep's left knee first in Knee, Leg, Foot, and not to be swapped because the right thigh happens to be nearer you.
Read next
The Front of the Body I The Front of the Body — I — (6) WD, the half of this treatment that is not written out here
Treating Women Treating Women — the prohibitions on the jerk, and what may honestly be promised about an operation
The Shorthand The Shorthand — read the whole code, never the letter — P means three different things
T8 — a point that is almost entirely a limit
Press and release, and never enough to increase the pain
Press and release the region all around the thoracic T8 vertebra — but the pressure should not be so much that the pain increases further.
Patient's position
Prone — the standing arrangement applies, 1½ pillows under the chest Prone
Where the hands are placed
All around the thoracic T8 vertebra — the bead itself and the tissue on either side of it
Duration and repetitions
Press and release. No count is given, so the therapy's standing unit applies — six seconds to the application 6 sec
The condition on the force
The pressure should not be so much that the pain increases further ▲ Take care
This is the shortest entry in the atlas and half of it is a restraint. That is the teaching. Most points tell you what to do and then what it is for; this one tells you what to do, and then sets a ceiling on how hard you may do it, and stops.
Finding T8. Count is slow and honest work. With the arms resting at the sides, the bottom corner of the shoulder blade sits at roughly the level of the eighth thoracic bead — a useful first landmark, to be confirmed by counting from the big prominent bead at the base of the neck downward.
ROCKET POINT — driving the muscles back up
Everything in it travels upward — the arm three times, then the ear
When some blow has been taken on the shoulder, neck or arm, the muscles come down, so that they cannot raise the arm; to drive them up again, this is given.
With the base of your palm, from the wrist of the arm that has the problem, draw the muscles upward and drive them up towards the shoulder. Do this three times.
Then with the tip of the thumb, giving quite strong pressure to the tissue of the back part of the ear, push it upward.
The patient may be given it either seated or lying down.
Patient's position
Either seated or lying down — both are given, neither preferred Seated Supine
Where the hands are placed
1 — the base of the palm, starting at the wrist of the arm that has the problem, drawing the muscles upward and driving them up towards the shoulder. 2 — the tip of the thumb, on the tissue of the back part of the ear, pushing it upward
Pressure
The arm sweep, drawing the muscles as it travels. At the ear, quite strong pressure
Duration and repetitions
The arm sweep three times. The ear component is given once, and is not counted × 3
Which side
The arm that has the problem
What it is for
When some blow has been taken on the shoulder, neck or arm, the muscles come down, so that they cannot raise the arm — this drives them up again
Now the name. Everything in this point travels in one direction: up. The palm goes up the arm; the thumb goes up behind the ear; the whole idea named in the first sentence is that something has come down and must be driven up again. The atlas has techniques named for a sound, for a place and for a person. This one is named for a direction of travel — and a rocket is a thing that is entirely about going up. Once you have seen that, the name tells you the treatment.
The tool in stage 1 is the base of the palm — the firm heel of the hand at the wrist, not the fingers and not the flat of the palm — and it starts at the patient's wrist, the far end, and travels to the shoulder. Three times.Stage 2 is a separate action with a separate tool at a completely different place: the tip of the thumb, behind the ear, on the tissue there, pushed upward, with quite strong pressure. It is the only place in this article where those words appear, and they appear about a thumb rather than a foot. Behind the ear you are on the hard knob of bone below and behind the ear lobe — firm bone under the thumb, and the front of the throat nowhere near it.
GAL–SPL GHISAI — the pelvic rim, softly, six times
Soft mid-soles, inside outward, and no weight onto the bone
Lay the patient straight. On both sides of the waist, support your palms well on chairs. Then, putting the full weight onto the chairs, at one and the same time rub softly from inside outward on the outer side of the patient's pelvic bone — the hip bone — 6 times.
Bear in mind that only the soft middle part of the soles of both your feet is to be used, and rub in such a way that weight does not come onto the bone.
This corrects blockage in the lymph nodes and reduces swelling in the leg. Especially for those who wear tight trousers, if they have this kind of trouble, this treatment is very beneficial.
Patient's position
Laid straight Supine
The therapist
Standing, palms well supported on chairs on both sides of the waist, the full weight put onto the chairs
Where the feet are placed
Only the soft middle part of the soles of both feet, on the outer side of the pelvic bone — the hip bone — both sides at one and the same time Both sides
Direction
From inside outward
Duration and repetitions
6 times, softly, rubbing in such a way that weight does not come onto the bone ▲ Take care
What it is for
Correcting blockage in the lymph nodes and reducing swelling in the leg. Especially for those who wear tight trousers, if they have this kind of trouble
The name records the method's parents. GAL and SPL are the gall bladder and spleen codes of the supine atlas; ghisai is the therapy's own word for a rubbing, sliding application rather than a still press. This entry is that pair of actions performed at the rim of the pelvis.
Three instructions here are all about keeping force off a bone.Putting the full weight onto the chairs — more of the therapist's weight goes into his arms in this treatment than in almost any other. Only the soft middle part of the soles — the softest tool there is, on both feet. And rub in such a way that weight does not come onto the bone — the hip bone's front rim lies just under the skin and is sharp to a sole. The stroke crosses it; the weight does not rest on it.
And the direction is written: from inside outward, both sides at once, six times. Not up, not down, not round — outward from the midline, the same idea as the widening actions of The Low Back and Knee, Leg, Foot, arriving here at a new border.
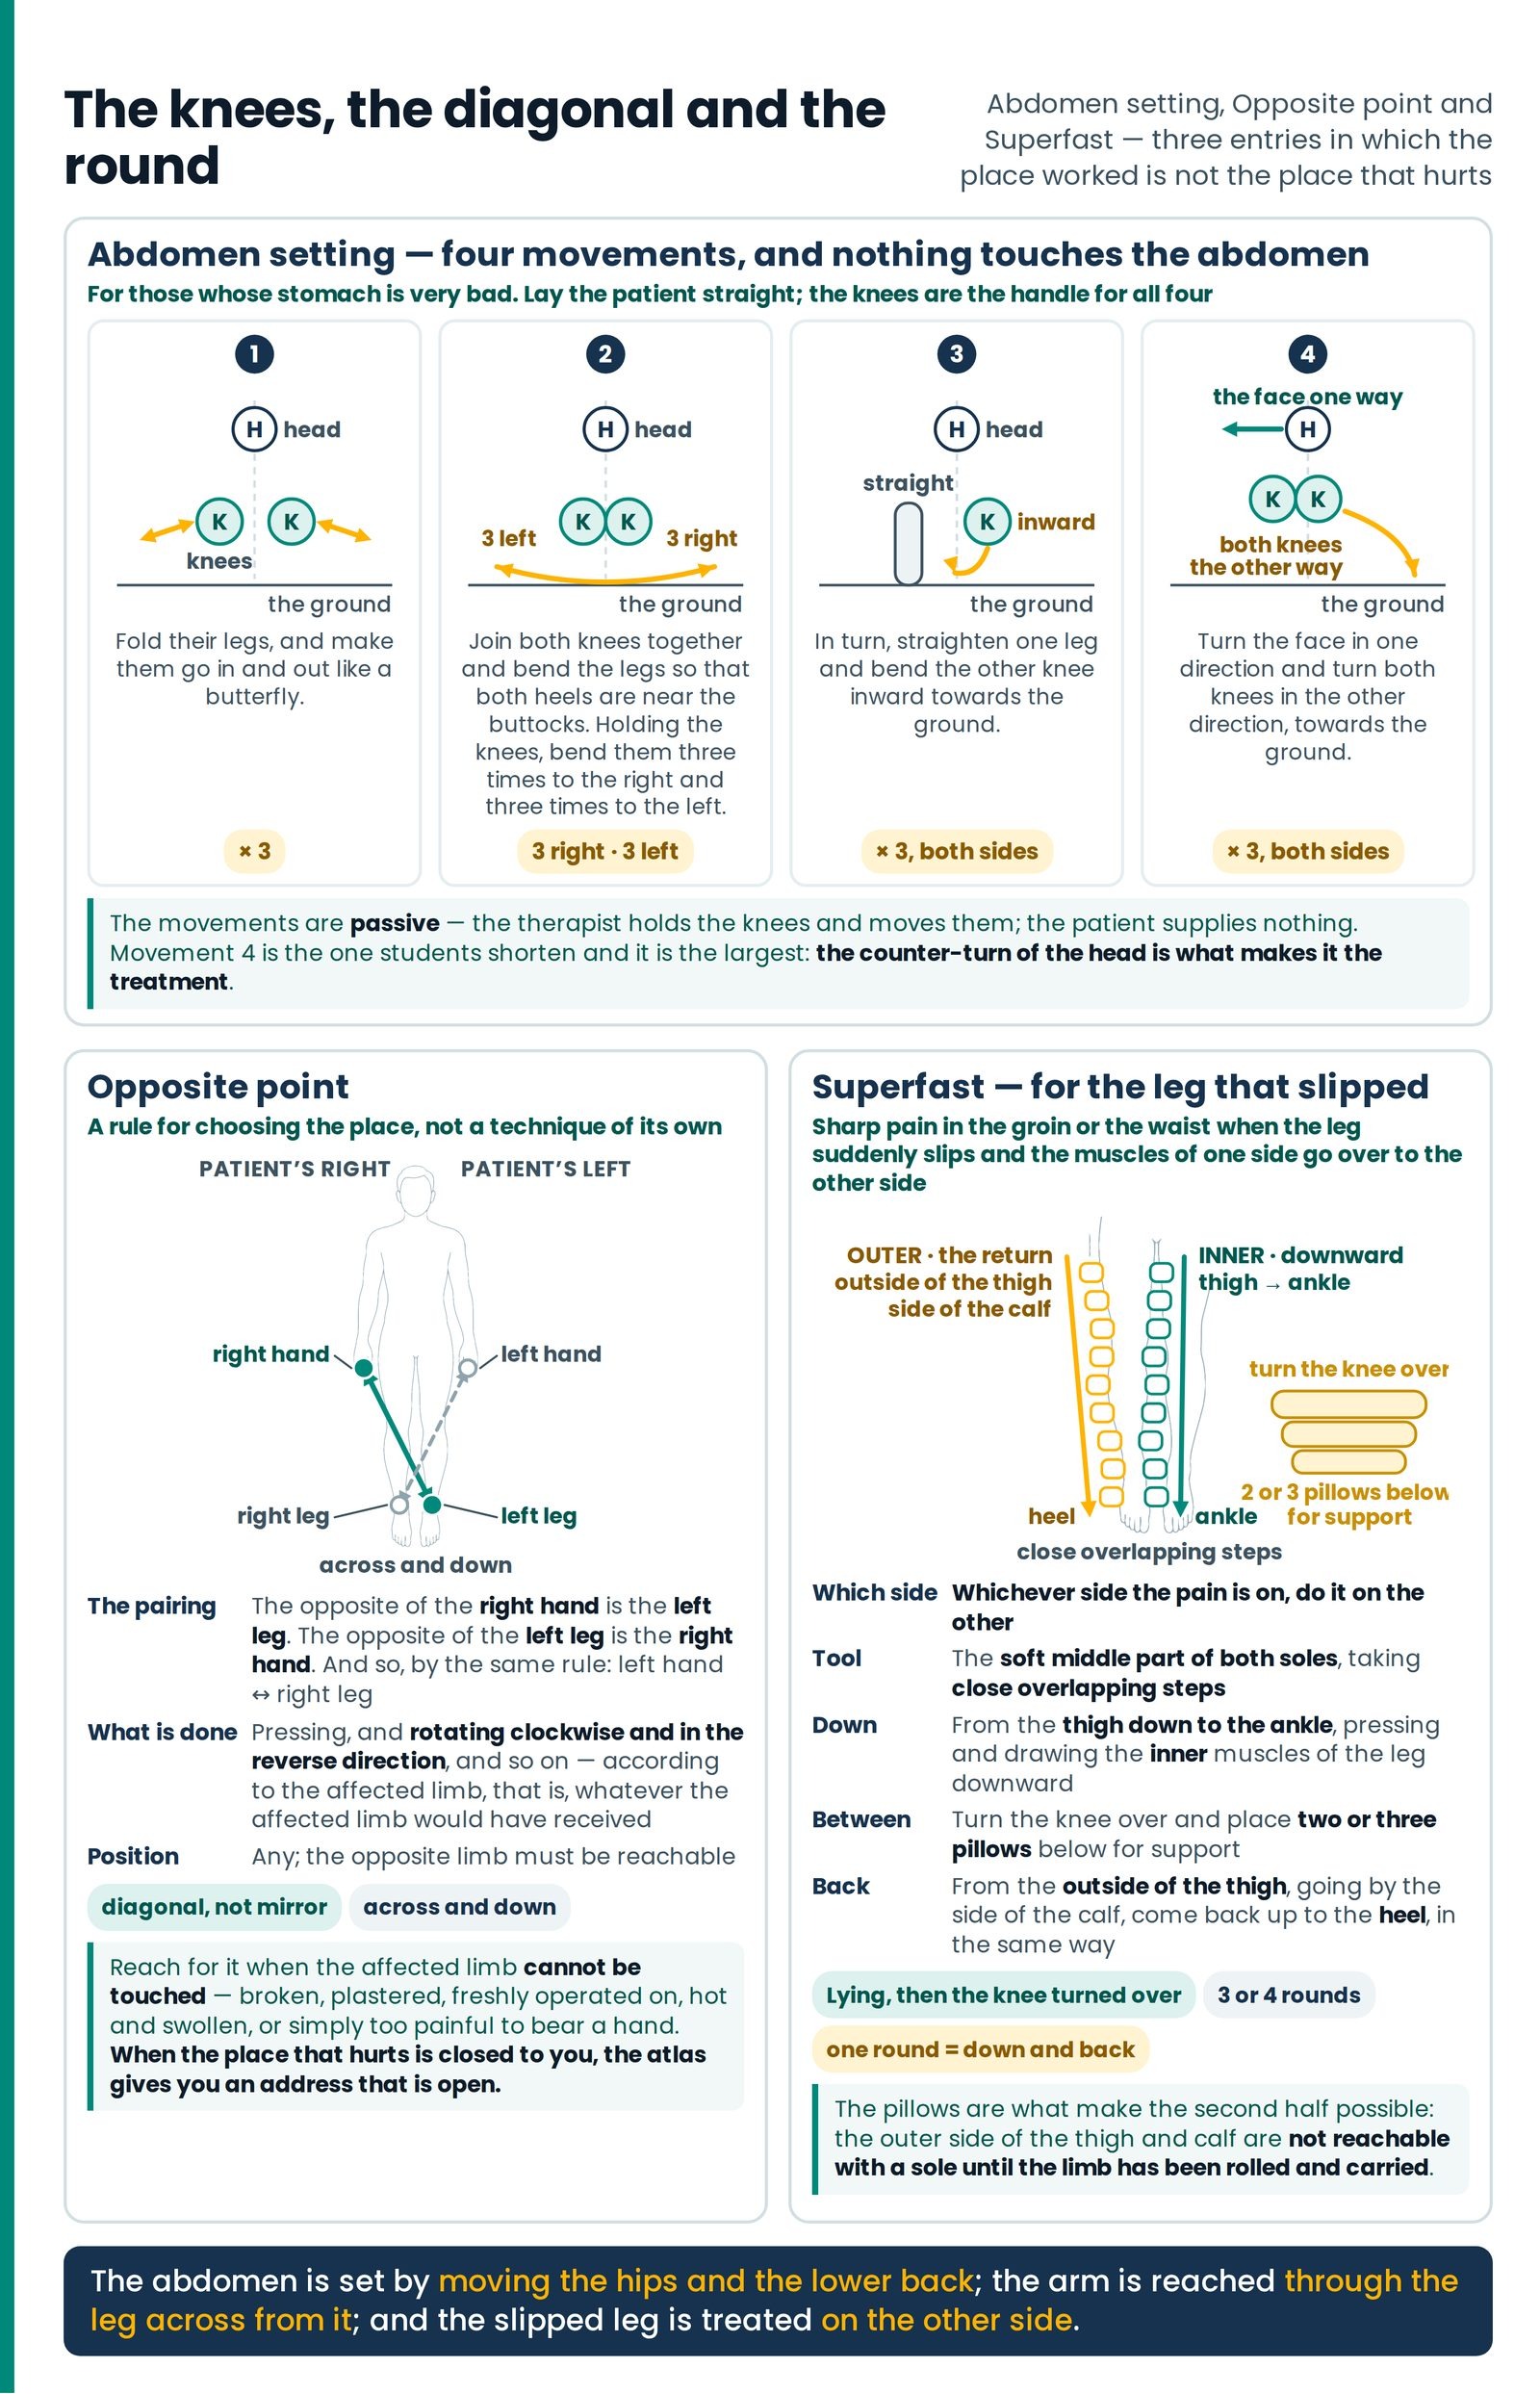
The knees, the diagonal and the round. Abdomen setting drawn as four movement diagrams, every count three and nothing touching the abdomen; the Opposite point rule as a diagonal across the body; and Superfast as one round down the inside, over the pillows, and back up the outside of the other leg.
Ready to begin?
Send COURSE for course details, or your name, age and health issue for a consultation.