- Category
- Brain, nerves and mind
- What is given
- The sciatica point and its setting; L5–S1 ghisai
- What is barred
- L3, 4, 5 where there is a fracture between L1 and S1
- Explained in
- The Low Back
Watch

From The Low Back
SCIATICA POINT
This is useful for those who get a sharp, pricking pain running from the waist toward the leg, which sometimes goes away and sometimes stays for hours. This is called sciatic pain, or sciatica. Some people have the problem in one leg only, while others get burning or pain in both legs. In the figure it is shown for both legs, but it is done on the leg whose sciatic nerve has the problem. Prone Left Right
Taking the support of the chairs, place both your big toes on either side of the L5 bead and give a light pressure. Then, with your heel, on the leg that has the pain, go from the hip down to the heel — either pressing, or turning round and round clockwise.
| Patient's position | Prone, 1½ pillows; therapist taking the support of the chairs Prone |
|---|---|
| Where the feet go | Both big toes either side of the L5 bead, light pressure; then the heel, on the leg that has the pain, from hip down to heel |
| Duration and repetitions | No count is given. The descent is made either by pressing or by turning round and round clockwise |
| Laterality | The figure shows both legs; it is done on the leg whose sciatic nerve has the problem ▲ Take care |
| What it is for | Sciatic pain, or sciatica — sharp, pricking, running from waist toward leg, sometimes going, sometimes staying for hours. Some have it in one leg only; others get burning or pain in both legs |
Three instructions here are easily lost. The tool at the top is two big toes and the pressure is light — a narrow, precise, low-force contact used nowhere else in this article, while the rest of the treatment is a heel and the body's weight. The descent is on one leg, the leg that hurts — the figure shows two because a figure must show something, and the instruction overrides the figure in plain words. And two ways down are given, neither preferred — pressing, a series of holds descending hip to heel; or the clockwise turn, the heel circling as it descends. Choose by what the leg tolerates and record which you gave.
Note also what the entry does not give: a count. That is unusual in a book of counts and should be read as written rather than filled in from habit — the descent is made, and how long it takes is governed by the leg.
From The Low Back
SCIATICA SETTING
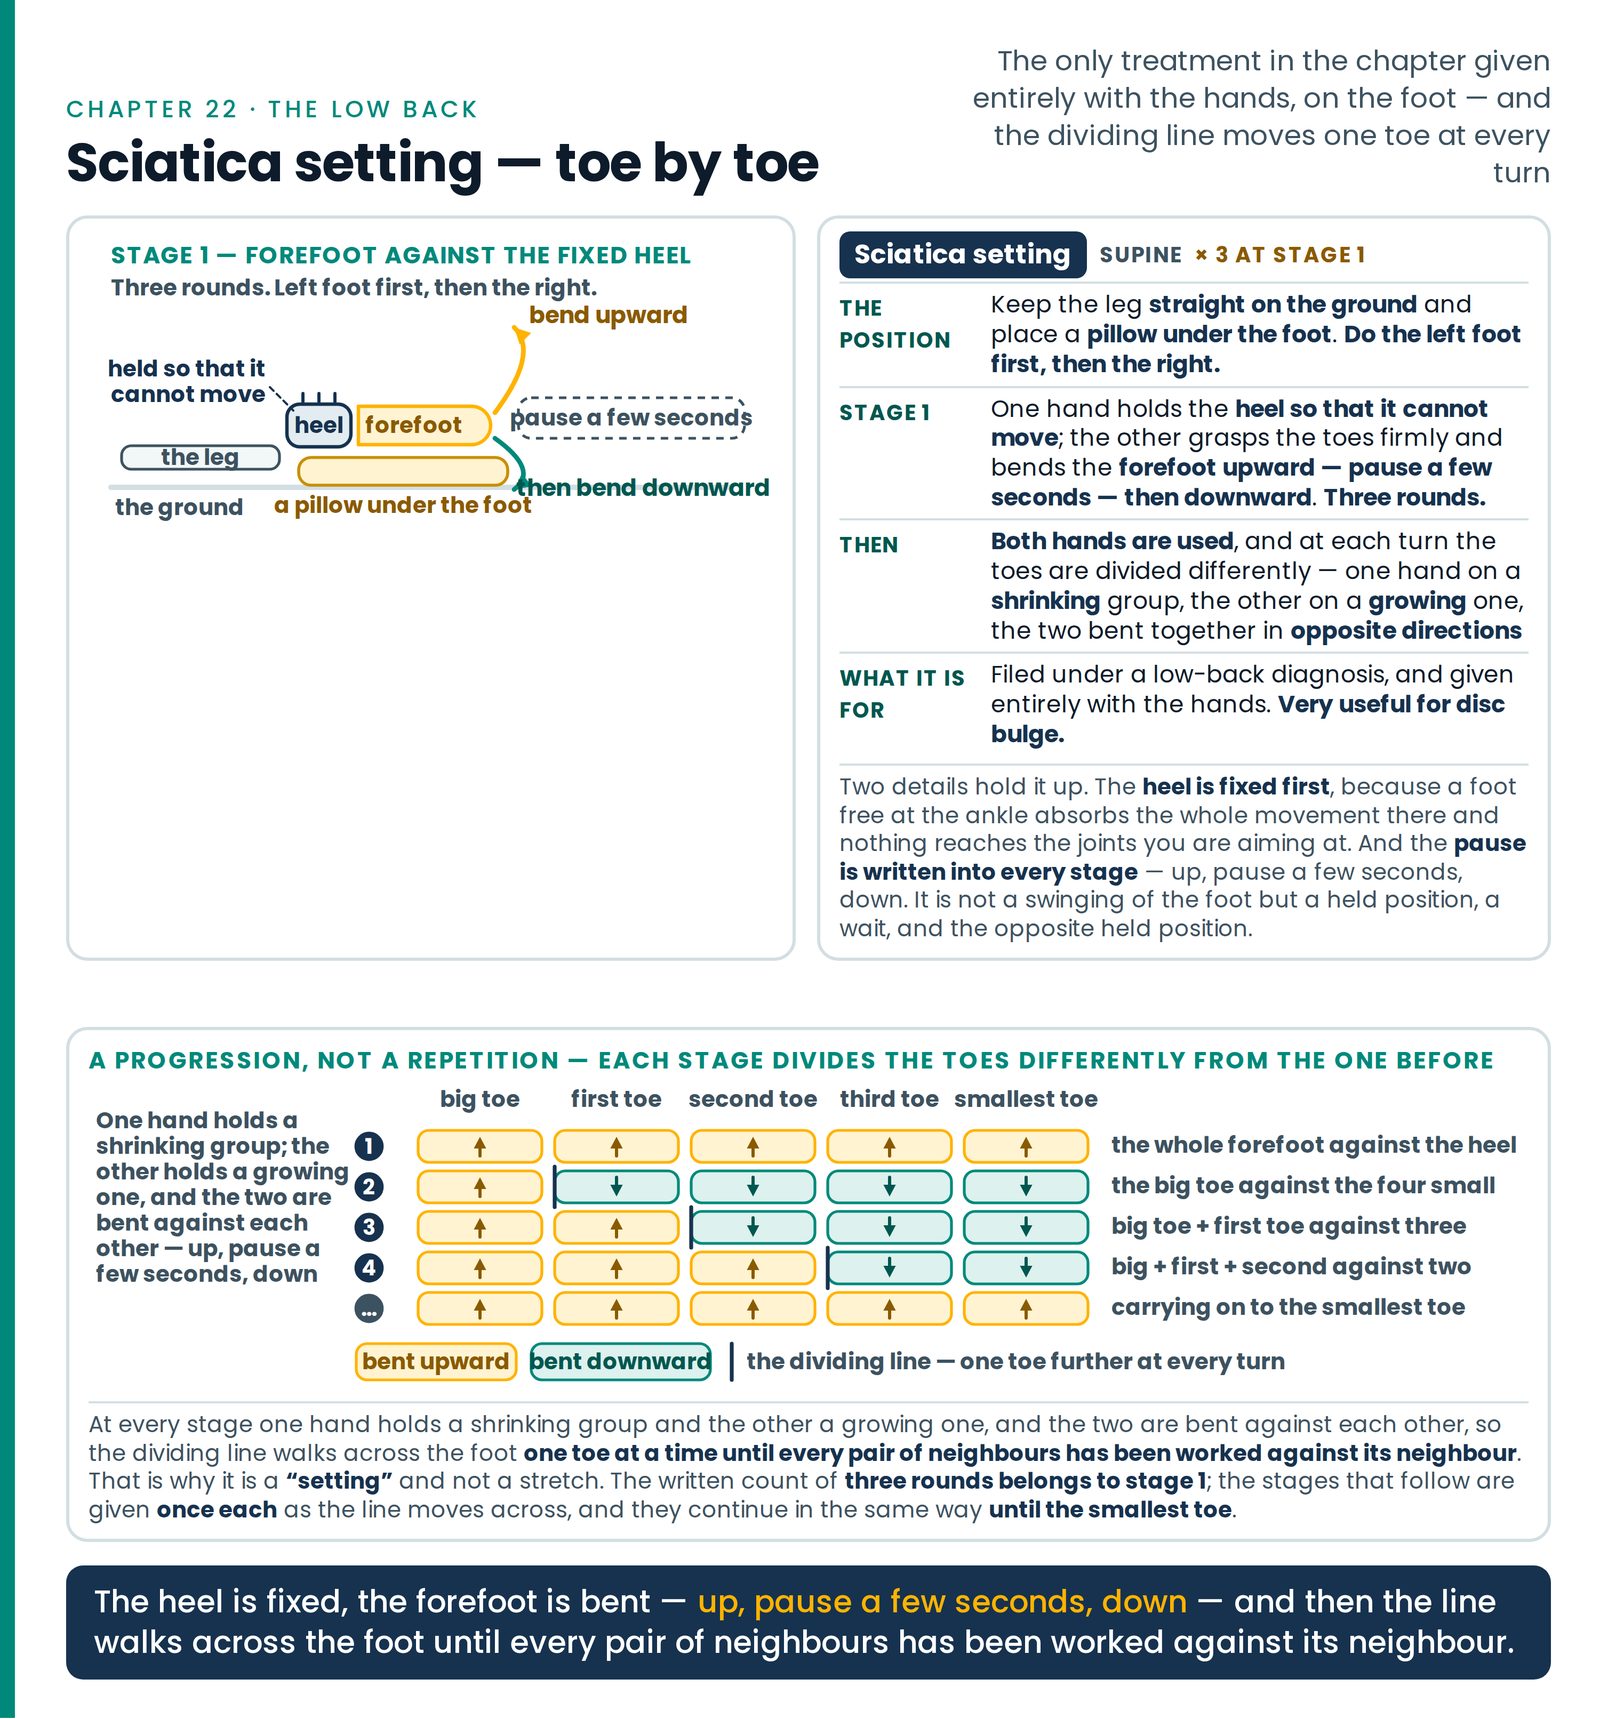
The only treatment in the article given entirely with the hands, on the foot — and filed under a low-back diagnosis. It is a progression, not a repetition: each stage divides the toes differently from the one before. (Figure 22.6)
Keep the leg straight on the ground and place a pillow under the foot. Do the left foot first, then the right. Supine Left Right × 3
With one hand, hold their heel so that it cannot move. Then, with the other hand grasping the toes firmly, bend the forefoot upward, pause for a few seconds, then bend it downward. Do three rounds. After this, both hands are used — and at each turn the toes are divided differently, one hand holding a shrinking group and the other the big toe with, next time, one more toe added to it, the two hands bent together in opposite directions, upward and downward — pause — bend.
| Stage | One hand holds | The other holds | The movement |
|---|---|---|---|
| 1 | The heel, held so it cannot move | The whole forefoot, the toes grasped firmly | Bend up — pause a few seconds — bend down. Three rounds |
| 2 | The four small toes | The big toe | That big toe bent up and down — pause — bend |
| 3 | Three toes | Big toe + first toe, together | Both hands together in opposite directions, up and down — pause — bend |
| 4 | The remaining toes | Big toe + first + second, all three held together | Both hands together in opposite directions, upward and downward — pause — bend |
| … | Continuing in this same way | Carry on until the smallest toe |
This is very useful for disc bulge.
At every stage one hand holds a shrinking group and the other a growing one, and the two are bent against each other, so the dividing line walks across the foot one toe at a time until every pair of neighbours has been worked against its neighbour. That is why it is a "setting" and not a stretch. And the written count of three rounds belongs to stage 1; the stages that follow are given once each as the line moves across.
Two details hold it up. The heel is fixed first, because a foot free at the ankle absorbs the whole movement there and nothing reaches the joints you are aiming at. And the pause is written into every stage — up, pause a few seconds, down. It is not a swinging of the foot but a held position, a wait, and the opposite held position.
What lies beneath. Bending toes and forefoot upward draws tight the strong fibrous band under the sole and the small muscles between the long bones of the foot; bending one toe up while its neighbour goes down shears the spaces between those bones, where the small nerves to the toes run. Toe and ankle bending upward is also the manoeuvre used everywhere to add tension along the nerve line running continuously from the sole to the low back — so working a foot in a patient with leg symptoms is not the arbitrary act it looks. What it plainly is: a low-force, well-tolerated mobilisation of the foot, easy to stop at any moment.
Also explained in
- Introduction The Low Back
Give the Sciatica point and the whole of Sciatica setting, toe by toe to the smallest one; and Bending forward, Standing point, Pelvic and Bindu, each with its own position, count and limit.
- The heading this group carries The Low Back
Where the therapist stands Named in Astride the L5–S1 joint, weight on the palms through the chairs L5–S1 ghisai, stage 3 Prone Comfortably near the waist, full weight on the hands through the chairs Fracture point — th
- The back that gets better, and the back that leaves the room today The Low Back
This is why the Sciatica point instruction to treat only the affected leg matters twice over: pain down both legs means the saddle and bladder questions come before anything else.
- BINDU POINT — the long diagonal The Low Back
Sciatica point: both big toes either side of L5, light pressure; then the heel, hip to heel, on the painful leg only — the figure shows both legs; the instruction does not — pressing or turning clockwise.
- BLOOD SUPPLY TO LEGS — the stance that faces the wrong way The Low Back
Blood Supply to Legs, Sciatica point, Pelvic and Bindu on one sheet — four different contacts on one prone body, with the stance, the pillows, the 90-second ceiling and the anchoring foot that makes the moving foot mean
- Questions students ask The Low Back
The Sciatica point figure shows both legs and my patient has pain in both legs.
- The master list — every treatment point, by the position the patient is placed in The Shorthand
Code Full name / Hindi Where it is taught in this wiki Adr Adrenal Face Down Swt Sweat Face Down Back Arrow Back Arrow, or Blood supply to lungs Face Down H arrow — Face Down On the spine — Face Down Beside the spine — Face Down Round arrow —
- Questions students ask The Shorthand
Two lists contain Sciatica setting.
- The low back, the sacrum and the tail bone Each Point in Use
Table 15 — The low back, the sacrum and the tail bone Point What it is used for When it must not be used Notes L5–S1 ghisai Prone Good for sciatica, and for all pains of the back — especially for lumbar spondylosis or s