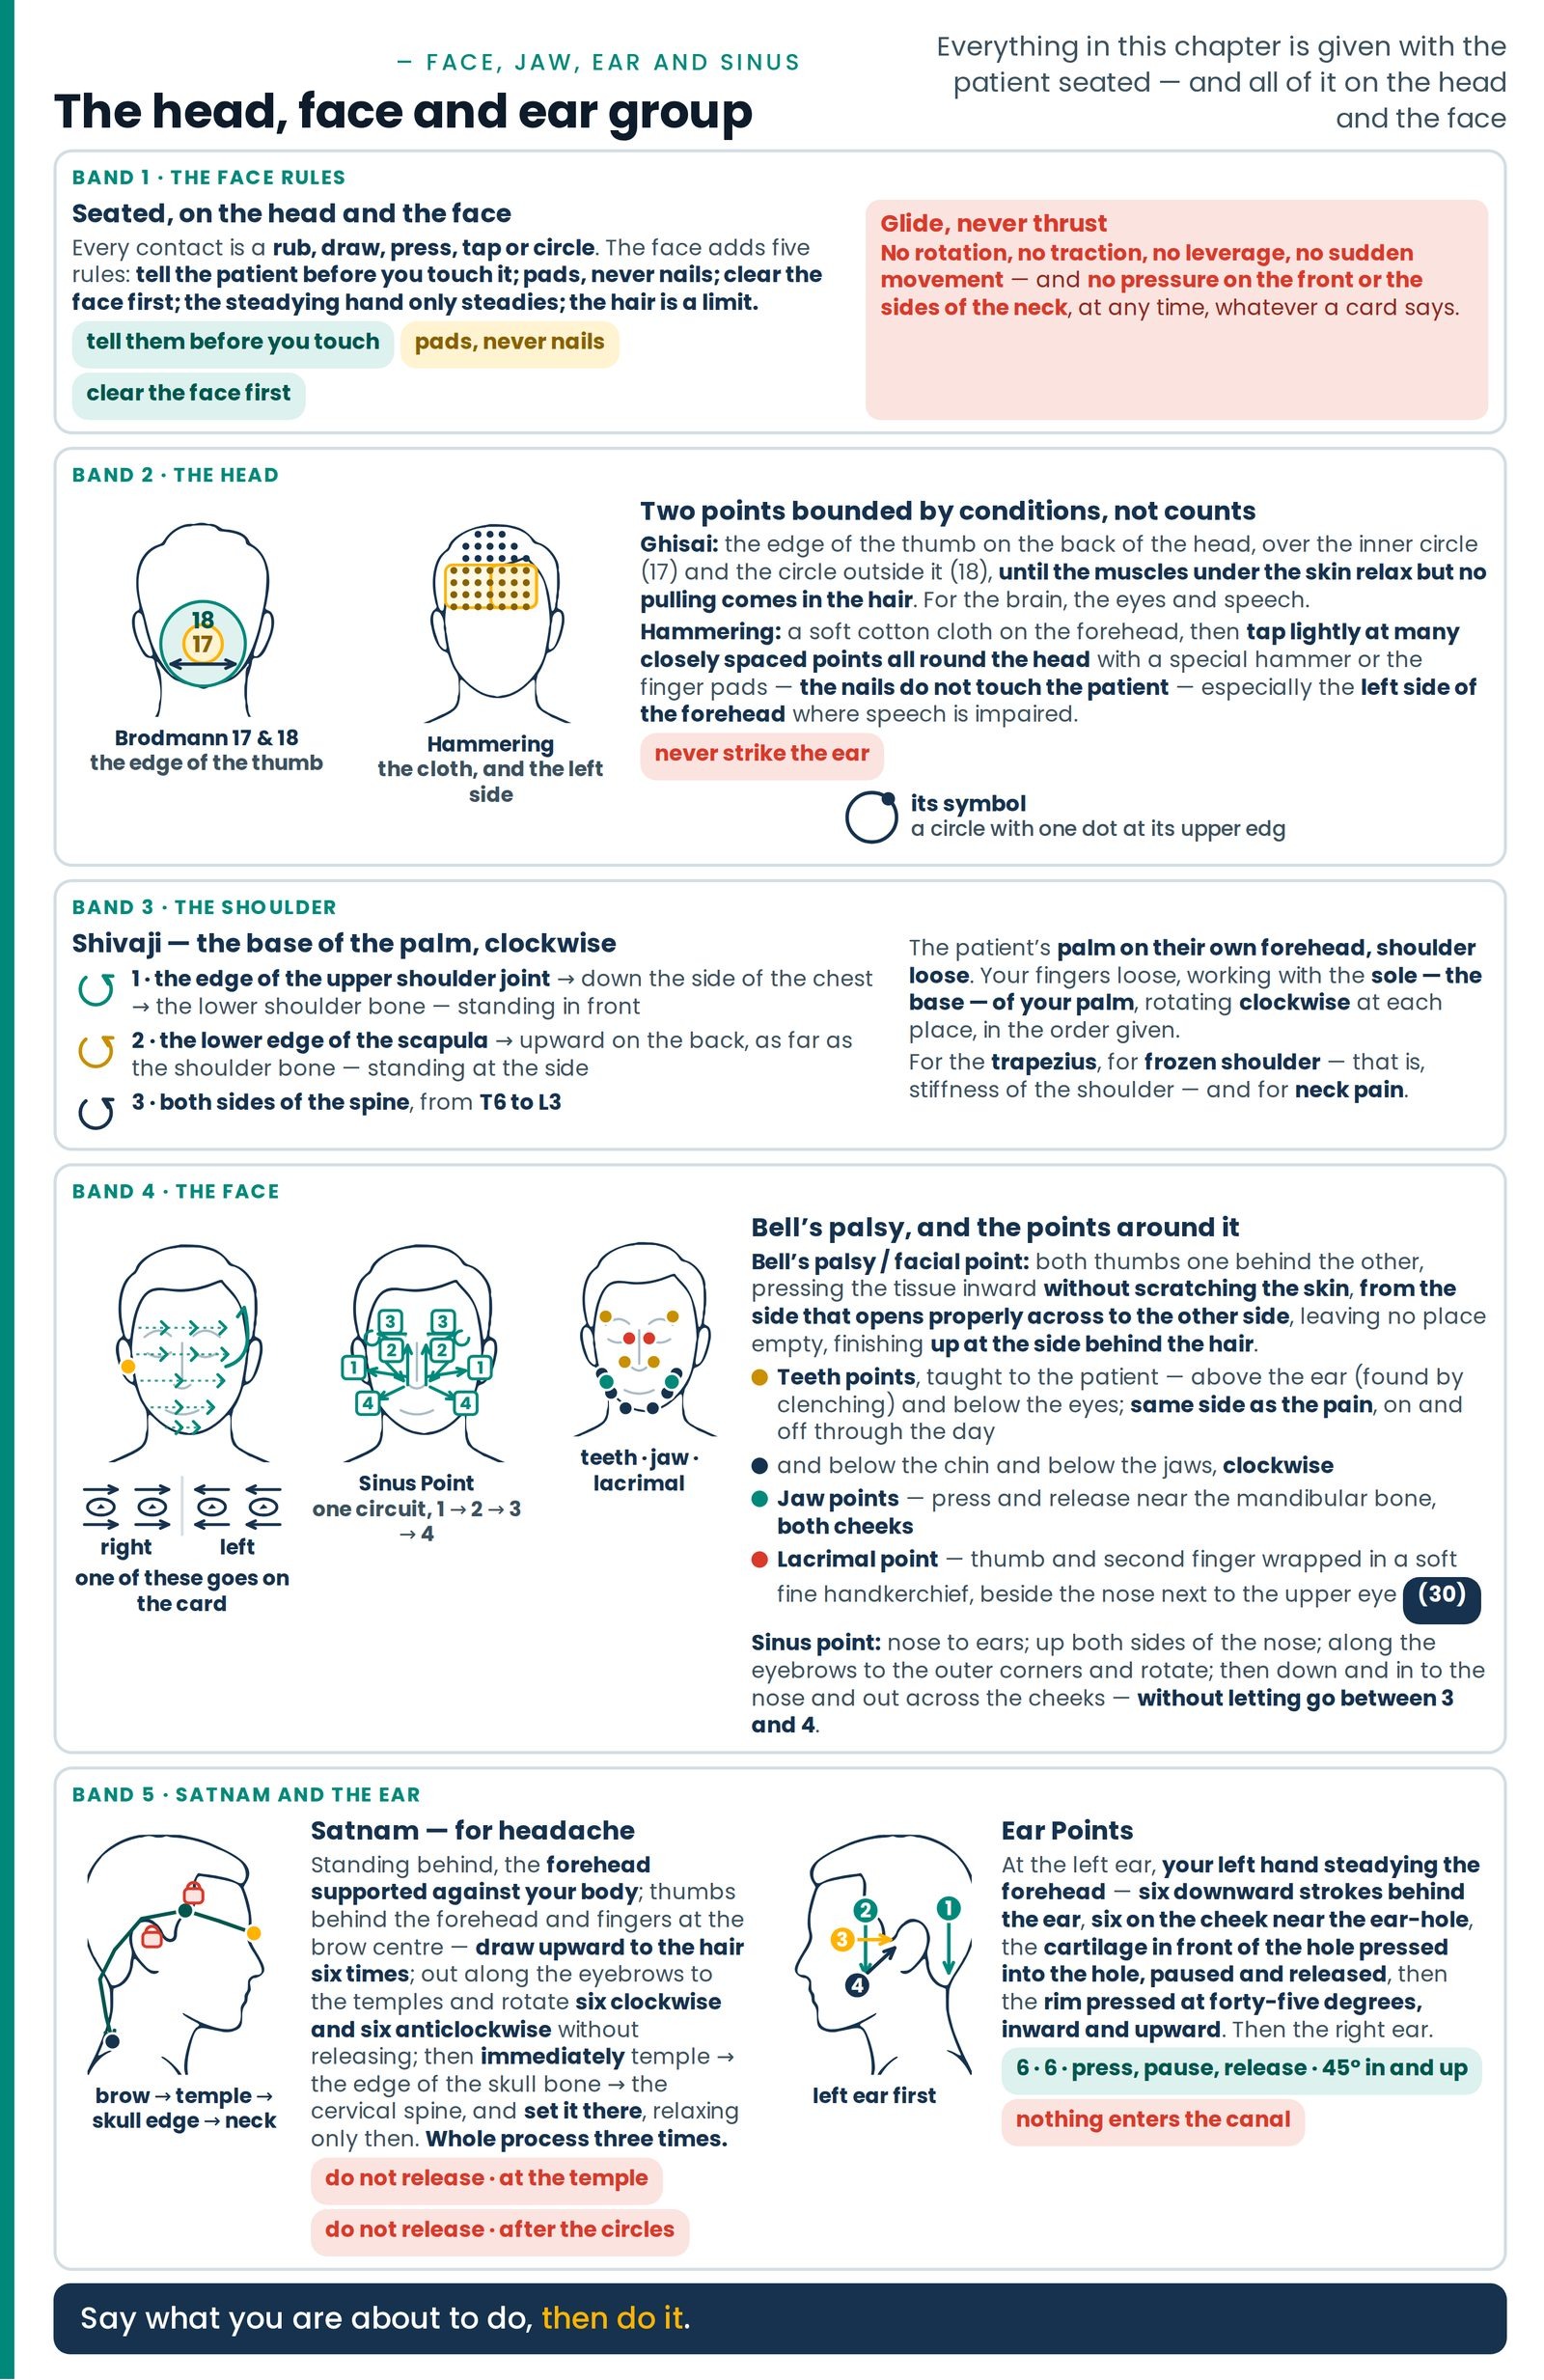
Seated I — Brain, Medulla, Neck took the seated group as far as the base of the skull and stopped at the Necklace. The patient has not moved; your hands are about to — up over the edge of the skull onto the back of the head, round onto the forehead, and then down onto the face. (Figure 19.1)
Until now the patient has not been able to see your hands. At the nape, work arrives from behind and is simply felt. On the face it is watched — and a body that has not been warned will flinch, blink, pull back, or tighten every muscle you were about to work. Telling the patient what is coming is not manners laid on top of the technique. It is part of the technique.
Watch


What the face adds to the seated rules
Five additions — and the two rules that arrive with you
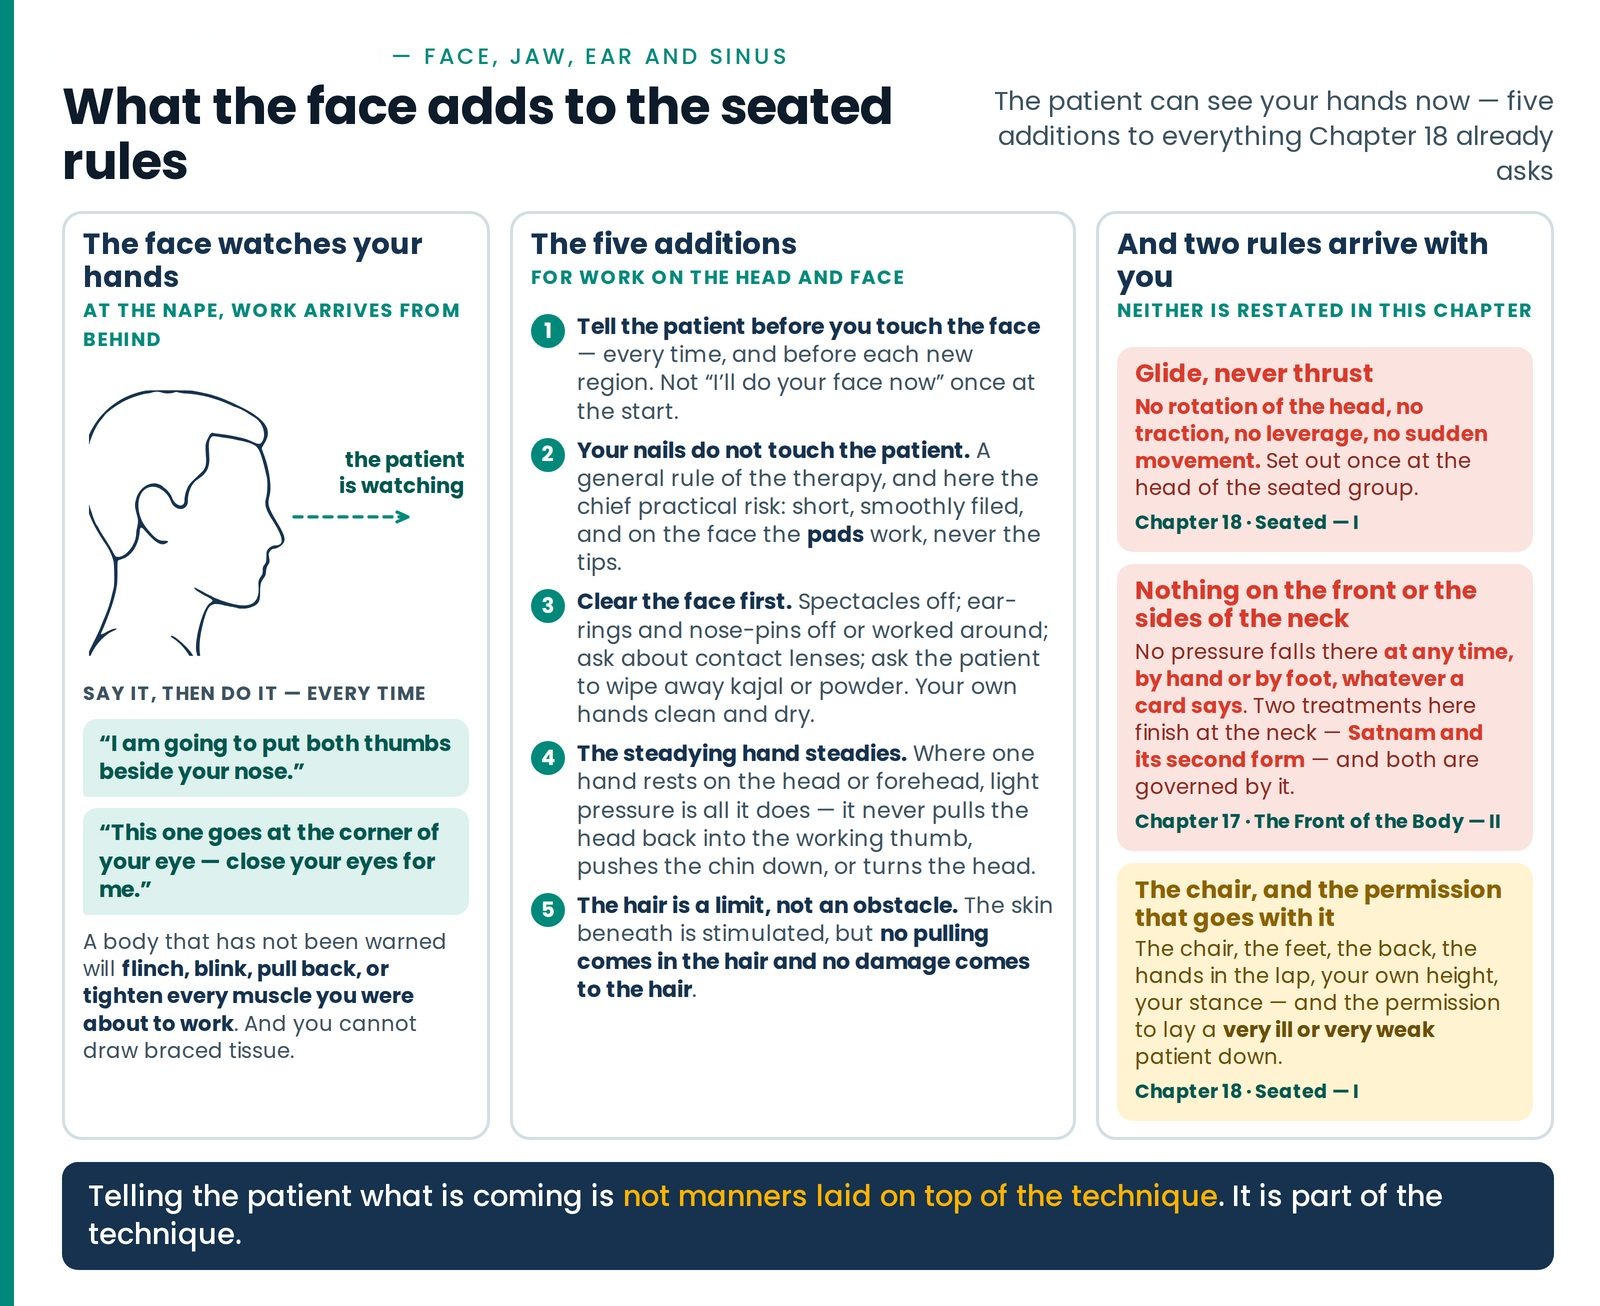
The rules governing every treatment here were set out once at the head of the seated group — the chair, the feet, the back, the hands in the lap, your own height, your stance, and the permission to lay a very ill or very weak patient down. All of that is in Seated I — Brain, Medulla, Neck, "Seated — I", together with the rule that outranks the rest — glide, never thrust: no rotation of the head, no traction, no leverage, no sudden movement.
The anterior-neck rule is not restated either. No pressure falls on the front or the sides of the neck at any time, by hand or by foot, whatever a card says; the rule and the conditions under which it bites hardest are in full at the head of The Front of the Body II, "The Front of the Body — II". Two treatments here finish at the neck — Satnam and its second form — and both are governed by it.
The five additions for work on the head and face
1. Tell the patient before you touch the face — every time, and before each new region.
Not "I'll do your face now" once at the start, but "I am going to put both thumbs beside your nose." "This one goes at the corner of your eye — close your eyes for me." An unwarned face braces, and you cannot draw braced tissue.
2. Your nails do not touch the patient. A general rule of the therapy, and here the chief practical risk: short, smoothly filed, and on the face the pads work, never the tips.
3. Clear the face first. Spectacles off; ear-rings and nose-pins off or worked around; ask about contact lenses; ask the patient to wipe away kajal or powder. Your own hands clean and dry.
4. The steadying hand steadies. Where one hand rests on the head or forehead, light pressure is all it does — it never pulls the head back into the working thumb, pushes the chin down, or turns the head.
5. The hair is a limit, not an obstacle. In one treatment the instruction is explicit: the skin beneath is stimulated, but no pulling comes in the hair and no damage comes to the hair.
The head — the visual areas, and the tapping
The thumb's edge on two rings, then the cloth and the light tap
Brodmann's Area 17 & 18 Ghisai
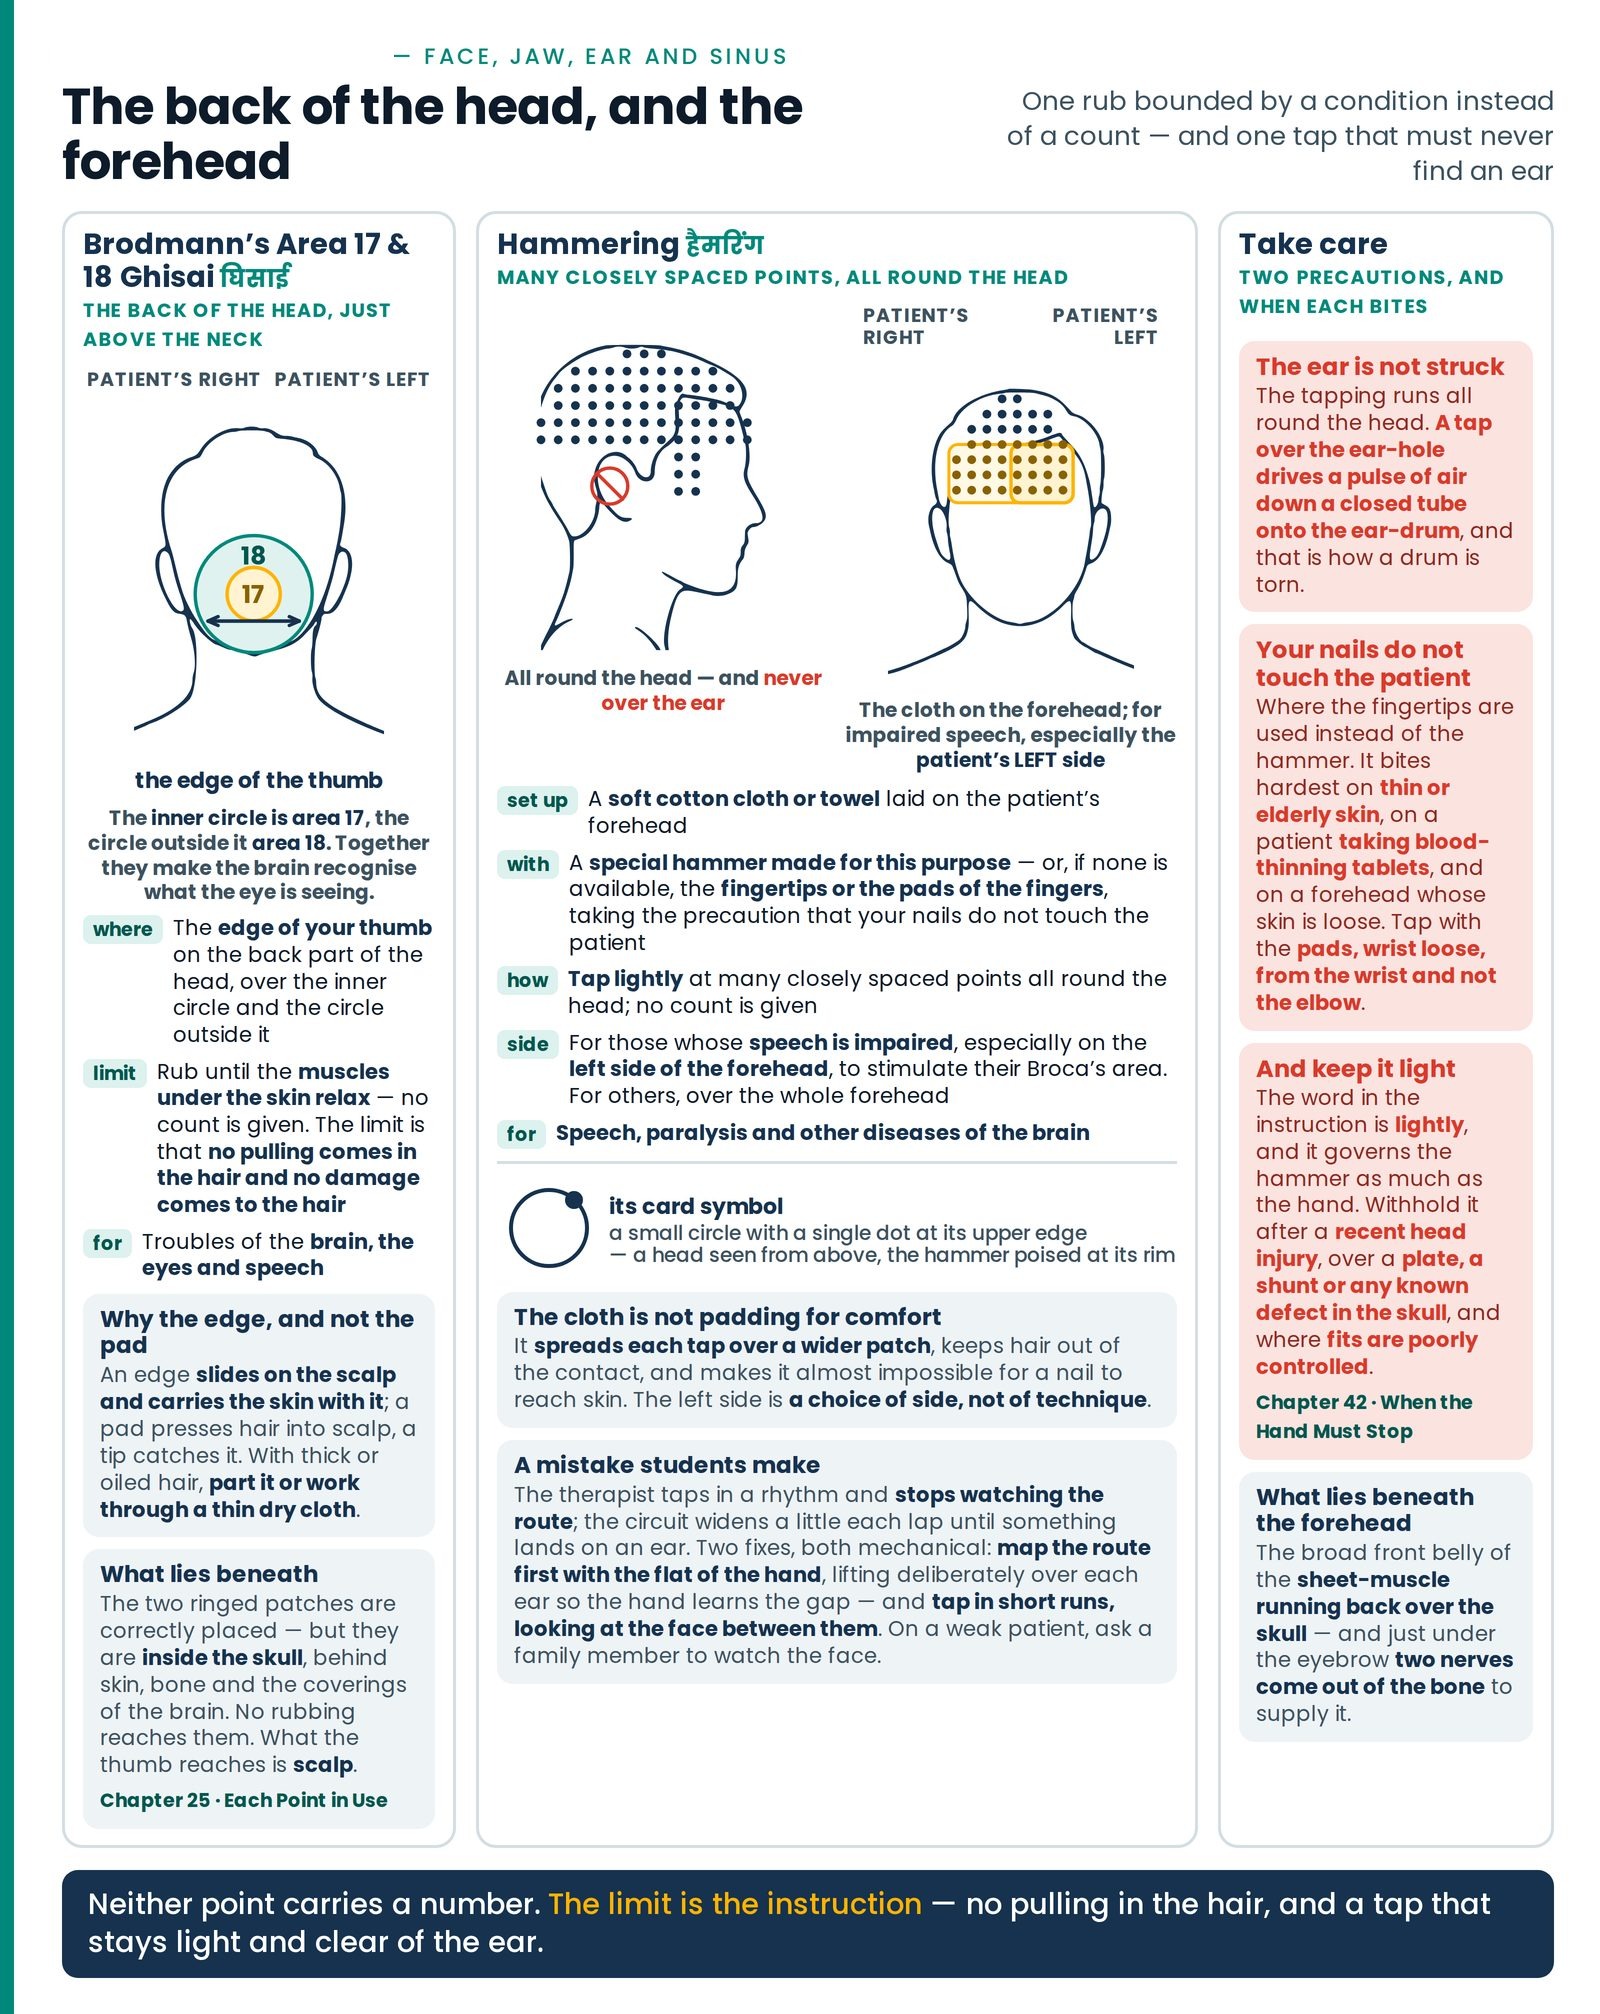
Rub — ghisai — the back part of the head in such a way that the muscles under the skin relax, but no pulling comes in the hair. This is excellent for troubles of the brain, the eyes and speech. (Figure 19.2)
According to function, the brain has been divided into more than forty regions, and each area has a fixed number; these are called Brodmann's area No. 1, 2, 3 and so on. Among these, behind the head, just above the neck, there are two parts related to vision. Of these, the inner circle is Brodmann's area 17, and the circle outside it is Brodmann's area 18. These two areas together make the brain recognise what the eye is seeing.
Method. With the edge of your thumb, rub these two areas so that the skin underneath is stimulated, but no damage comes to the hair.
| Patient's position | Seated Seated |
|---|---|
| Where the hands are placed | The edge of the thumb on the back part of the head, over the inner circle (area 17) and the circle outside it (area 18) |
| Duration and repetitions | Rub until the muscles under the skin relax; no count is given — the limit is that no pulling comes in the hair and no damage comes to the hair |
| What it is for | Troubles of the brain, the eyes and speech |
The limit is the instruction. This point is bounded not by a number but by a condition, which is why the technique uses the edge of the thumb: an edge slides on the scalp and carries the skin with it, a pad presses hair into scalp, a tip catches it. With thick or oiled hair, part it or work through a thin dry cloth.
What lies beneath. The two ringed patches are real and correctly placed — but they are inside the skull, behind skin, bone and the coverings of the brain. No rubbing reaches them. What the thumb does reach is a scalp crossed by three nerves from the top of the neck, which arrive in the cord where the nerves of the face and of the neck land on the same cells — the convergence taught with Medulla in Seated I — Brain, Medulla, Neck.
Hammering — हैमरिंग
Place a soft cotton cloth or towel on the patient's forehead. Then you may use a special hammer made for this purpose. Tap lightly at many closely spaced points all round the head, but take care that the ear is not struck.
If a special hammer is not available, you can tap with the fingertips or the pads of the fingers — but take the precaution that your nails do not touch the patient.
This is excellent for speech, paralysis and other diseases of the brain. For those whose speech is impaired, hammering is to be done especially on the left side of the forehead, to stimulate their Broca's area. For others it can be done over the whole forehead.
Its symbol is → a small circle with a single dot at its upper edge — a head seen from above with the hammer poised at its rim.
| Patient's position | Seated, with a soft cotton cloth or towel laid on the forehead Seated |
|---|---|
| Where the hands are placed | A special hammer made for the purpose — or the fingertips or the pads of the fingers, never the nails — tapping at many closely spaced points all round the head, taking care that the ear is not struck ▲ Take care |
| Duration and repetitions | Tap lightly; no count is given. For impaired speech, especially on the left side of the forehead; for others, over the whole forehead Left |
| What it is for | Speech, paralysis and other diseases of the brain; stimulating Broca's area where speech is impaired |
The cloth is not padding for comfort. It spreads each tap over a wider patch, keeps hair out of the contact, and makes it almost impossible for a nail to reach skin. The left side is a choice of side, not of technique.
What lies beneath. The forehead is the broad front belly of the sheet-muscle running back over the skull, and just under the eyebrow two nerves come out of the bone to supply it.
The shoulder — Shivaji
Her palm on her own forehead, then three clockwise stations
Shivaji — शिवाजी
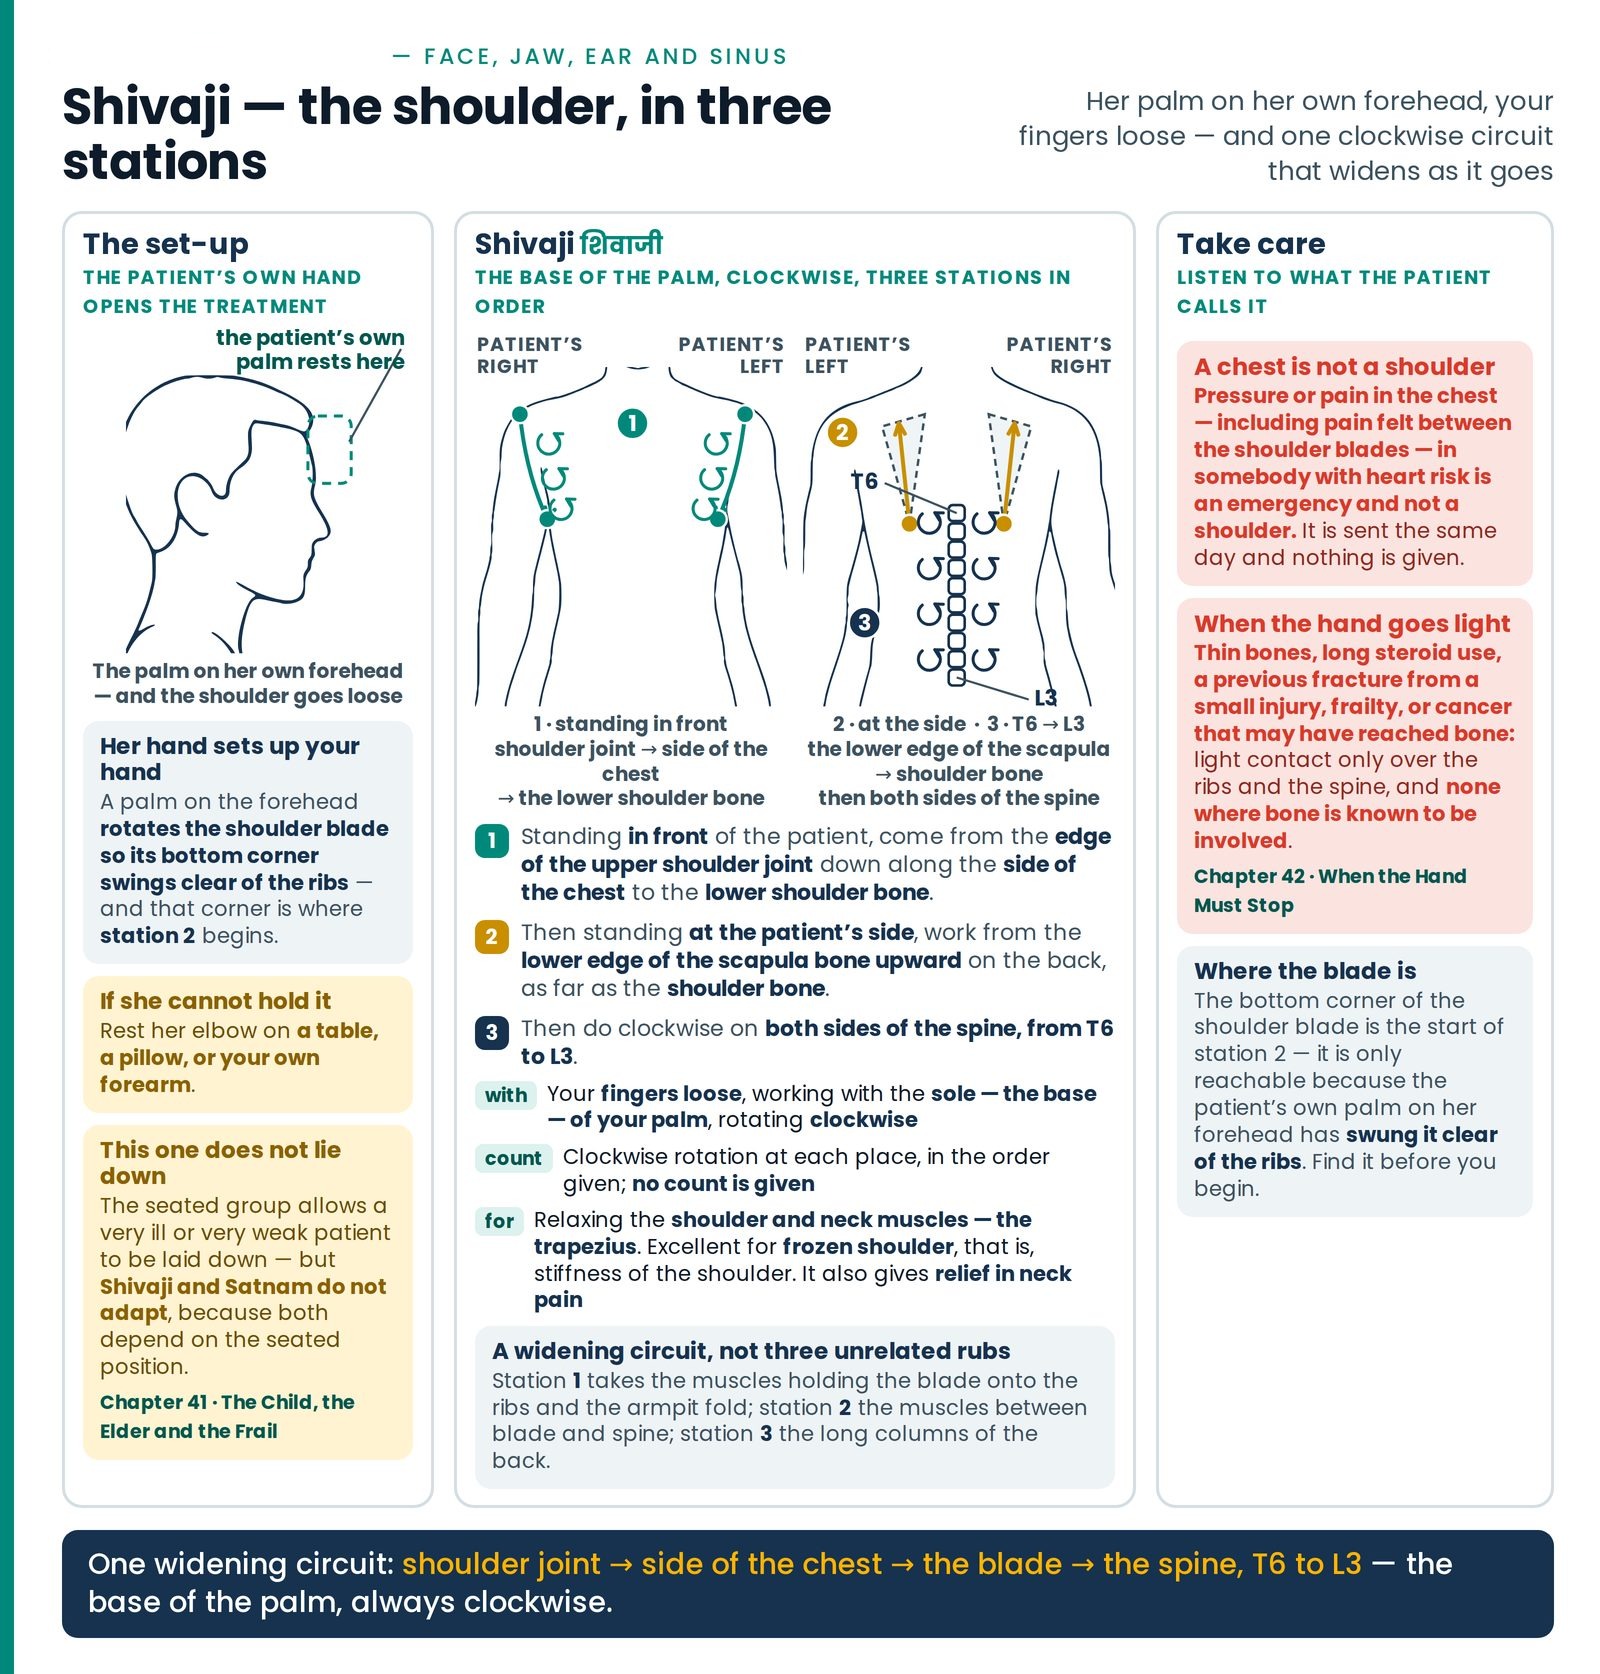
Tell the patient to place the palm of their hand on their forehead and to let the shoulder go loose. (Figure 19.3)
You keep your fingers loose, and with the sole — the base — of your palm, rotating clockwise, work at the following places:
Standing in front of the patient, come from the edge of the upper shoulder joint down along the side of the chest to the lower shoulder bone.
Then standing at the patient's side, work from the lower edge of the scapula bone upward on the back, as far as the shoulder bone.
Then do clockwise on both sides of the spine, from T6 to L3.
This treatment is to relax the shoulder and neck muscles — the trapezius. It is excellent for frozen shoulder, that is, stiffness of the shoulder. It also gives relief in neck pain.
| Patient's position | Seated, the palm of the hand on their own forehead, the shoulder loose Seated |
|---|---|
| Where the hands are placed | The therapist's fingers loose, working with the sole (base) of the palm, rotating clockwise: (1) from the edge of the upper shoulder joint down the side of the chest to the lower shoulder bone, standing in front; (2) from the lower edge of the scapula bone upward on the back as far as the shoulder bone, standing at the side; (3) both sides of the spine, from T6 to L3 Both sides |
| Duration and repetitions | Clockwise rotation at each place, in the order given; no count is given |
| What it is for | Relaxing the shoulder and neck muscles (trapezius); frozen shoulder, that is stiffness of the shoulder; also relief in neck pain |
The patient's own hand sets up the treatment. A palm on the forehead rotates the shoulder blade so its bottom corner swings clear of the ribs — and that corner is where station 2 begins. If she cannot hold the position, rest her elbow on a table, a pillow, or your own forearm.
What lies beneath — a widening circuit, not three unrelated rubs. Station 1 takes the muscles holding the blade onto the ribs and the armpit fold; station 2 the muscles between blade and spine; station 3 the long columns of the back.
The face — the facial point, the teeth and the jaw
The arrow on the card, and the points you hand the patient
Bell's Palsy / Facial Point
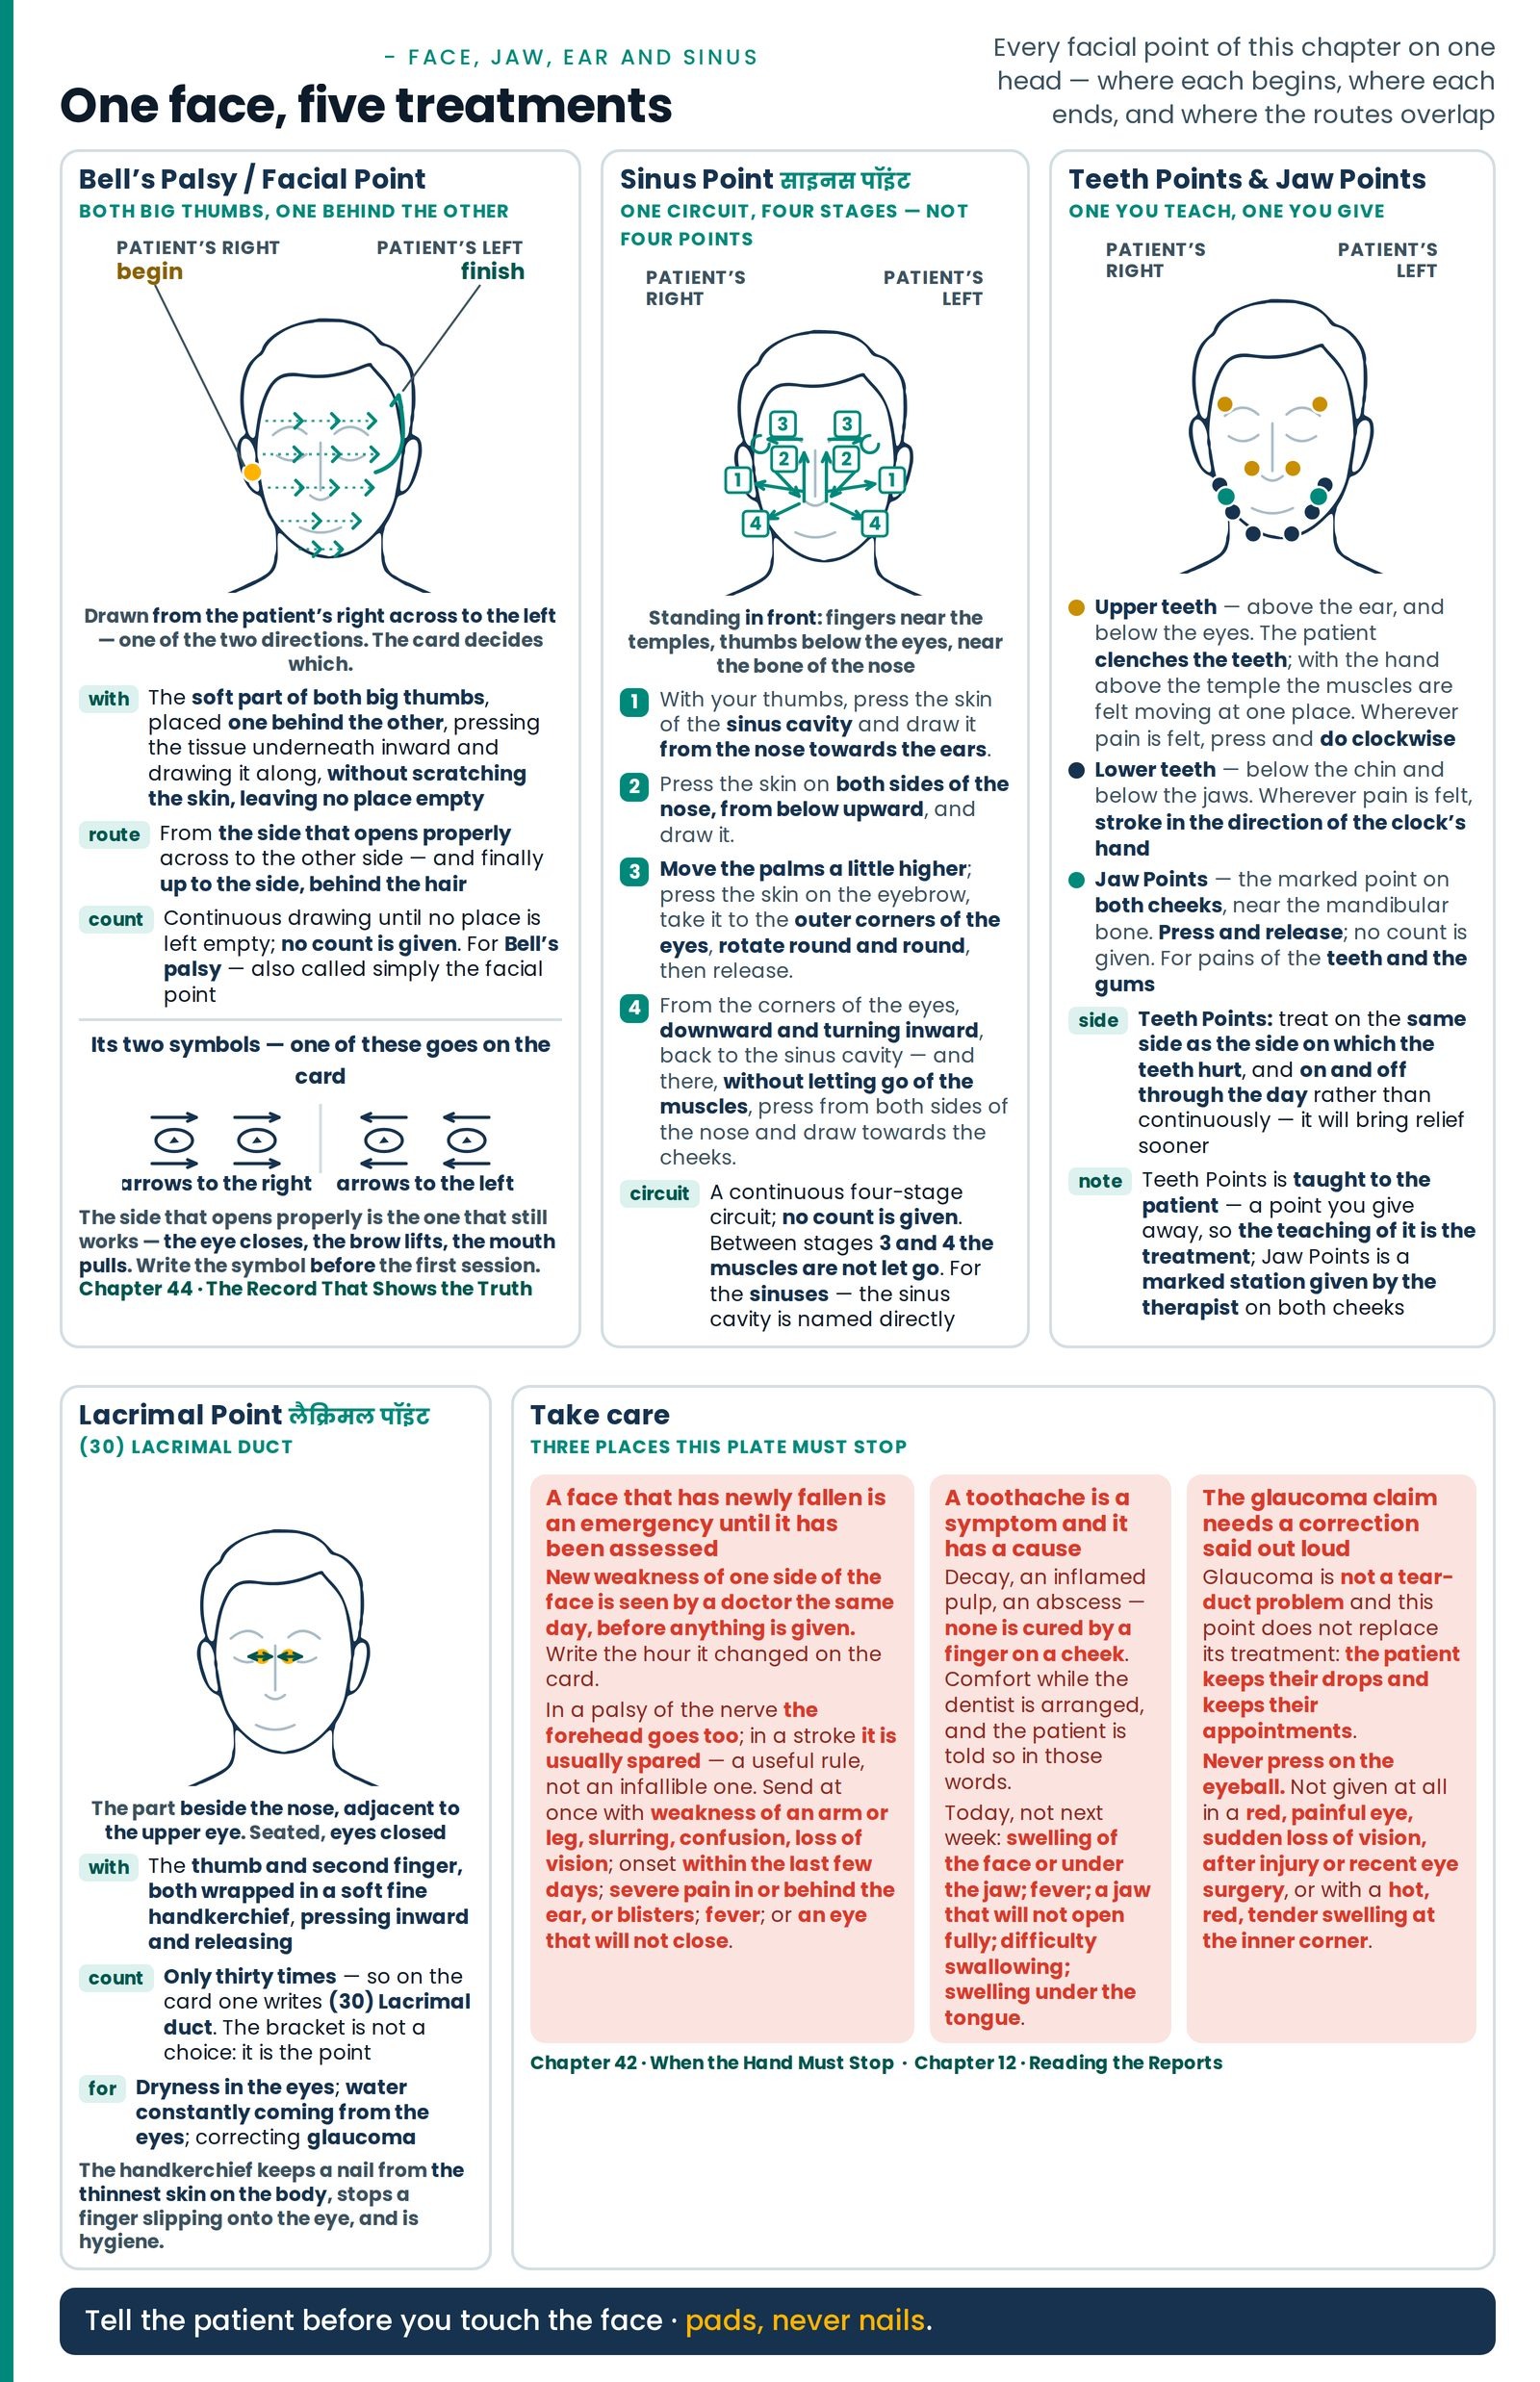
This treatment is to be given with the soft part of the big thumbs of your hands. Placing both thumbs one behind the other, and without scratching the skin, press the tissue underneath inward and go on drawing it along, leaving no place empty. (Figure 19.4)
In this way, from the side that opens properly, draw the tissue across to the other side, and finally bring it up to the side, behind the hair.
Its symbols are: two eye-with-arrow marks pointing to the right, or two eye-with-arrow marks pointing to the left.
Looking at the patient, whichever of the two is appropriate should be written on the sign card, so that the therapist knows from which side it is to be done and no mistake occurs.
| Patient's position | Seated Seated |
|---|---|
| Where the hands are placed | The soft part of both big thumbs, placed one behind the other, pressing the tissue underneath inward and drawing it along without scratching the skin, leaving no place empty — from the side that opens properly across to the other side, and finally up to the side, behind the hair Both sides |
| Duration and repetitions | Continuous drawing until no place is left empty; no count is given. The direction is chosen for each patient and written on the sign card as a symbol |
| What it is for | Bell's palsy; also called simply the facial point |
The two symbols are the laterality, and they are why the card exists. Write the symbol before the first session, not after.
"The side that opens properly" is the side that still works — where the eye closes, the brow lifts and the corner of the mouth pulls. The draw begins there and travels across to the weak side.
Both thumbs, one behind the other — not side by side. The leading thumb presses the tissue inward and moves it; the second follows in the same track a little behind, keeping what has been picked up from slipping back. Without scratching the skin is part of the method: soft thumb, no nail, and a word to the patient before each track.
What lies beneath. The face is the one place in the body where muscles are anchored into the skin rather than onto bone, which is why dragging the skin loads the muscle bellies instead of sliding over them. So the treatment loads real muscle; whether it reaches a nerve whose injury sits inside a bony canal in the skull has not been shown. Offer it alongside medical care, never in place of it.
Teeth Points — दांतों के दर्द के लिए पॉइंट्स
This treatment is to be taught to the patient, and tell them to press and release at the points shown in the figure.
For the upper teeth, press at the points above the ear and below the eyes. To find the point above the ear, tell the patient to clench their teeth; at that moment, placing the hand above the temple, the muscles will be felt moving at one place. Wherever pain is felt there, press at that place and do clockwise.
For the lower teeth, at the points below the chin and below the jaws, wherever pain is felt, stroke in the direction of the clock's hand at that place.
Treat on the same side as the side on which the teeth hurt.
Doing it on and off through the day, rather than continuously, will bring relief sooner.
| Patient's position | Seated; the treatment is taught to the patient to do themselves Seated |
|---|---|
| Where the hands are placed | Upper teeth: the point above the ear — found by asking the patient to clench the teeth and feeling where the muscles move — and the point below the eyes. Lower teeth: below the chin and below the jaws. Wherever pain is felt |
| Duration and repetitions | Press and release, then clockwise; no count is given. Doing it on and off through the day, rather than continuously, will bring relief sooner |
| What it is for | Pain of the teeth — upper and lower separately, on the same side as the side on which the teeth hurt Left Right |
This is a point you give away, so the teaching of it is the treatment.
What lies beneath. The bunch that rises when the jaw clenches is the fan-shaped muscle of the temple; below the cheekbone is the thick slab doing the same work from the other direction. Both are run by the lower division of the great nerve of the face — the same division that carries sensation from the lower teeth — while the upper teeth are served by the division above it. Hence something a therapist meets constantly: pain from a clenching jaw muscle is very commonly reported as toothache.
Jaw Points — जॉ पॉइंट्स
On both cheeks, as shown in the figure, press and release at the point marked near the mandibular bone.
This is excellent for pains of the teeth and the gums.
| Patient's position | Seated Seated |
|---|---|
| Where the hands are placed | The marked point on both cheeks, near the mandibular bone — at the angle of the jaw Both sides |
| Duration and repetitions | Press and release; no count is given |
| What it is for | Pains of the teeth and the gums |
What lies beneath. The point sits on the thick slab that closes the jaw, from the cheekbone to the angle of the jawbone — the commonest site in the head for the pain of clenching. Muscle work can quieten a jaw; it cannot treat a gum.
Teeth Points is taught to the patient and given on the painful side only; Jaw Points is a marked station given by the therapist on both cheeks.
Lacrimal Point — लैक्रिमल पॉइंट · (30) Lacrimal duct
Wrapping a soft, fine handkerchief around your thumb and second finger, use them to press inward and release the part beside the nose, adjacent to the upper eye.
This is generally done only thirty times. So on the card one writes (30) Lacrimal duct.
This is an excellent remedy for dryness in the eyes, for water constantly coming from the eyes, and for correcting glaucoma.
| Patient's position | Seated, eyes closed Seated |
|---|---|
| Where the hands are placed | The thumb and second finger, both wrapped in a soft fine handkerchief, on the part beside the nose, adjacent to the upper eye — the inner corner — pressing inward and releasing Both sides |
| Duration and repetitions | Only thirty times — the count that gives the card its written form, (30) Lacrimal duct |
| What it is for | Dryness in the eyes; water constantly coming from the eyes; correcting glaucoma |
The count is written into the name. This point carries thirty of its own, recorded as part of the point's name: the bracket in (30) Lacrimal duct is not somebody's choice — it is the point.
The handkerchief keeps a nail away from the thinnest skin on the body, stops a finger slipping onto the eye, and is hygiene. Tell the patient before you come in, and have them close the eyes.
What lies beneath. At the inner corner of each eye two tiny openings lead into channels carrying tears into a small sac behind the corner, and from there down a duct into the nose.
The sinuses and the head — Sinus Point and Satnam
One four-stage circuit, and one hold that runs brow to neck
Sinus Point — साइनस पॉइंट
Standing in front of the patient, place your palms on their face so that the fingers are near the temples and the thumbs are below the eyes, near the bone of the nose.
First, with your thumbs, press the skin of the sinus cavity and draw it from the nose towards the ears.
Then press the skin on both sides of the nose from below upward, and draw it.
Then change the position of the palms, placing them a little higher, and with the thumbs press the skin on the eyebrow, take it to the outer corners of the eyes, and rotate the skin round and round, then release.
Then from near the corners of the eyes, going downward and turning inward, bring it back to the sinus cavity of the nose, and there, without letting go of the muscles, press from both sides of the nose and draw towards the cheeks.
| Patient's position | Seated; the therapist standing in front, palms on the face, fingers near the temples, thumbs below the eyes near the bone of the nose Seated |
|---|---|
| Where the hands are placed | Four thumb-sweeps: (1) the skin of the sinus cavity, from the nose towards the ears; (2) the skin on both sides of the nose, from below upward; (3) the palms moved a little higher, the skin on the eyebrow taken to the outer corners of the eyes and rotated round and round; (4) from near the corners of the eyes, downward and turning inward, back to the sinus cavity of the nose, and from both sides of the nose drawn towards the cheeks Both sides |
| Duration and repetitions | A continuous four-stage circuit; no count is given. Between stages 3 and 4 the muscles are not let go |
| What it is for | The sinuses — the sinus cavity is named directly |
This is a circuit, not four points — one loop beginning and ending beside the nose, and the muscles are not let go between stages 3 and 4. Tell the patient before each stage.
What lies beneath. The sinuses are air-filled caves inside the bones of the face, each draining through an opening the width of a pencil lead, deep inside rigid bone. A thumb on a cheek cannot drain one. What the circuit does do is well designed for something else: just below the rim of the eye socket, above the inner end of the eyebrow and beside the nose, the nerves carrying sensation from the front of the face come out of the bone through small holes, and stages 1, 2 and 3 pass directly over those exits.
Satnam — सतनाम
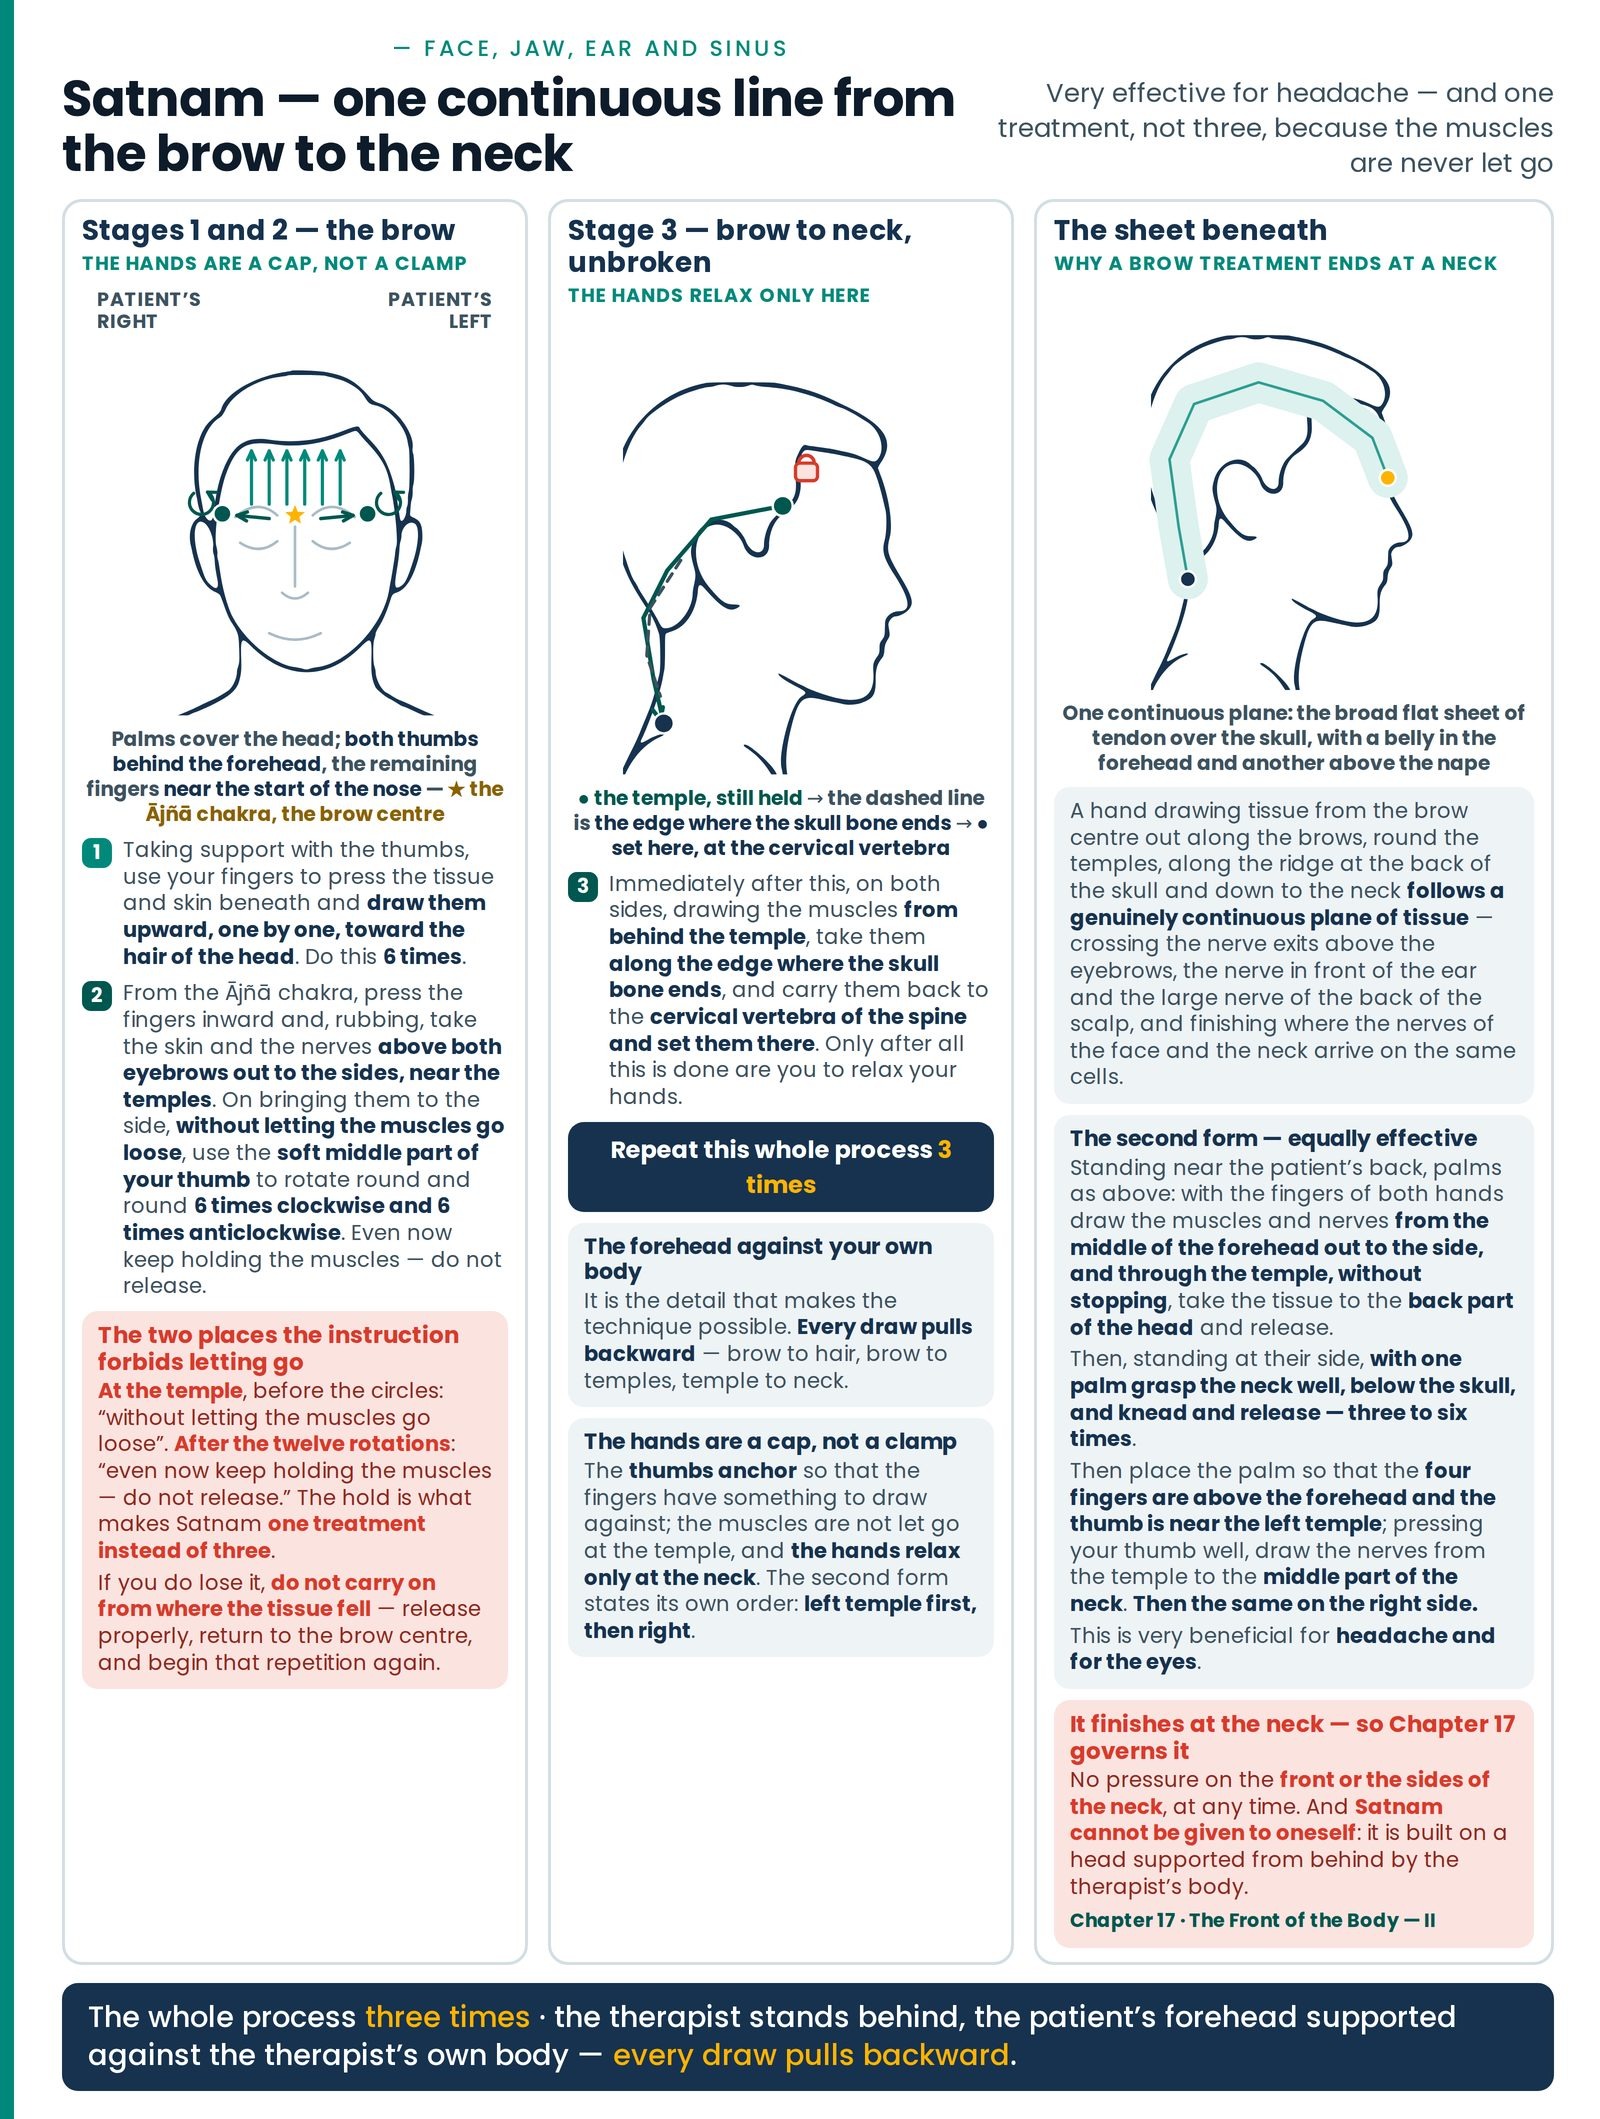
This treatment is very effective for headache. It has the following stages. (Figure 19.5)
- 1. Stand behind the patient, supporting their forehead against your own body. With your palms, cover their head so that both thumbs are behind the forehead and the remaining fingers are near the start of the nose — the Ājñā chakra …
… Taking support with the thumbs, use your fingers to press the tissue and skin beneath and draw them upward, one by one, toward the hair of the head. Do this 6 times.
2. After this, from the Ājñā chakra, press the fingers inward and, rubbing, take the skin and the nerves above both eyebrows out to the sides, near the temples. On bringing them to the side, without letting the muscles go loose, use the soft middle part of your thumb to rotate round and round 6 times in the direction of the clock's needle, and 6 times in the opposite direction. Even now keep holding the muscles — do not release.
- 3. Immediately after this, on both sides, drawing the muscles from behind the temple, take them along the edge where the skull bone ends, and carry them back to the cervical vertebra of the spine and set them there. Only after all this is done are you to relax your hands.
- 4. Repeat this whole process 3 times.
Another form of this same treatment is equally effective:
Standing near the patient's back, place the palms as above. Then, with the fingers of both hands, draw the muscles and nerves from the middle of the forehead out to the side, and through the temple, without stopping, take the tissue to the back part of the head and release. This also gives relief.
After this, standing at their side, with one palm grasp the neck well, below the skull, and knead and release. This may be done three to six times.
Place the palm so that the four fingers are above the forehead and the thumb is near the left temple. Then, pressing your thumb well, with pressure draw the nerves from the temple and bring them to the middle part of the neck. Then do the same on the right side.
This is very beneficial for headache and for the eyes.
| Patient's position | Seated, the therapist standing behind, the patient's forehead supported against the therapist's own body Seated |
|---|---|
| Where the hands are placed | Palms covering the head, both thumbs behind the forehead, the remaining fingers near the start of the nose (the Ājñā chakra). Then: the fingers draw the tissue and skin upward toward the hair; from the Ājñā chakra the skin and nerves above both eyebrows are taken out to the temples; the soft middle part of the thumb rotates at the temple; then the muscles are drawn from behind the temple, along the edge where the skull bone ends, back to the cervical vertebra of the spine, and set there. Second form: palms as above, muscles drawn from the middle of the forehead through the temple to the back of the head and released; then one palm grasping the neck below the skull, kneading and releasing; then four fingers above the forehead, thumb near the left temple, drawing the nerves from the temple to the middle part of the neck, then the same on the right Both sides Left Right |
| Duration and repetitions | Stage 1 6 times; stage 2 6 times clockwise and 6 times anticlockwise at each temple, without releasing the muscles; stage 3 once, continuous; the whole process 3 times. Second form: kneading the neck three to six times, then the thumb-draw on the left side and then the right × 3 |
| What it is for | Very effective for headache; the second form is very beneficial for headache and for the eyes |
The forehead against your own body is the detail that makes the technique possible. Every draw pulls backward — brow to hair, brow to temples, temple to neck.
The hands are a cap, not a clamp. The thumbs anchor so the fingers have something to draw against; the muscles are not let go at the temple, and even now keep holding after the twelve rotations; the hands relax only at the neck. And the second form states its own order: left temple first, then right.
What lies beneath. Over the top of the skull runs a broad flat sheet of tendon, with a muscle belly at the front in the forehead and another at the back above the nape, continuous at the sides with the fascia over the temple. It is one sheet. So a hand drawing tissue from the brow centre out along the brows, round the temples, along the ridge at the back of the skull and down to the neck follows a genuinely continuous plane of tissue — crossing the nerve exits above the eyebrows, the nerve in front of the ear and the large nerve of the back of the scalp, and finishing where the nerves of the face and the neck arrive on the same cells. That is the best explanation of why a treatment beginning at an eyebrow should end at a neck.
The ear — four stations, left ear first
Six, six, press-pause-release, and forty-five degrees in and up
Ear Points — कान के पॉइंट
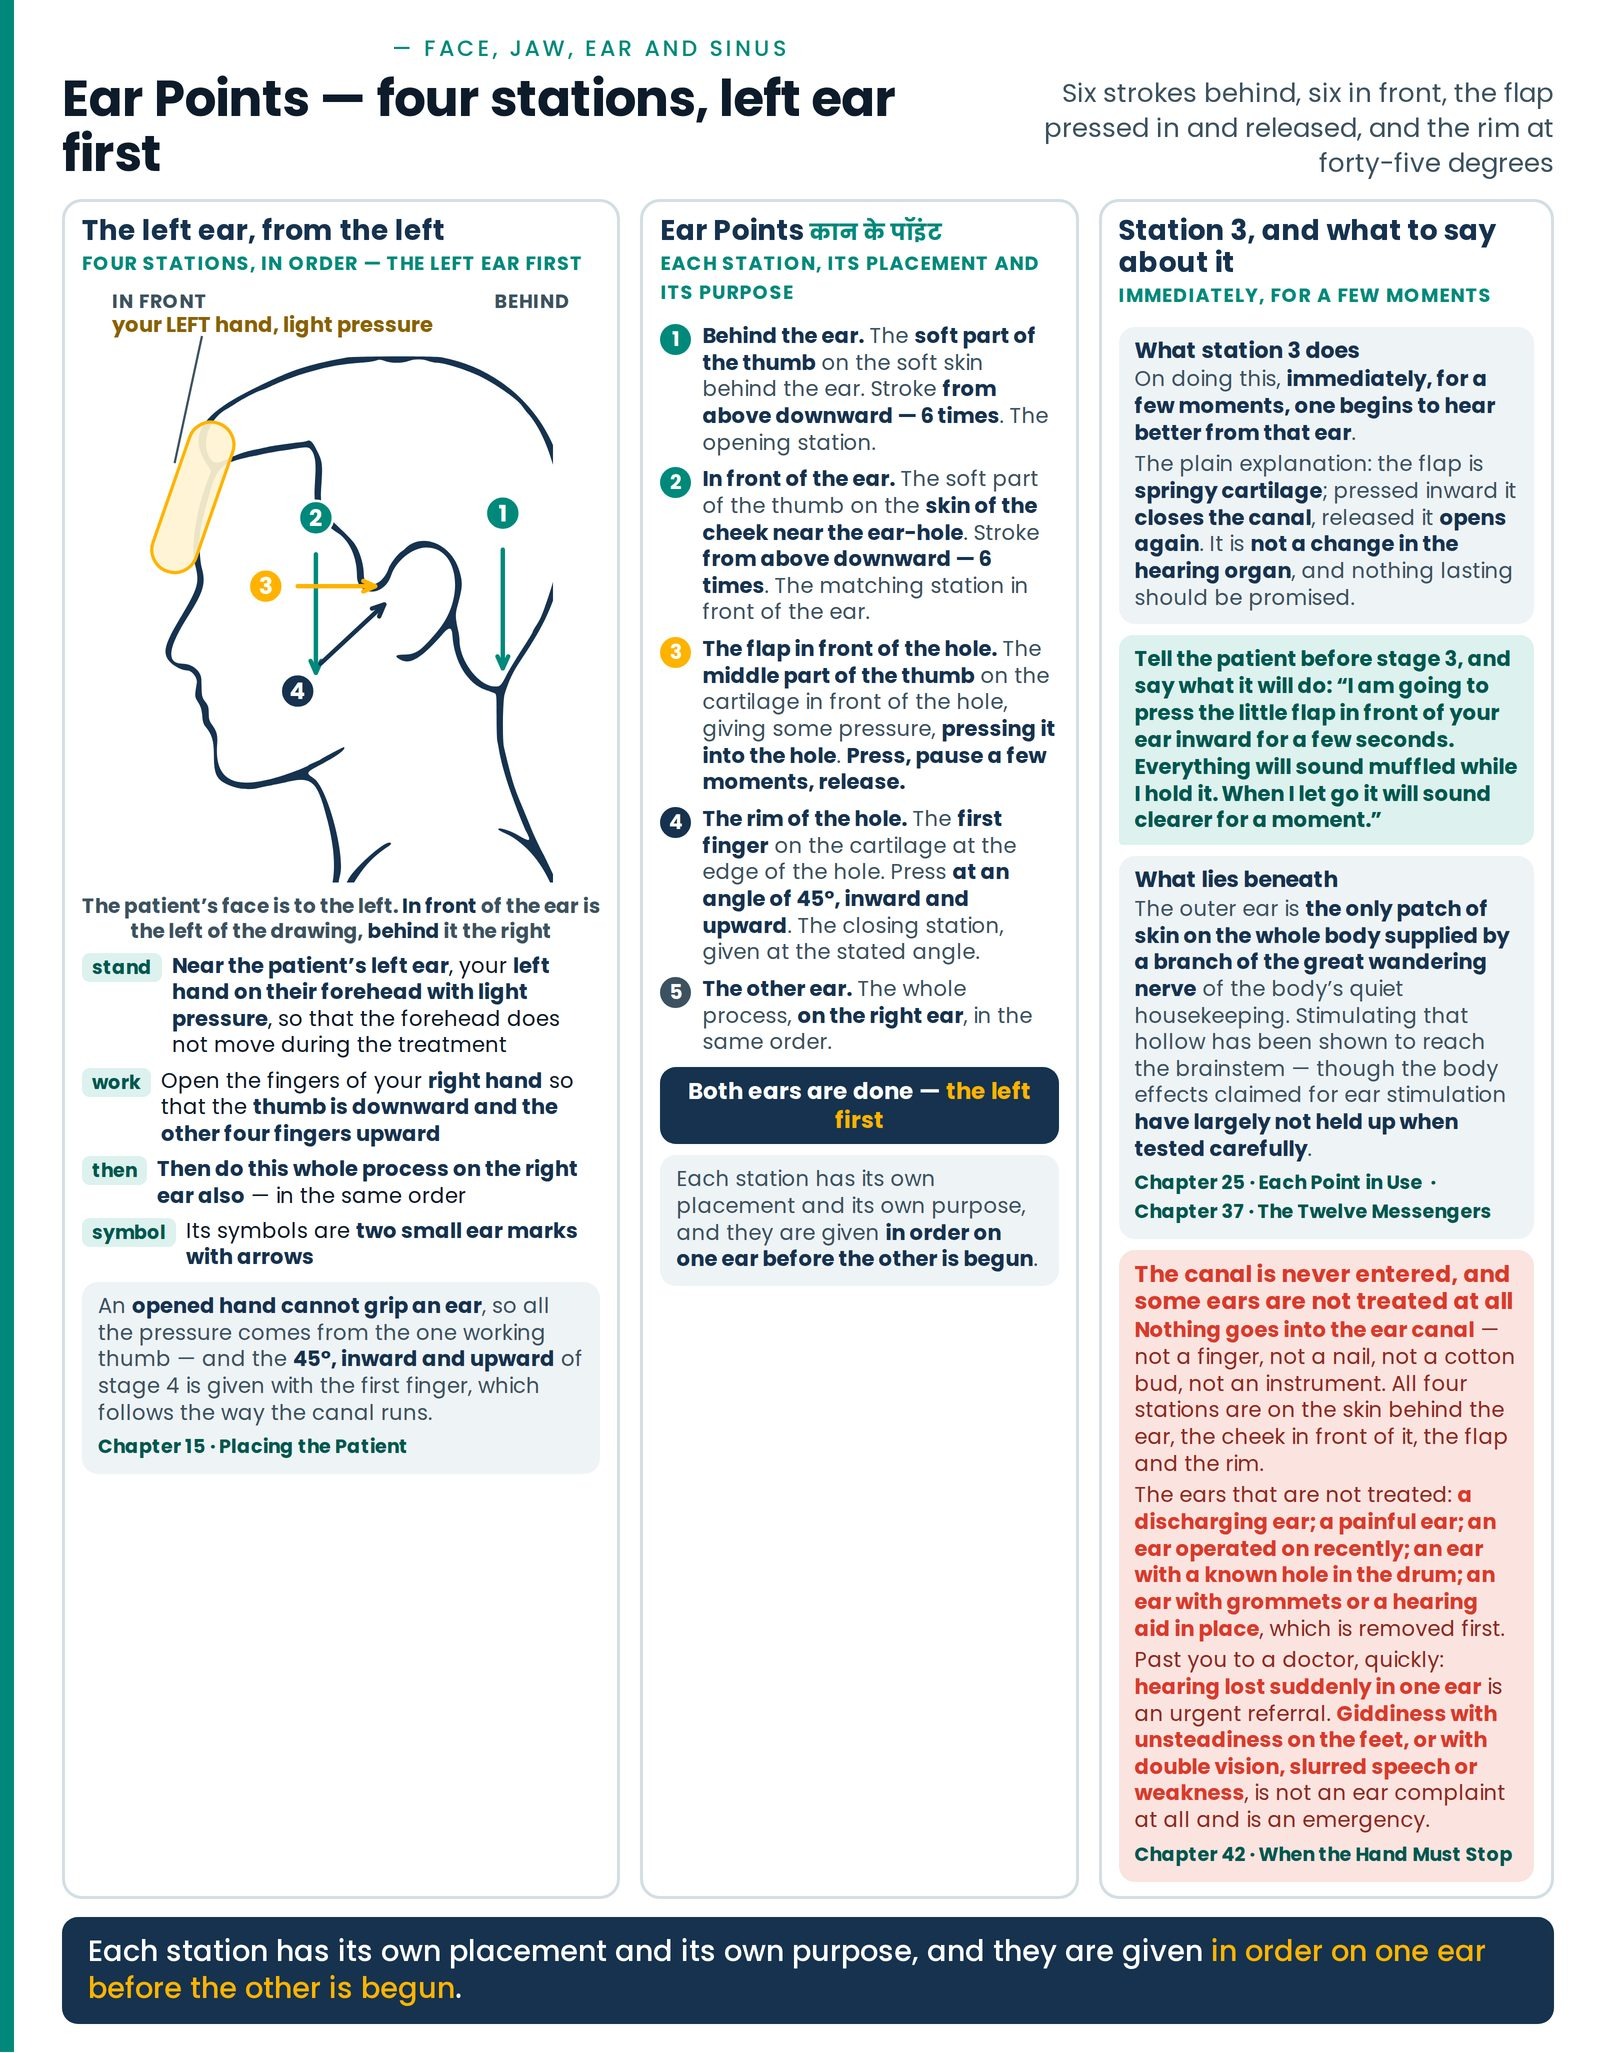
Its symbols are → two small ear marks with arrows.
Stand near the patient's left ear and place your left hand on their forehead with light pressure, so that their forehead does not move during the treatment. The treatment has the following stages: (Figure 19.6)
Open the fingers of your right hand so that the thumb is downward and the other four fingers upward. Then with the soft part of your thumb, stroke the soft skin behind their ear 6 times, from above downward.
Then stroke the skin of the cheek near the ear-hole 6 times, from above downward.
With the middle part of the thumb, giving some pressure, press the cartilage in front of the hole and press it into the hole; pause for a few moments and release. On doing this, immediately, for a few moments, one begins to hear better from that ear.
With your first finger, press the cartilage at the edge of the hole at an angle of 45°, inward and upward.
Then do this whole process on the right ear also.
| Patient's position | Seated; the therapist standing near the patient's left ear, the left hand on the forehead with light pressure so that the forehead does not move Seated Left |
|---|---|
| Where the hands are placed | The right hand opened, thumb downward and the other four fingers upward; the four stations are set out separately below |
| Duration and repetitions | Stages 1 and 2: 6 strokes each, from above downward. Stage 3: press, pause a few moments, release. Stage 4: the angled press. Then the whole process on the right ear also Left Right |
| What it is for | On stage 3, immediately, for a few moments, one begins to hear better from that ear |
Each station has its own placement and its own purpose, and they are given in order on one ear before the other is begun.
| Where the hand goes | How | What it is for | |
|---|---|---|---|
| 1 · Behind the ear | The soft part of the thumb on the soft skin behind the ear | Stroke from above downward — 6 times | The opening station: the skin behind the ear, worked downward |
| 2 · In front of the ear | The soft part of the thumb on the skin of the cheek near the ear-hole | Stroke from above downward — 6 times | The matching station in front of the ear |
| 3 · The flap in front of the hole | The middle part of the thumb on the cartilage in front of the hole, giving some pressure, pressing it into the hole | Press, pause a few moments, release | Immediately, for a few moments, one begins to hear better from that ear |
| 4 · The rim of the hole | The first finger on the cartilage at the edge of the hole | Press at an angle of 45°, inward and upward | The closing station, given at the stated angle |
| 5 · The other ear | The whole process, on the right ear | In the same order | Both ears are done — the left first |
Where you stand is part of it — near the patient's left ear, left hand on the forehead, right hand working, then across for the right. An opened hand cannot grip an ear, so all the pressure comes from the one working thumb; and the 45°, inward and upward of stage 4 is given with the first finger, which follows the way the canal runs.
Tell the patient before stage 3, and say what it will do. "I am going to press the little flap in front of your ear inward for a few seconds. Everything will sound muffled while I hold it. When I let go it will sound clearer for a moment."
What lies beneath — and here the anatomy is remarkable. The outer ear is the only patch of skin on the whole body supplied by a branch of the great wandering nerve of the body's quiet housekeeping. Stimulating that hollow has been shown to reach the brainstem — though the body effects claimed for ear stimulation have largely not held up when tested carefully.
Stage 3's effect has a plain explanation. The flap is springy cartilage; pressed inward it closes the canal, released it opens again. It is not a change in the hearing organ, and nothing lasting should be promised.
What this article hands to the next
The chair is folded away; the patient is laid on the side
That completes the treatments given with the patient seated. The atlas now changes position again: the patient is laid on their side, and a new group begins with positioning rules of its own — a pillow under the head in every one of them, pillows at the knees that differ from point to point, and a rule about which way the shoulder is turned. Those rules, and the Acid, Parkhoo, Fluid and vitamin points that follow, are taught at the head of On the Side, "On the Side". (Figure 19.7)
One whole layer of everything here has been left out deliberately: what each point is used for, and when it must not be used. That is Each Point in Use, "Each Point in Use". The formulas belong to — see also → How a Formula Is Built, "How a Formula Is Built", and Cranial Nerve and Brain Formulas, "The Twelve Messengers".
Questions students ask
- 1. I have never touched a stranger's face. How do I stop feeling as though I am intruding? By saying out loud what you are about to do, every time, before you do it. That turns an intrusion into a procedure — for the patient and for you. It is also the technique: an unwarned face braces.
- 2. Brodmann's Area 17 & 18 Ghisai has no count. How do I know when to stop? By the two conditions written into it: until the muscles under the skin relax, and short of the point where the hair begins to be pulled. With thick or oiled hair, part it or work over a thin dry cloth.
- 3. Is a special hammer necessary? I cannot buy one. No — the instruction gives the alternative: the fingertips or the pads of the fingers, with the precaution that your nails do not touch the patient. Both versions still need the cloth on the forehead, and both keep clear of the ear.
- 4. How do I decide the direction for the facial point when the weakness is slight? By which side opens properly — where the eye closes, the brow lifts and the mouth pulls; you draw from there across to the weaker side. Decide it once, in daylight, and draw the symbol on the card. Never decide it afresh each week from memory.
- 5. I am a dentist. Why should a patient press a muscle when the tooth needs filling? They should not, and the wiki does not ask them to: these points are comfort while dental care is arranged, and the article sends swelling, fever, trismus or difficulty swallowing to you the same day.
- 6. Satnam is exhausting to give. May I let go and re-grip after the temple circles? No. The instruction forbids it twice, in those two places, because the continuous hold is what makes it one treatment. Set your feet first, keep wrists straight and elbows down, and take the tissue with a broad contact. If you lose it, return to the brow centre and start that repetition again.
- 7. A patient heard better after the ear point and asked whether her deafness is curable. Tell her what she felt was real and short-lived: pressing the flap closes the canal, releasing it opens it, and for a few moments hearing feels sharper by contrast — immediately, for a few moments, as the instruction says. If her hearing is genuinely reduced, she needs it tested.
8. My mother is eighty-four and cannot sit for long. Must I leave out the whole group? No. The seated group carries its own permission from Seated I — Brain, Medulla, Neck: if the patient is very ill or very weak, these treatments may also be given lying down. The facial, teeth, jaw, lacrimal and ear points adapt; Satnam and Shivaji do not, because both depend on the seated position. See also → The Child, the Elder and the Frail, "The Child, the Elder and the Frail".
Questions patients ask
- 1. "Why do you keep telling me what you are about to do? Just do it." Because your face is the one part of you that watches my hands coming. If you are expecting the touch, the muscles stay soft and the treatment works better; if you are not, you brace, and then I am working against you.
- 2. "My mouth has gone crooked since this morning. Can you fix it today?" Not today, and here is exactly why. A face that changes suddenly must be looked at by a doctor the same day, because some of the causes are treatable only in the first hours. I am writing down the time you noticed it, because that number matters to them. Go now, and come back afterwards.
- 3. "The eye doctor's drops have not helped my headache. Can I stop them and take this instead?" Please don't. They were never for your headache — they are for a pressure inside the eye that does not hurt and gives no warning, and the sight it takes cannot be given back. Keep the drops and the appointments, and let me treat the headache, which is my part of this.
- 4. "My tooth is killing me. If I press this point, do I still need the dentist?" Yes. What I am teaching you is something you can do at eleven at night when nothing is open, and it may take the edge off; it does not touch the reason the tooth hurts.
- 5. "You pressed my ear and I could hear better. Will that last?" No, and I would rather tell you than let you hope. Pressing the little flap closes the ear for a moment, and when I let go everything sounds sharper by comparison — the way stepping out of a noisy room makes a street seem quiet. If your hearing is genuinely reduced, get it properly tested.
Words used here
| Hindi | English | Neurotherapy code / usage |
|---|---|---|
| घिसाई | Rubbing — the rub, not the press | Brodmann's Area 17 & 18 Ghisai — the edge of the thumb; the limit is the hair |
| ब्रॉडमैन एरिया १७ · १८ | Brodmann's areas 17 and 18 | The inner circle (17) and the circle outside it (18), behind the head just above the neck |
| हैमरिंग | Hammering | Cloth on the forehead; hammer or finger pads, never nails; the ear is never struck. Symbol: a circle with one dot at its upper edge |
| शिवाजी | Shivaji | Base of the palm, clockwise; shoulder joint → side of chest → scapula → T6–L3 |
| — | Bell's palsy · the facial point | Both thumbs one behind the other, from the side that opens properly across to the other, finishing behind the hair. Symbols: arrows right or left |
| दांतों के दर्द के लिए पॉइंट्स | Points for pain of the teeth | Taught to the patient; upper above the ear and below the eyes, lower below the chin and jaws; same side as the pain |
| जॉ पॉइंट्स | Jaw points | Press and release near the mandibular bone, both cheeks |
| लैक्रिमल पॉइंट | The tear point | (30) Lacrimal duct — thumb and second finger in a soft fine cloth, beside the nose next to the upper eye, thirty times |
| साइनस पॉइंट | Sinus point | One four-stage circuit from in front; not released between stages 3 and 4 |
| सतनाम | Satnam — "the true name" | From behind, forehead supported against the therapist's body; ×6, then 6 + 6 at the temples, then to the cervical spine; ×3 |
| आज्ञा चक्र | The brow centre, between and above the eyebrows | Used in Satnam as a landmark |
| कान के पॉइंट | Ear points | Left ear first; 6 behind, 6 in front, the flap pressed in and released, the rim at 45° inward and upward |