Watch

Sinus Point — साइनस पॉइंट
Standing in front of the patient, place your palms on their face so that the fingers are near the temples and the thumbs are below the eyes, near the bone of the nose.
First, with your thumbs, press the skin of the sinus cavity and draw it from the nose towards the ears.
Then press the skin on both sides of the nose from below upward, and draw it.
Then change the position of the palms, placing them a little higher, and with the thumbs press the skin on the eyebrow, take it to the outer corners of the eyes, and rotate the skin round and round, then release.
Then from near the corners of the eyes, going downward and turning inward, bring it back to the sinus cavity of the nose, and there, without letting go of the muscles, press from both sides of the nose and draw towards the cheeks.
| Patient's position | Seated; the therapist standing in front, palms on the face, fingers near the temples, thumbs below the eyes near the bone of the nose Seated |
|---|---|
| Where the hands are placed | Four thumb-sweeps: (1) the skin of the sinus cavity, from the nose towards the ears; (2) the skin on both sides of the nose, from below upward; (3) the palms moved a little higher, the skin on the eyebrow taken to the outer corners of the eyes and rotated round and round; (4) from near the corners of the eyes, downward and turning inward, back to the sinus cavity of the nose, and from both sides of the nose drawn towards the cheeks Both sides |
| Duration and repetitions | A continuous four-stage circuit; no count is given. Between stages 3 and 4 the muscles are not let go |
| What it is for | The sinuses — the sinus cavity is named directly |
This is a circuit, not four points — one loop beginning and ending beside the nose, and the muscles are not let go between stages 3 and 4. Tell the patient before each stage.
What lies beneath. The sinuses are air-filled caves inside the bones of the face, each draining through an opening the width of a pencil lead, deep inside rigid bone. A thumb on a cheek cannot drain one. What the circuit does do is well designed for something else: just below the rim of the eye socket, above the inner end of the eyebrow and beside the nose, the nerves carrying sensation from the front of the face come out of the bone through small holes, and stages 1, 2 and 3 pass directly over those exits.
Satnam — सतनाम
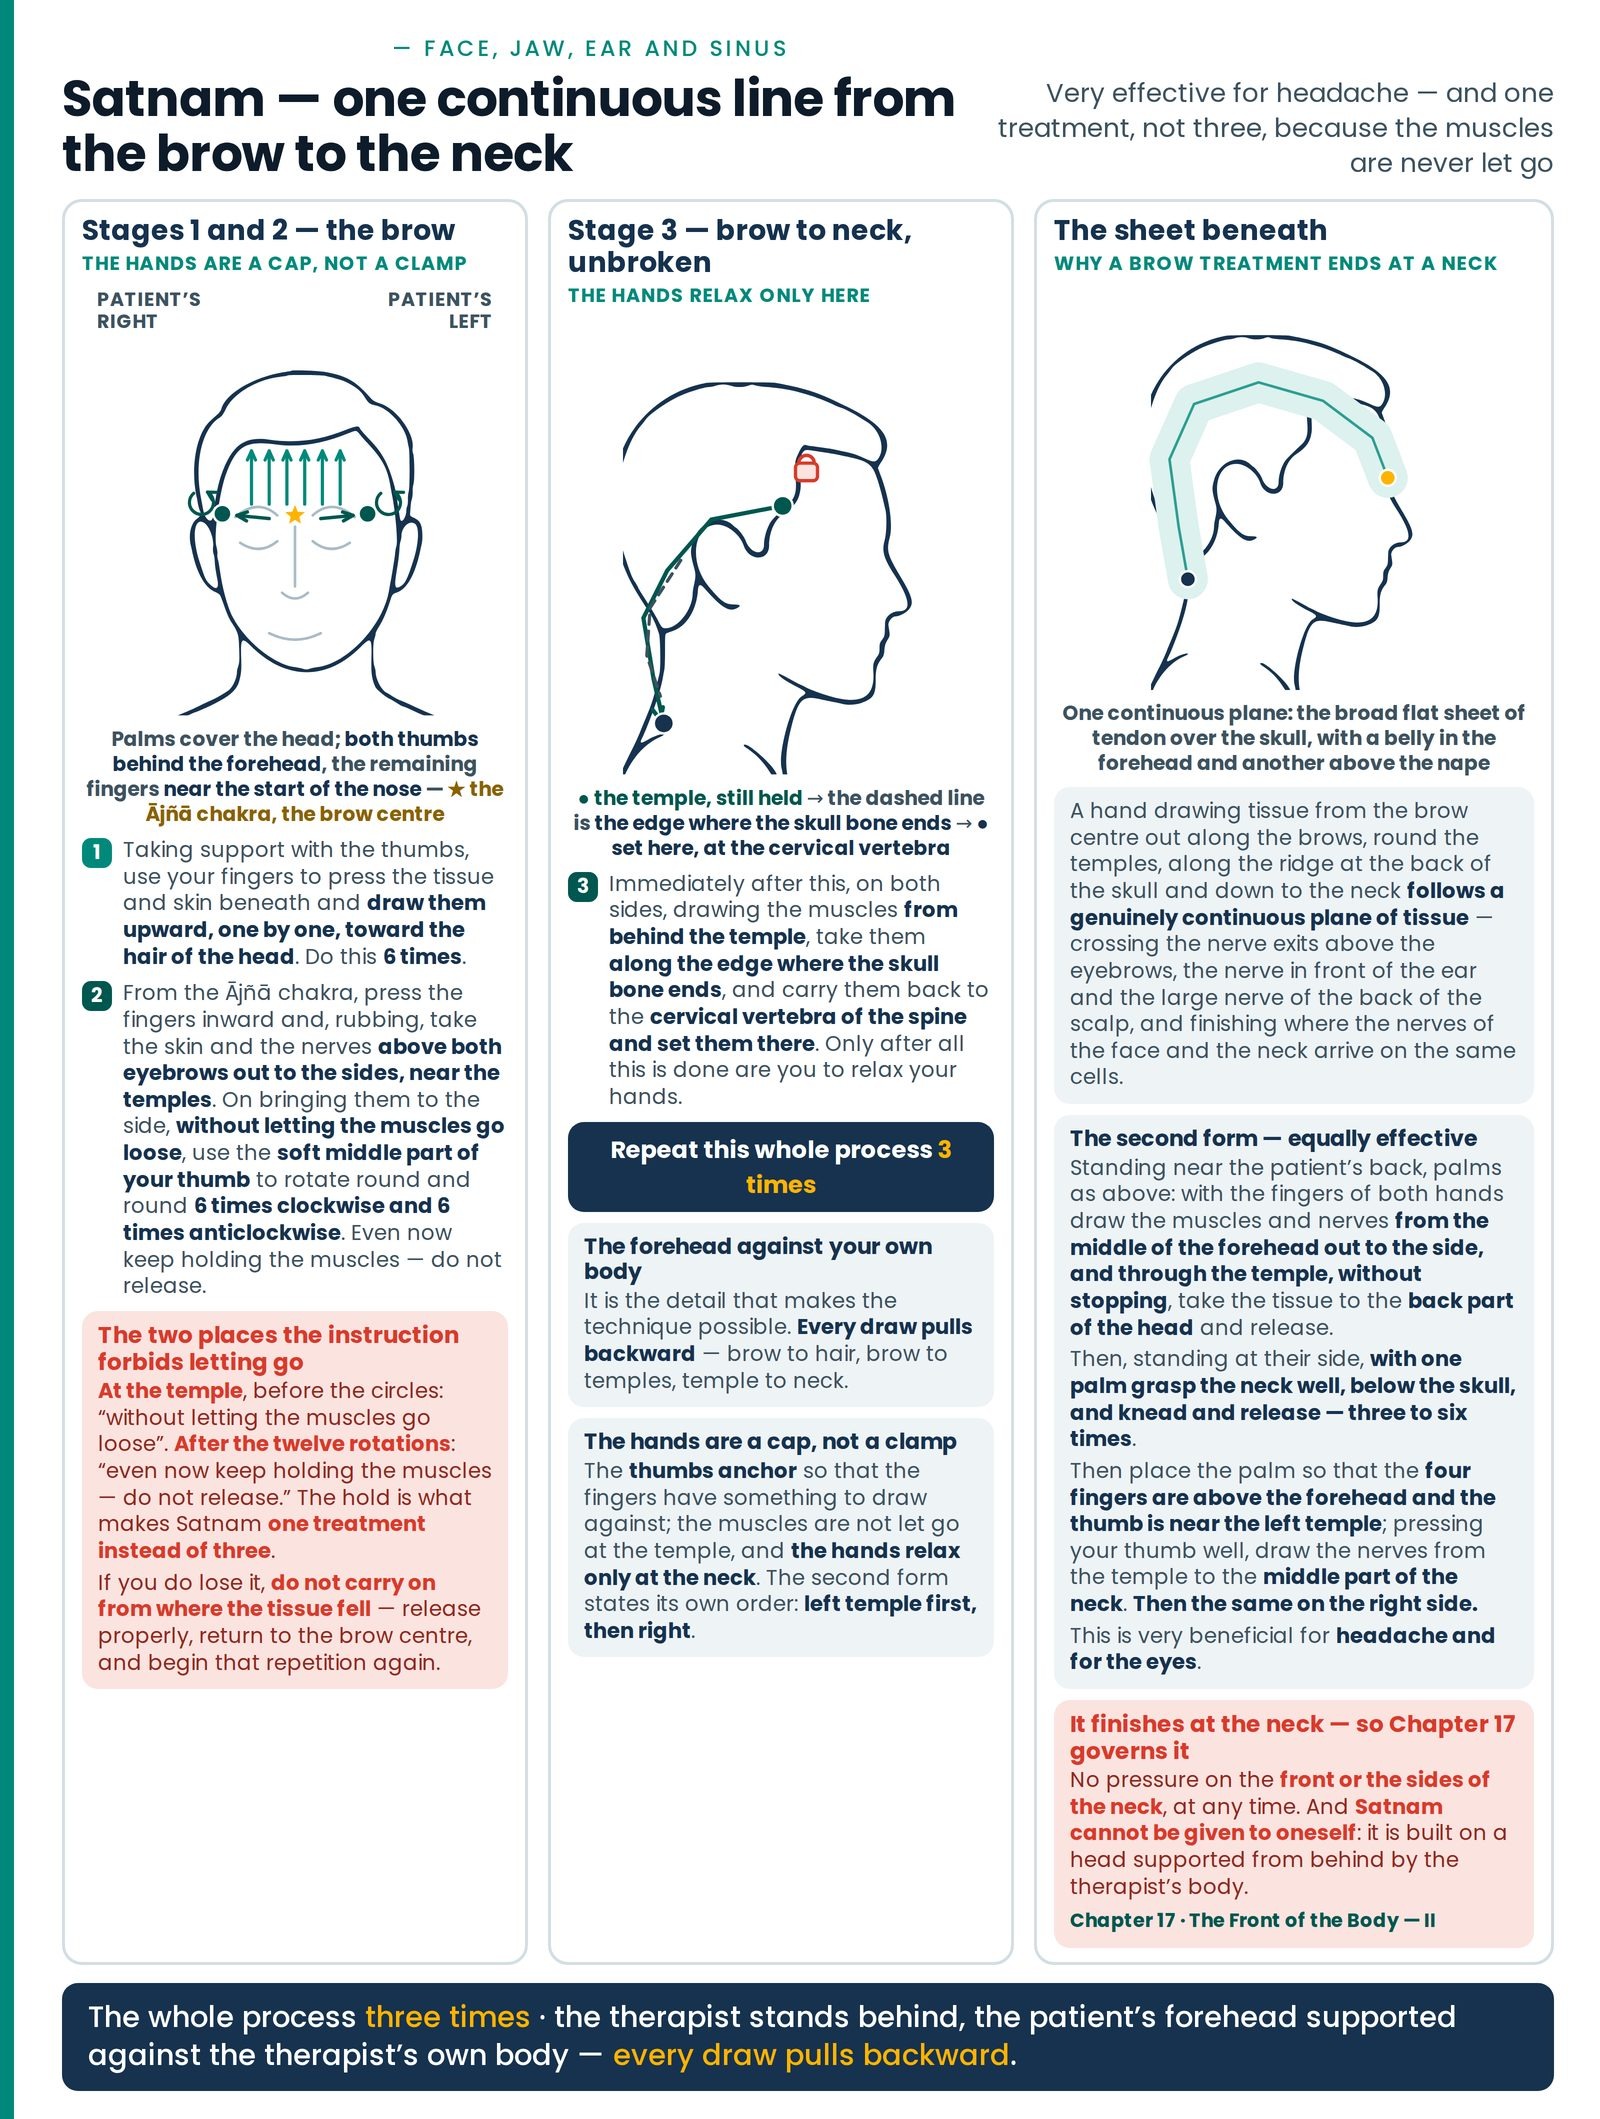
This treatment is very effective for headache. It has the following stages. (Figure 19.5)
- 1. Stand behind the patient, supporting their forehead against your own body. With your palms, cover their head so that both thumbs are behind the forehead and the remaining fingers are near the start of the nose — the Ājñā chakra …
… Taking support with the thumbs, use your fingers to press the tissue and skin beneath and draw them upward, one by one, toward the hair of the head. Do this 6 times.
2. After this, from the Ājñā chakra, press the fingers inward and, rubbing, take the skin and the nerves above both eyebrows out to the sides, near the temples. On bringing them to the side, without letting the muscles go loose, use the soft middle part of your thumb to rotate round and round 6 times in the direction of the clock's needle, and 6 times in the opposite direction. Even now keep holding the muscles — do not release.
- 3. Immediately after this, on both sides, drawing the muscles from behind the temple, take them along the edge where the skull bone ends, and carry them back to the cervical vertebra of the spine and set them there. Only after all this is done are you to relax your hands.
- 4. Repeat this whole process 3 times.
Another form of this same treatment is equally effective:
Standing near the patient's back, place the palms as above. Then, with the fingers of both hands, draw the muscles and nerves from the middle of the forehead out to the side, and through the temple, without stopping, take the tissue to the back part of the head and release. This also gives relief.
After this, standing at their side, with one palm grasp the neck well, below the skull, and knead and release. This may be done three to six times.
Place the palm so that the four fingers are above the forehead and the thumb is near the left temple. Then, pressing your thumb well, with pressure draw the nerves from the temple and bring them to the middle part of the neck. Then do the same on the right side.
This is very beneficial for headache and for the eyes.
| Patient's position | Seated, the therapist standing behind, the patient's forehead supported against the therapist's own body Seated |
|---|---|
| Where the hands are placed | Palms covering the head, both thumbs behind the forehead, the remaining fingers near the start of the nose (the Ājñā chakra). Then: the fingers draw the tissue and skin upward toward the hair; from the Ājñā chakra the skin and nerves above both eyebrows are taken out to the temples; the soft middle part of the thumb rotates at the temple; then the muscles are drawn from behind the temple, along the edge where the skull bone ends, back to the cervical vertebra of the spine, and set there. Second form: palms as above, muscles drawn from the middle of the forehead through the temple to the back of the head and released; then one palm grasping the neck below the skull, kneading and releasing; then four fingers above the forehead, thumb near the left temple, drawing the nerves from the temple to the middle part of the neck, then the same on the right Both sides Left Right |
| Duration and repetitions | Stage 1 6 times; stage 2 6 times clockwise and 6 times anticlockwise at each temple, without releasing the muscles; stage 3 once, continuous; the whole process 3 times. Second form: kneading the neck three to six times, then the thumb-draw on the left side and then the right × 3 |
| What it is for | Very effective for headache; the second form is very beneficial for headache and for the eyes |
The forehead against your own body is the detail that makes the technique possible. Every draw pulls backward — brow to hair, brow to temples, temple to neck.
The hands are a cap, not a clamp. The thumbs anchor so the fingers have something to draw against; the muscles are not let go at the temple, and even now keep holding after the twelve rotations; the hands relax only at the neck. And the second form states its own order: left temple first, then right.
What lies beneath. Over the top of the skull runs a broad flat sheet of tendon, with a muscle belly at the front in the forehead and another at the back above the nape, continuous at the sides with the fascia over the temple. It is one sheet. So a hand drawing tissue from the brow centre out along the brows, round the temples, along the ridge at the back of the skull and down to the neck follows a genuinely continuous plane of tissue — crossing the nerve exits above the eyebrows, the nerve in front of the ear and the large nerve of the back of the scalp, and finishing where the nerves of the face and the neck arrive on the same cells. That is the best explanation of why a treatment beginning at an eyebrow should end at a neck.
The ear — four stations, left ear first
Six, six, press-pause-release, and forty-five degrees in and up