Three places ordinarily — but the rule is the bare space, not the count
Most treatments are given not at one spot but at a series running down a limb, and the places are called stations. Students want a number; the therapy gives one, then tells you the number is not the instruction.
Key teaching
How many places, and the rule that decides it
For Gas, Gas I, Gal, Spl, Liv, Mu, Lt. Ov., Rt. Ov. and WD, three places is enough for an ordinary person — but this depends on the length of the patient's thigh and the width of the therapist's foot.
The main issue is that no space should be left empty from one joint to the other joint.
a. For a tall patient, four places may be enough for an ordinary therapist — but if the therapist is a young child, then even five places may be needed, and that too is correct.b. For a very small child, even two places may be enough. c.This is a matter of experience.
And where both feet are on the patient: while giving WD and Pit, keep equal weight on both soles → pay attention to this. Both sides
Nobody tells a painter how many strokes; they tell him not to leave bare wood. Lay each contact where the last ended, work from the upper joint to the lower, and count afterwards — deciding the stations before any weight goes down, and writing the number you used on the card.
Position one — supine Supine
Rolled down onto the side, legs propped straight, pillow at the thighs
Printed along the foot of every page of the supine atlas, applying to all of them:
Key teaching
The standing pillow rule, and its two exceptions
Place the pillow at the proper place as needed — but never under the head, and never under the back. Supine ▲ Take care
Why not the head. Unless it is needed, no pillow should be placed under the head, so that the spine stays straight. A head lifted on a pillow flexes the neck and tilts the whole column out of the line your pressure travels along.
Why not the back. The pillow must not come under the patient's waist, or they may get back pain during or after the treatment. Supine on a firm floor the low back already sits in a slight arch, and a pillow there deepens it and holds it so all session. A pillow at the knees is a rest; a pillow at the waist is a strain held for half an hour.
First stated exception — the head, in one named circumstance. Those who have cervical spondylosis may become giddy while taking the Pan treatment. They may be given a thin pillow under the head. Note every qualifier: cervical spondylosis, the Pan treatment, giddiness, a thin pillow.
Second stated exception — the head, for a whole position. In all the side-lying treatments a pillow under the head is needed, so the neck rests comfortably; for those who have neck pain or cervical spondylosis this precaution is compulsory. The rule against a head pillow belongs to the supine atlas; it does not travel onto the side.
The back has no exception. While treating on the chest, take care that no pillow lies under the back. None. A pillow there arches the ribcage up into your pressure, and the chest wall takes your load with no give left and the spine acting as a fulcrum. ▲ Take care
Before You Touch Anyone carries the full pillow table, treatment by treatment — one under both thighs for Pan and Gal–Spl; two for Liv⁰ and Mu⁰, the second under the shoulder with its edge against the side of the chest and not pushed in; a flat uniform pillow under the hand for the arm treatments; as a rule none for WD. The principle belongs here: a pillow is not comfort, it is positioning, and a treatment given without its pillow is a different treatment.
Where the therapist stands, supine. Five stances cover the group. Astride at the joint of thigh and waist, for both thighs or one thigh from hip to knee — Pan, Gal, Spl. Both sides Astride at hip level, one foot to an arm and one to a thigh — Liv Left , Mu Right , Liv⁰, Mu⁰. At the head end, feet either side of the neck, for both arms elbow to wrist — WD, the feet brought to the elbows one by one. At the shoulder, heels turned in, for the armpit and chest. ▲ Take care And beside the heel, standing, for the legs and feet raised by hand — ONS, raised only to the height of your own standing hands.
The points belong to The Front of the Body I, "The Front of the Body — I", and The Front of the Body II, "The Front of the Body — II". Notice the pattern: you stand at the joint above what you are treating and work downward toward the joint below — hip to knee, elbow to wrist, the way the muscles run and the drainage goes.
Position two — seated Seated
Feet flat, back supported — and lying down if the patient is weak
The brain, medulla, neck, head, face, jaw, ear and sinus points are given on a chair, almost all of them with the hands. On the mat the governing questions are balance and weight; on the chair they are the height of your own hands, the patient's neck and your fingernails.
Key teaching
The seated position has a stated alternative
If the patient is very ill or very weak, these treatments may also be given lying down.
That is a rule, not a concession, and it carries through the whole seated group: a patient who cannot sit unsupported for fifteen minutes spends them holding herself up, recruiting every muscle from pelvis to jaw — including the ones you are treating.
One group crosses the other way. Organ Clearance can be given lying prone or seated on a chair, the therapist sitting on the patient's left side either way. And the standing and bending treatments are given seated on a chair, or laid straight — and if lying, the legs bent, both heels near the buttocks, both knees pointing up at the sky but somewhat apart from each other, the left leg first, then the right.
Where the therapist stands. Three stances, each named in the treatment that uses it: on the patient's left side — the commonest, for the neck and medulla work, the palm made round to cover both sides of the neck; behind, for the shoulder lifts, both hands over the tops of the shoulders; and in front, for the leg and standing treatments.
The Low Back The Low Back — the standing and bending treatments, seated or laid straight
Position three — side-lying Side-lying
Head, knees and shoulder: three things, and two of them differ
Students get this position wrong most often: a body on its side has three things to arrange — head, knees, shoulder — and two differ between treatments.
In all the treatments given lying on the side, give a pillow under the head as well, so that the neck rests comfortably on it.
Key teaching
The rule for the whole side-lying group
Especially for those who have neck pain or cervical spondylosis, this precaution is compulsory. Side-lying ▲ Take care
Lie on the floor on your side without one and the reason is plain: the head hangs toward the floor and the neck is held in a sideways bend by the muscles above it for as long as you stay there. On a stiff degenerative neck, half an hour of that is a treatment in itself — and not one you prescribed.
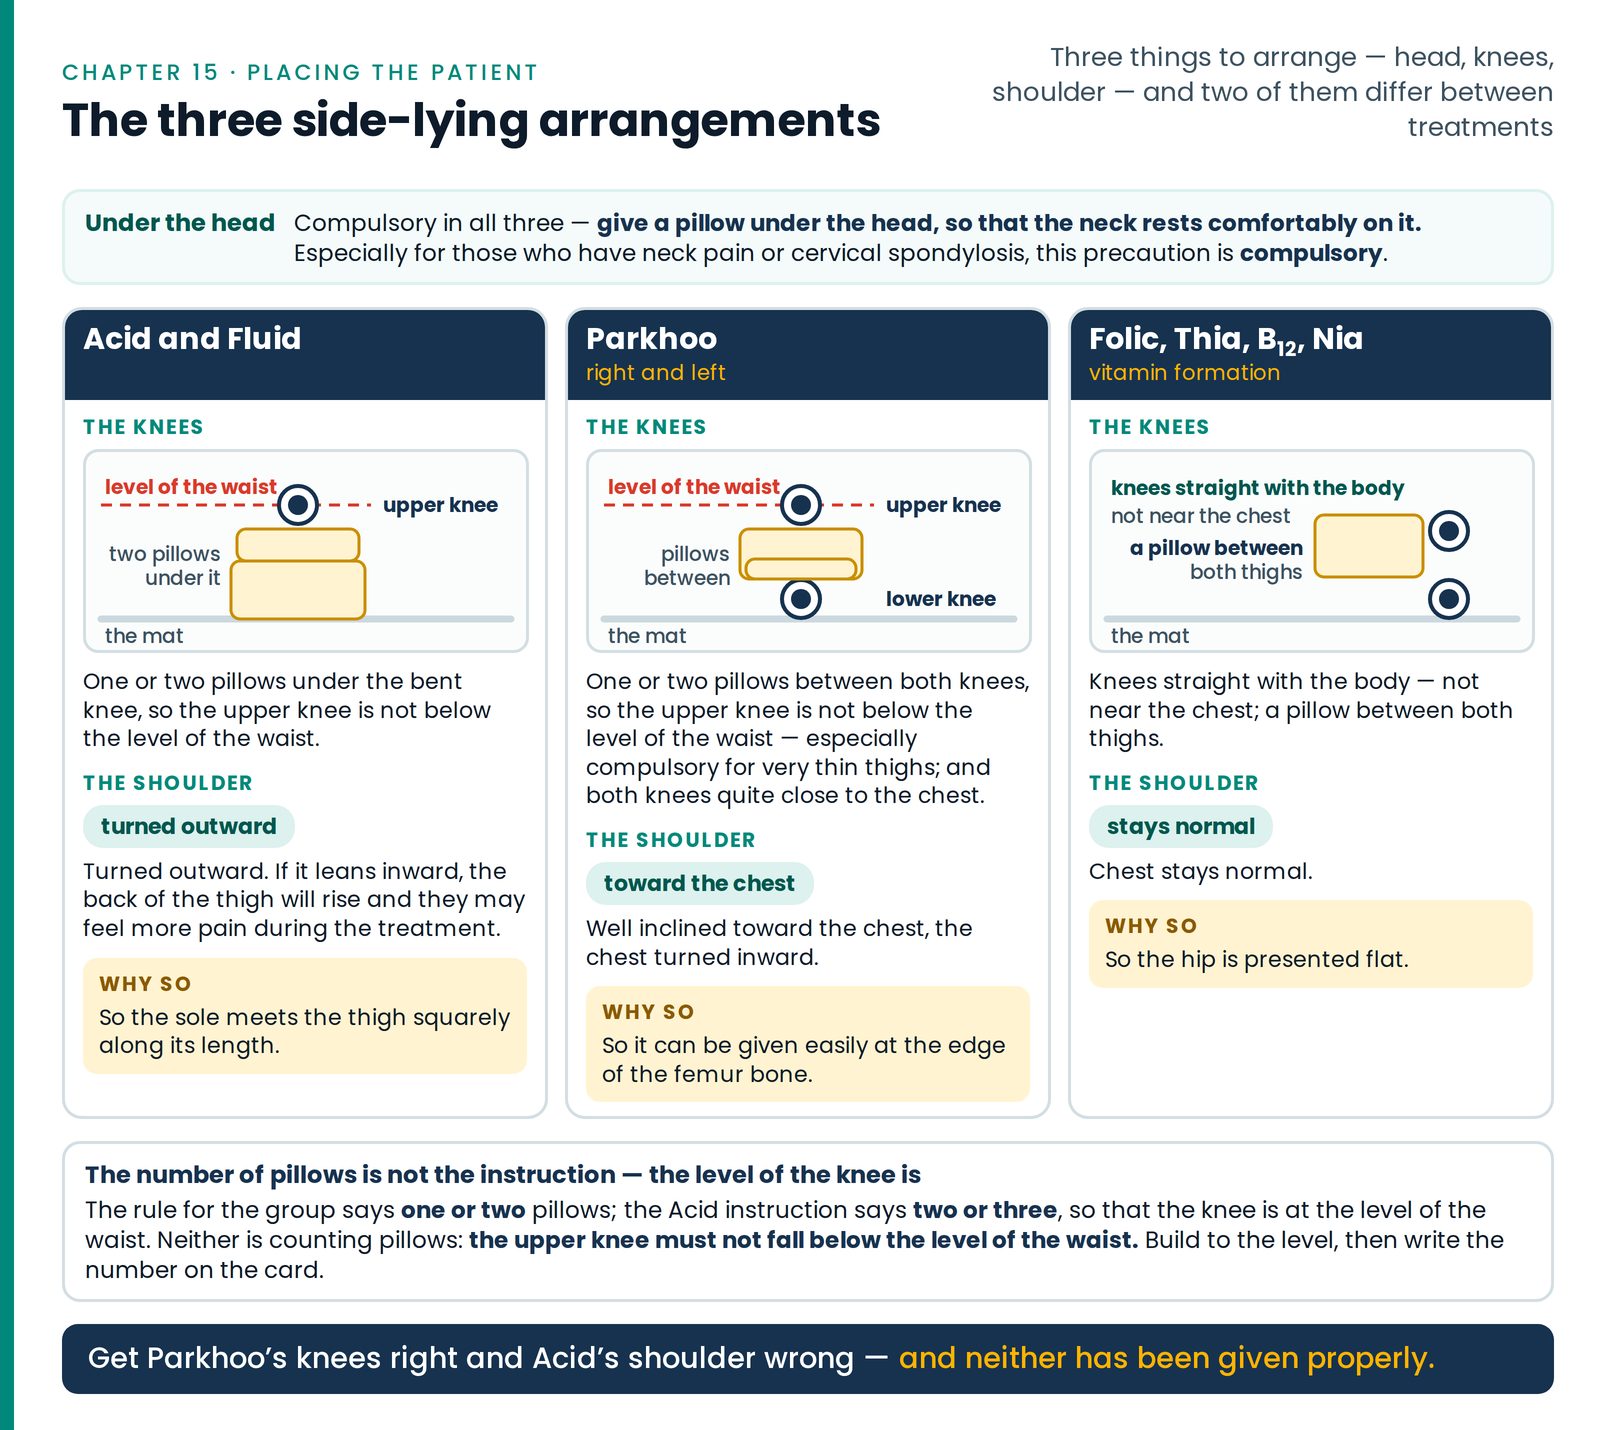
The three side-lying arrangements. Table 2 as a comparison: Acid and Fluid, Parkhoo right and left, and the vitamin group, each with its knee arrangement drawn against the level of the waist, its shoulder, and the reason given for it.
Read the second row across and you have this article in one line: three knee arrangements — under the bent knee, between both knees, straight with the body — and three shoulder arrangements, one the opposite of another. Get Parkhoo's knees right and Acid's shoulder wrong and neither has been given properly. (Figure 15.4)
Key teaching
The number of pillows is not the instruction — the level of the knee is
The rule for the group says one or two pillows. The Acid instruction says two or three pillows, so that the knee is at the level of the waist.
Neither is counting pillows. The instruction is a level: the upper knee must not fall below the level of the waist. On a broad-hipped woman with a firm pillow that is one; on a thin man with soft ones it is three. Build to the level, then write the number on the card.
And note whom the rule names: for those whose thighs are very thin the pillow between the knees is especially compulsory — there is nothing between the two knee bones to keep the upper leg up, and the pelvis rolls forward the moment you begin.
Turning her is done in one piece. Ask her to bend both knees while still on her back; lay her upper arm across her chest; then, with one hand at the shoulder and the other at the hip, roll the whole trunk as one unit — rolled shoulder-first, a trunk twists along its length. Then the head pillow, the knee pillows, the shoulder.
Position four — prone Prone
The 1½ pillows under the chest, compulsory on every page of the group
The back, the spine, the sacrum, the backs of the legs and the soles are worked face down. Prone carries the strictest pillow rule in the therapy, repeated as a footer on every page of the group because it is the one people skip.
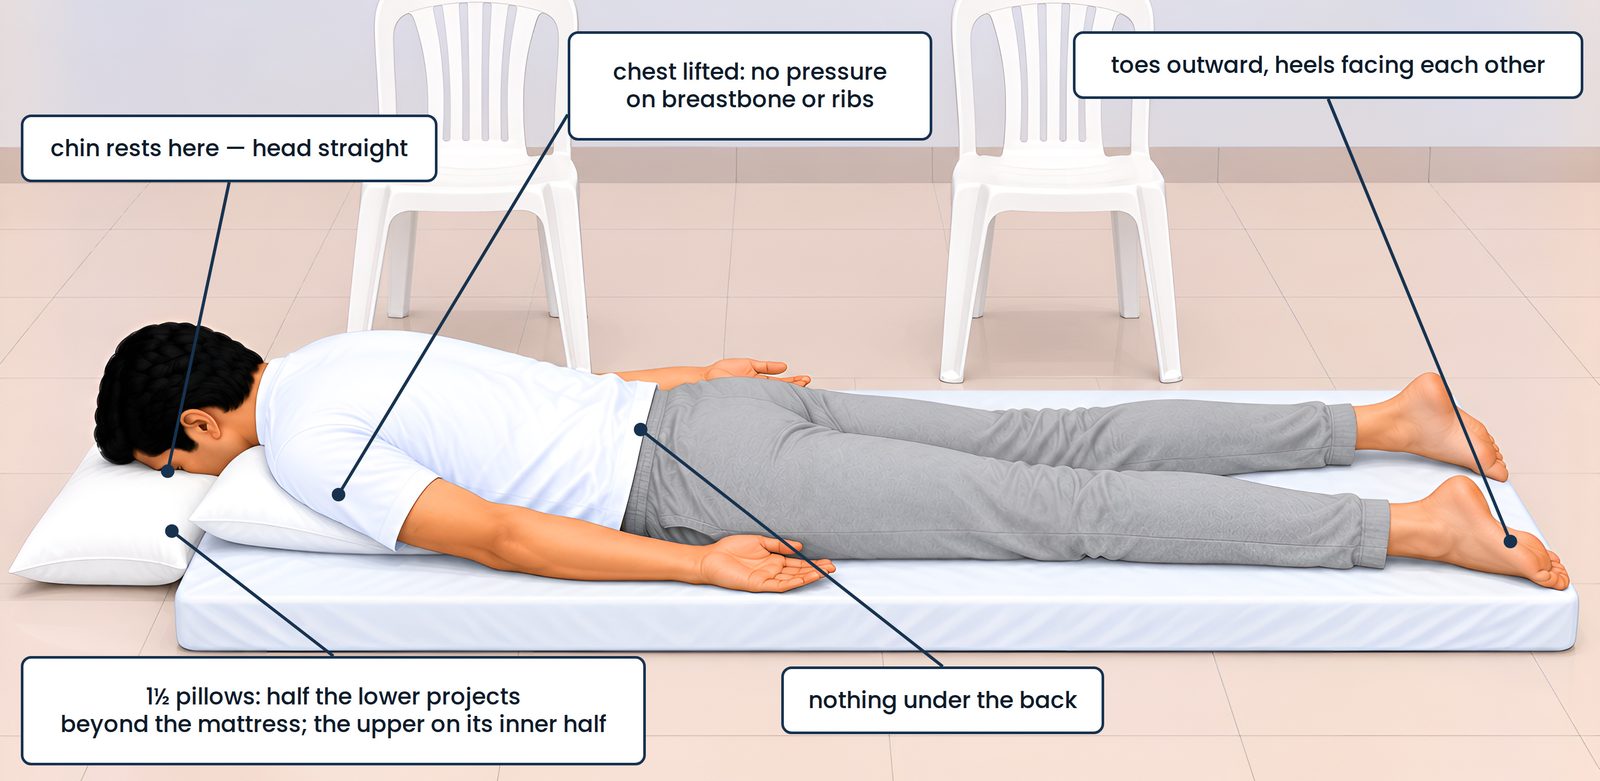
For the treatments given face down, putting 1½ pillows under the chest is compulsory — that is: (Figure 15.5)
Half of the lower pillow should stick out beyond the end of the mat.
Key teaching
The 1½ pillows — compulsory, and exactly what it means
The chest should rest on the upper pillow.
Their chin should rest comfortably on the lower pillow.
(Repeated on every single page of this group:) In all these treatments, do not forget to give 1½ pillows under the chest. Prone ▲ Take care
The chest is lifted so your pressure passes into the trunk rather than crushing the breastbone and rib cartilages against the floor; and the chin, resting forward on the projecting half-pillow, means the face points downward and the head stays straight — the neck is not turned to let the patient breathe.
Where the therapist stands, prone. Four stances, each named in the treatments using it: astride, feet on the ground between the waist and the thigh, the full weight on the hands with the chairs' support; standing comfortably near the waist, again with the weight on the hands; facing the other way, toward the patient's heels — the reverse of every other stance, stated as such where required; and sitting between the patient's feet, the heels facing each other.
The 1½ pillows, and a patient laid face down. The prone arrangement. The lower pillow lies crosswise with half of it projecting beyond the end of the mattress; the upper sits on its inner half. The chest rests on the upper pillow and the chin on the lower, so the face points downward and the head stays straight. The legs lie loose, toes outward, heels facing each other. Nothing is under the back.
Patients who must be treated by hand and not by foot
Small children, the very weak, osteoporosis — and those who cannot feel
The foot is the tool of an adult treatment. For four kinds of patient it is not the tool at all, and the substitution is a technique with its own rules.
Key teaching
How the hand is used on a very small child
Use the soft part of the palms, so laid that the whole palm rests on their thigh and the pressure is not felt as pressure. If the palm is held crooked, or pressure is given with the edge of the palm, or with the fingers, they will not bear it and will begin to cry.
Hear that the right way round. The crying is the measuring instrument — the only report you will get, and it reports one fault: a contact that has become narrow.
And the stations change with the size: for a very small child, even two places may be enough — the same rule, applied to a shorter thigh. × 3
For the elderly and the frail, four adjustments carry most of the way. Shorten the lever — work closer to the joint above. Support everything — every unsupported part is one she is holding up herself. Shorten the session, not the formula. Turn less.
Changing position in the middle of a formula
Group the card by position; change only in the gap between formulas
Any formula of length will move the patient at least once, and doing it without losing the sequence, count or timing rests on one decision taken before the session starts.
That last rule is arithmetic, not principle. Several treatments have a rest written into them: a pass at one station, then stop for one minute, then the next, through six. The vitamin group is counted 2, 4, 4 — press and release twice, after ten seconds four times, after ten seconds again four times. Those intervals are part of the treatment exactly as the six seconds are: a minute written into a formula is a minute of the treatment, not spare time.
Key teaching
What the gaps are for — all four kinds
1. The rest inside a formula.
Written into the treatment — stop for one minute, after ten seconds — and timed as precisely as the six-second hold; its work happens in the tissue during the interval, in the flush of blood that follows a release.
2. The gap between formulas. Where the position is changed, the chairs moved, the pillows re-laid, the patient re-draped.
3. The gap in which you speak. Ordinarily one does not talk to the patient during treatment. But when different formulas are given in one session, then in the gap after each formula one must certainly ask the patient how they are feeling.
4. The gap that makes the session bearable. For common ailments about thirty minutes a day is enough — and not continuously: according to the formula there may be gaps of a few minutes.
How a turn is performed. Tell her what is coming — "now I turn you onto your right side; do not help me." Re-drape before you move her; move her as one unit; head pillow, knees, shoulder; then place your chairs again and check your balance before any weight goes down. Under a minute rehearsed; three improvised in front of the patient. (Figure 15.6)
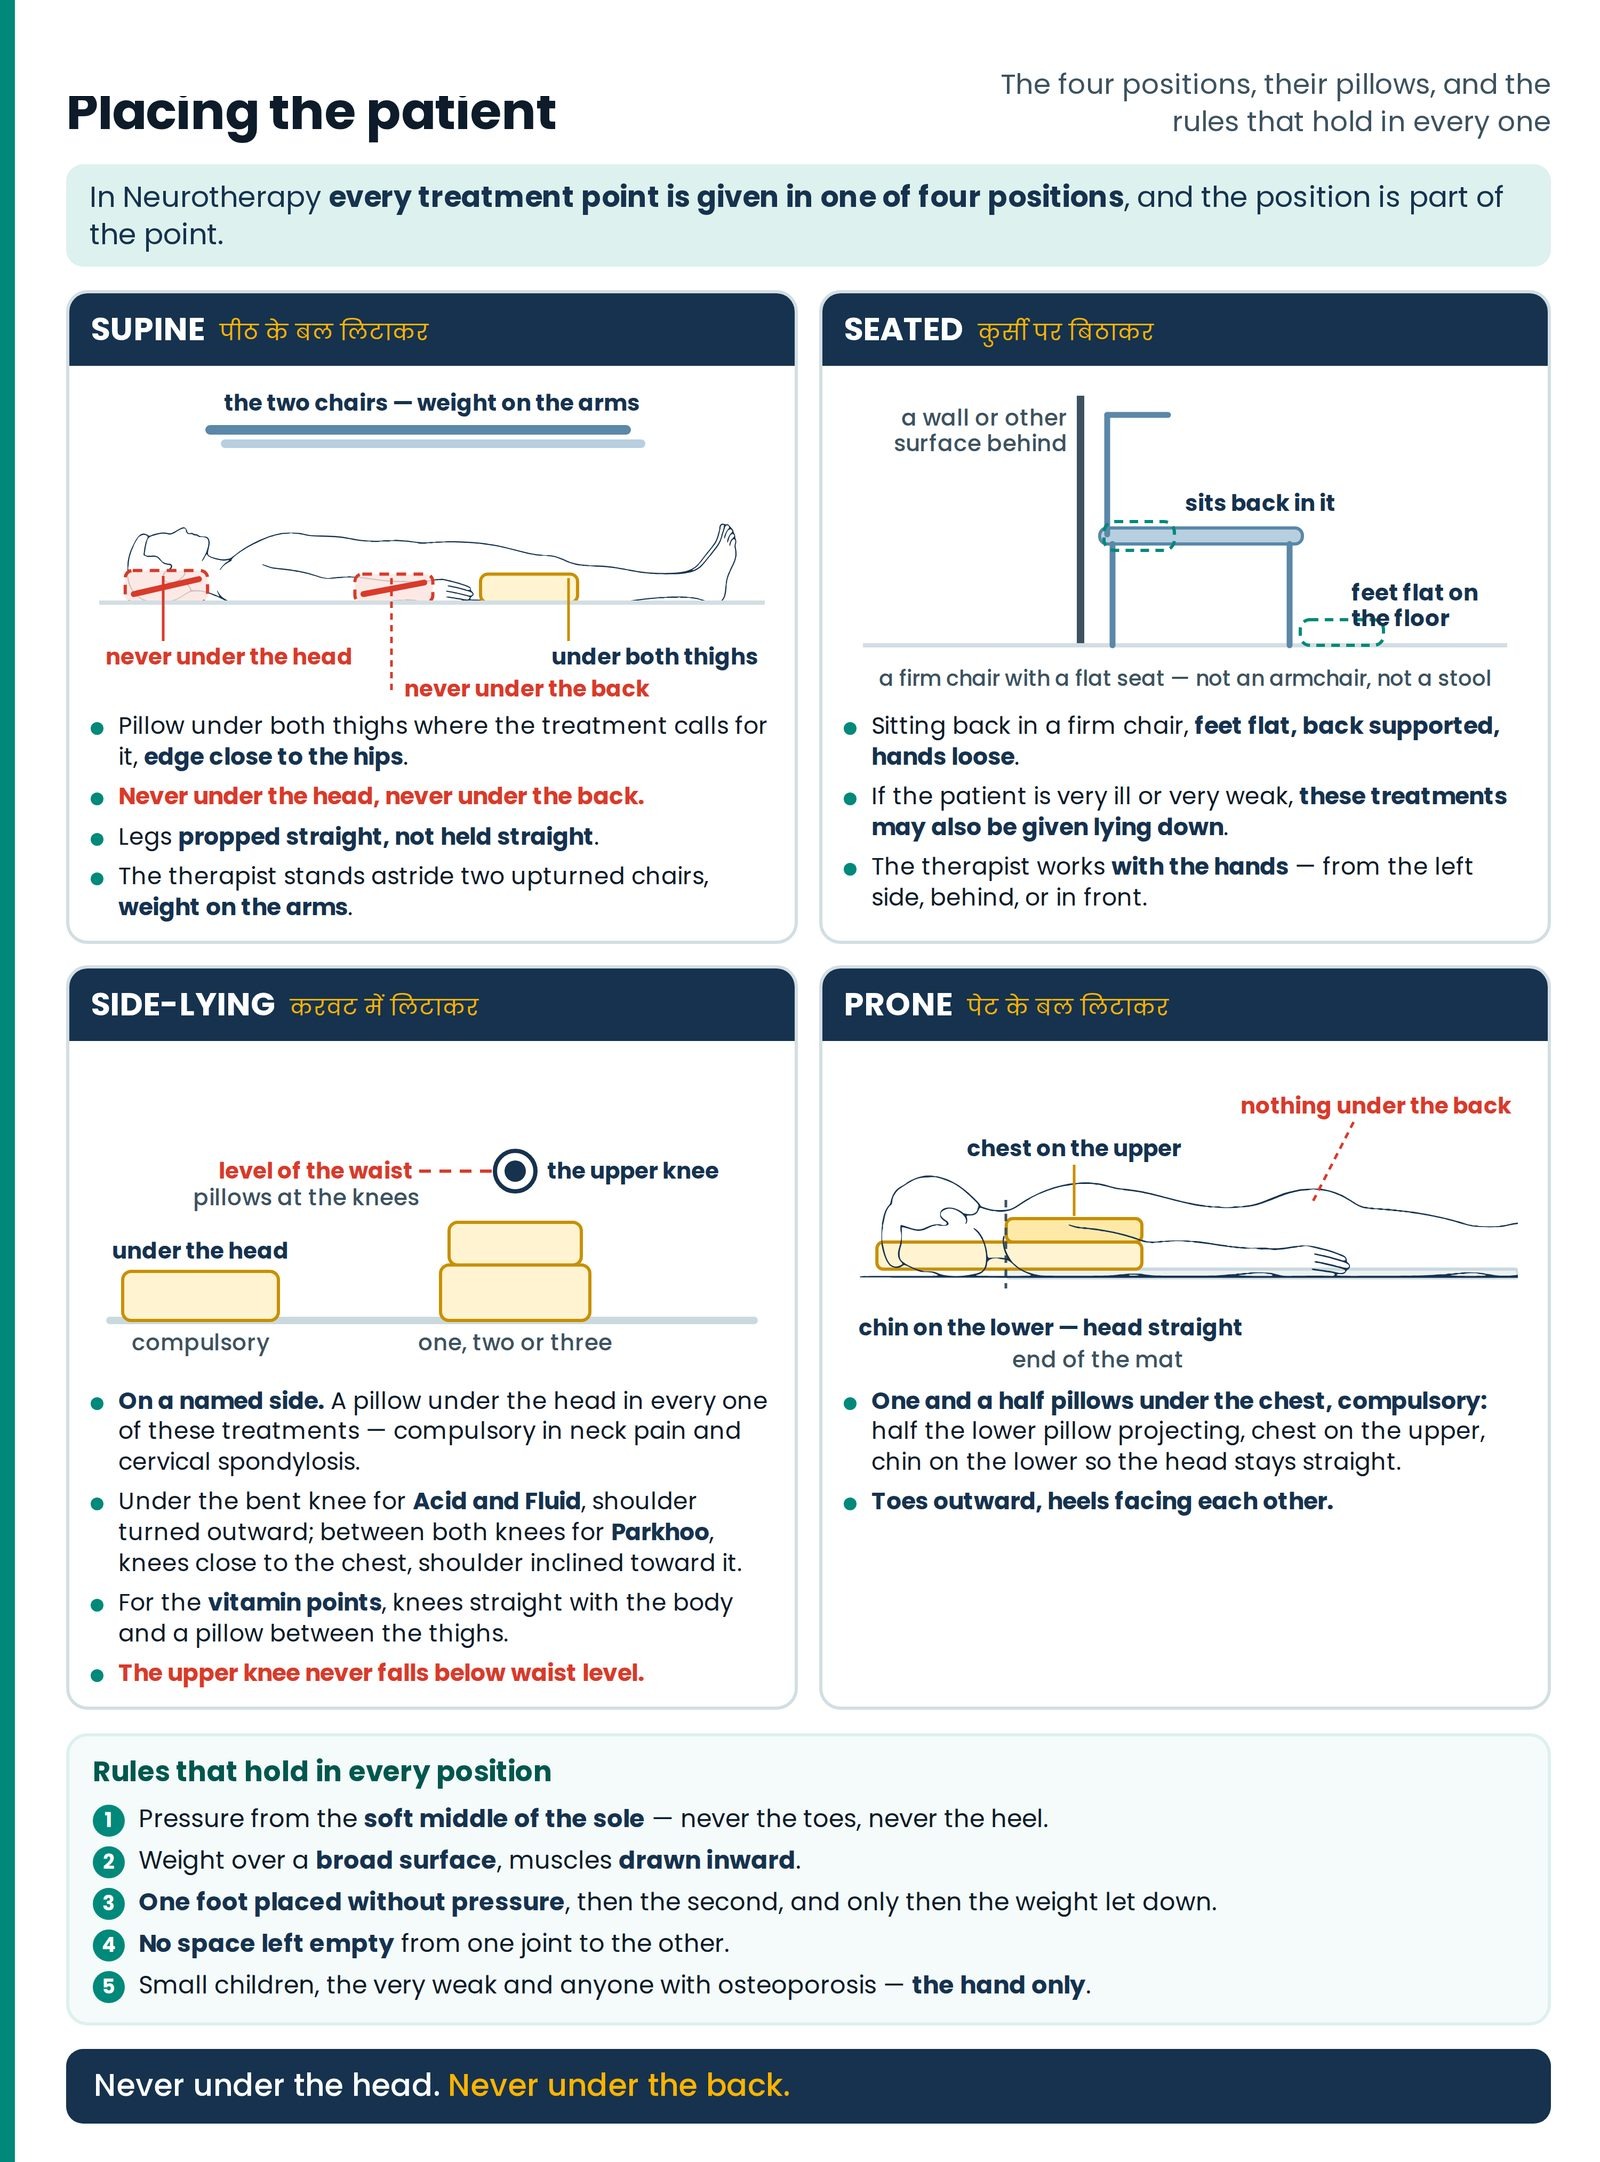
Placing the patient. The article as one poster: the four positions in a 2x2 grid with their pillows and prohibitions, then the five rules that hold in every position, and the standing rule at the foot.
Read next
The Shorthand The Shorthand — the master list gives the position for every point
How a Formula Is Built How a Formula Is Built — why the order inside a formula is never rearranged
Six Seconds Six Seconds — the rests written into a treatment, timed like the hold
Ready to begin?
Send COURSE for course details, or your name, age and health issue for a consultation.